Updated on Sept 8, 2017
by Gerrit Grunwald
See how easy it is to use Java SE and JavaFX to create mobile applications that run on iOS and Android devices in the cloud—without the need to learn a lot of different platforms.
Sometimes it's useful to share your current location with someone else, especially if you have a meeting in another city or country. You might know Apple's Find My Friends application or remember Google's Latitude application, which do exactly this. I thought it might be nice to have my own application, which could run on both the iOS and Android platforms, to share my current location with some people. This article will show you how you can easily create such a location-sharing application by using Java and JavaFX.
The Idea
The idea is to have a mobile application that reads the current location of your device, shows it on a map, and shares it with other people that use the same application. To realize such a project, we need several things such as a server application, a database where we can store our location, and mobile clients for iOS and Android.
The challenges start with the server application: not everyone owns a server where the application can be run and even even if they do, not everyone who owns a server has enough knowledge about Java EE to run a server application.
However, for this project we don't need a Java EE application server, and we don't even need our own server. For this project, we will make use of the Oracle Application Container Cloud service, which provides preconfigured containers that run Java SE applications. Yes, you read that correctly: Java SE is enough for this kind of application. Nevertheless, if you like, the server application could also run on your own server, which shows how easy it is to move such an application from your own machine to the cloud.
The Server Application
We have various requirements for our server application. It needs to be able to do the following:
- Offer a service that can be called by mobile applications to send its current location.
- Add a location to the database.
- Get a location from the database.
- Remove a location from the database.
- Get all locations from the database.
- Perform some tasks regularly to clean up the database.
Following the de facto standard, our server application will simply offer a REST interface to fulfill all of these requirements. You surely could use either a Java EE or Spring application to fulfill the requirements, but because the whole application is so small, those approaches seem to be a bit of overkill.
For this reason, I've decided to go with a really simple approach. I will use the so-called Spark Framework, which is a simple Java library that makes it possible to offer REST services in a really simple way.
The code in Listing 1 shows an example of the code that is needed to create a simple REST endpoint that will return all the locations that are stored in the database:
Spark.get("/locations", (request, response) -> {
    response.type("application/json");

return RestClient.INSTANCE.getAllLocations().toJSONString();
});
Listing 1. Code for creating a simple REST endpoint
As you can see in Listing 1, there is nothing that is related to database access, which leads us to the point where we have to talk about the database.
Again, we have a choice: we could either use a filed-based local database or a database that we have installed on our server. But because I told you we don't need our own server, this means we have to take another approach, which is using a database provider on the web.
In this case, I decided to go with MongoDB, which is hosted at mLab. mLab offers database as a service (DBaaS) for MongoDB, and it offers a free plan that has more than enough space (500 MB) for our application.
Because I would like to keep things as easy as possible, I will make use of another feature from mLab. mLab offers a REST service for access its databases (that is not the recommended way, but for us it is good enough).
This means you have to create an account at mLab, create a database (I just named it "accs"), and create a collection (here, I choose "locations" as the name). If you do this, you should see something similar to Figure 1 if you log in to your mLab account:
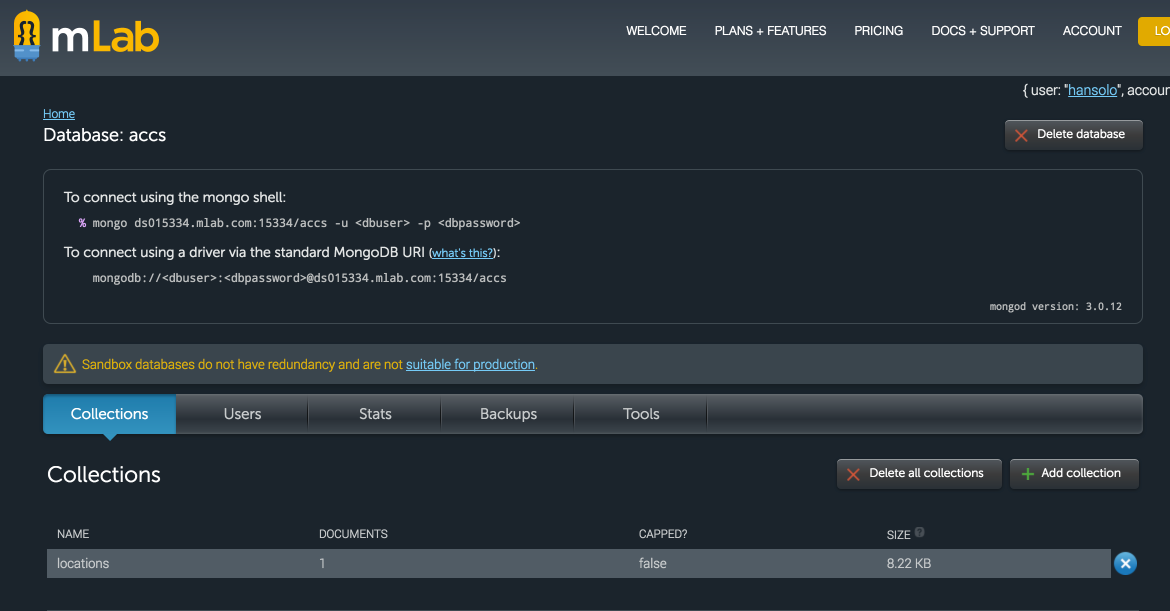
Figure 1. mLab screen after you log in
After completing those tasks, we have our MongoDB database running on the web without the need for our own server and without having additional costs.
To access REST services such as the mLab service requires other Java libraries, for example, Jersey or Apache HttpClient. In this case, I will go with the Apache HttpClient solution.
To give you an idea what is needed to get a list of all stored locations from the database, take a look at the code in Listing 2:
private JSONArray getAllLocations() {
   try {

            URIBuilder builder = new URIBuilder();

    builder.setScheme("http")

           .setHost("api.mlab.com")

           .setPort(80)

           .setPath(REST\_URL)

           .setParameter("apiKey", MLAB\_API\_KEY);

    HttpGet get = new HttpGet(builder.build());

    get.setHeader("accept", "application/json");

    HttpResponse response = httpClient.execute(get);

    int statusCode = response.getStatusLine().getStatusCode();

    if (statusCode != 200) { return new JSONArray(); }

    StringBuilder output = new StringBuilder();

            try (BufferedReader br = new BufferedReader(

                     new InputStreamReader(response.getEntity().getContent()))) {

            String line;

                             while ((line = br.readLine()) != null) { output.append(line); }

            } catch (IOException exception) {

                System.out.println("Error: " + exception);

        }

        JSONArray jsonArray = (JSONArray) JSONValue.parse(output.toString());

                    return jsonArray;

    } catch (IOException | URISyntaxException exception) {

        System.out.println("Error: " + exception);

                    return new JSONArray();

    }

}
}
Listing 2. Code for getting stored locations from the database
Note that because this is really just a project for fun, I don't care about exception handling, which you should do when running code like Listing 2 in a production environment.
The code in Listing 2 will simply call the REST API from mLab and return an array of JSON objects, because MongoDB handles its data in JSON format. To make the JSON handling in Java easy, I make use of the JSONSimple library.
The location data that is stored in the database is of the format shown in Listing 3:
{
"latitude" : 47.54565132,
"name" : "Gerrit",
"timestamp" : 1466765267,
"longitude" : 7.59746876,
"info" : "Basel, Switzerland"
}
Listing 3. Format of the stored location data
In Listing 3, you can see that we simply store the latitude, longitude, a name, a time stamp in seconds, and some additional information such as the city and country.
You might ask yourself where we get the city and country information from. You are right: we have to ask another REST service to get this information from the latitude and longitude values. For this, we make use of the free Google service that you can reach using the following:
[http://maps.google.com/maps/api/geocode/json?latlng=latitude,longitude&sensor=false](http://maps.google.com/maps/api/geocode/json?latlng=latitude,longitude&sensor=false)
If you simply fill in your latitude and longitude, the service will come return a lot of data in JSON format.
The idea for our service is that every time the location is updated, the server application looks up the city and country and adds it to the data before the data is stored to the database. So every time a location is taken from the database, it will contain the city and country.
In principle, that's all we need for our server application. So it will offer a REST interface to add, update, and remove a location, and it will update each location with the city and country information before it stores each location to the mLab MongoDB database.
In addition, I've also added a scheduled task that will remove all locations that are older than two days from the database to prevent old locations from filling up the database.
To create an executable JAR file, we simply have to build the application using the following command at the command line:
gradle build
Because we have some variable parameters, such as the mLab URL, we need to set those parameters before we start the application. Therefore, I use environment variables that we have to set before we start the app.
The easiest way to start the application will be to create a bash script that sets the environment variables and starts the application, as shown in Listing 4:
#!/bin/bash
# Set Environment variables
export PORT="THE PORT WE COULD REACH OUR REST SERVICE, USUALLY 80"
export LOCATION_URL="api.mlab.com/api/1/databases/accs/collections/locations"
export MLAB_API_KEY="HERE GOES YOUR MLAB KEY"
# Start REST Server
java -jar accs-1.0.jar
Listing 4. Script for setting environment variables and starting the application
The code for the server application can be found on GitHub at https://github.com/HanSolo/accs.
The Mobile Application
Now that we have the server application ready, we need a mobile application. Because I really like JavaFX and because there is a framework, called Gluon, that makes it possible to run JavaFX on mobile devices, I've decided to use the Gluon framework to create the mobile application.
I won't go through all the code, because that would be too detail much for this article. Instead I'll show you some screenshots.
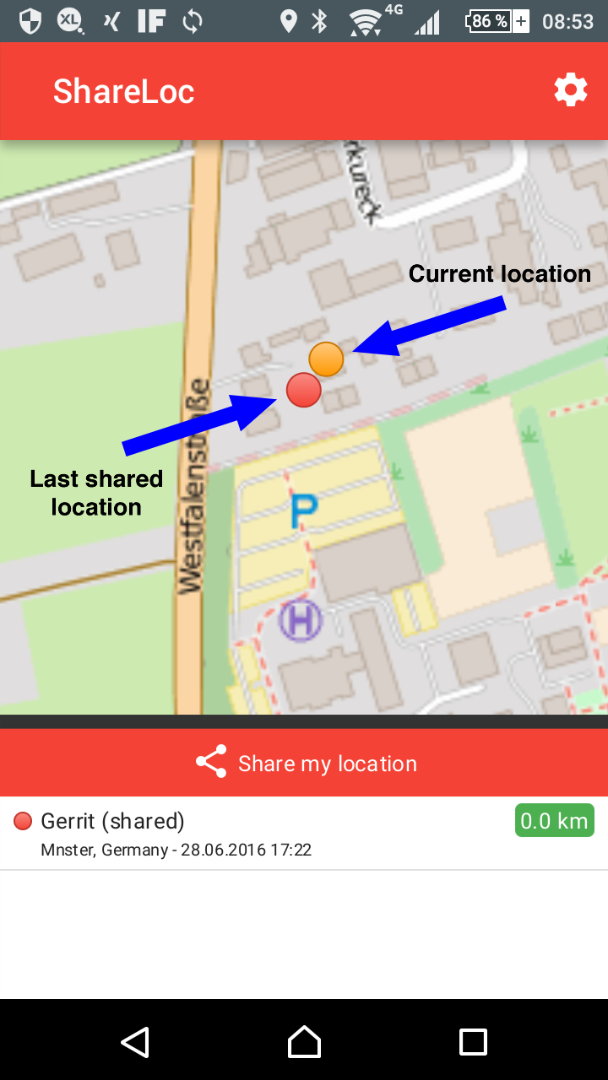
Figure 2. Before updating the user's location
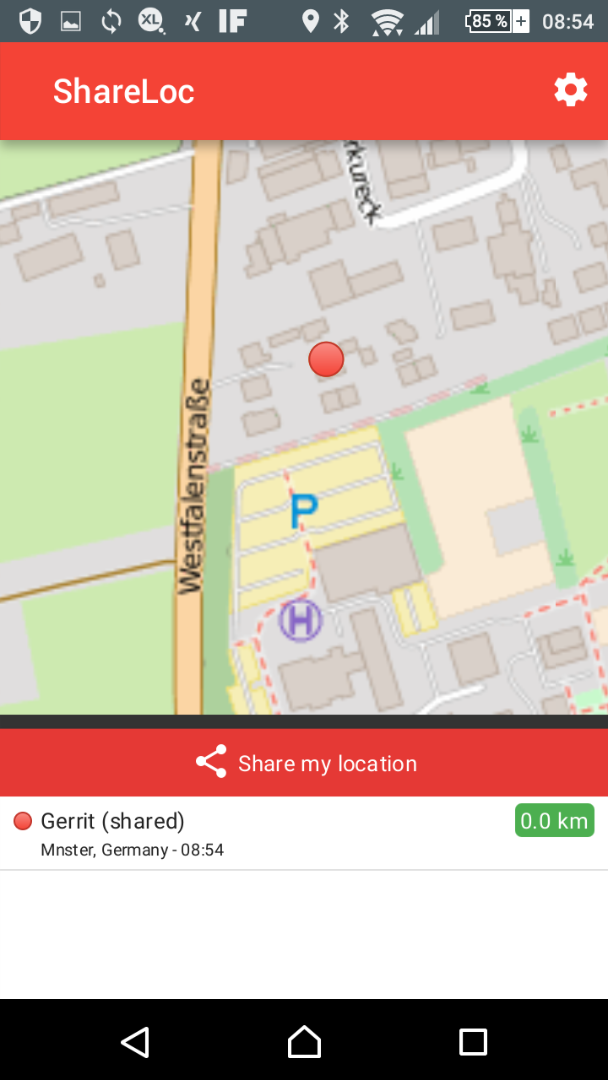
Figure 3. After updating the user's location
As you can see in Figure 2 and Figure 3, we have a map view that shows our current location with an orange marker and we have a red marker that always indicates our last shared location.
On the lower part of the application you see the "Share my location" button, which will call our server application and publish our current location.
Below this button, you will find a list of locations with their distances to our location. Locations from other people will be visualized using a blue marker if they are not older than one day. In they are older than that, the locations will be visualized using a gray marker.
And of course you can zoom and pan on the map view.
On the upper right corner, you see a button that will bring you to the configuration screen where you have to set the URL of the server application and your username, which will be shown in the list view.
The nice thing about using the Gluon framework is the fact that you simply can use the same code and compile it either for Android or for iOS, which saves a lot of time. The application might not be as fast as a native application but it will easily compete with web applications.
To compile the code for iOS, use the command shown in Figure 4 in the shell:
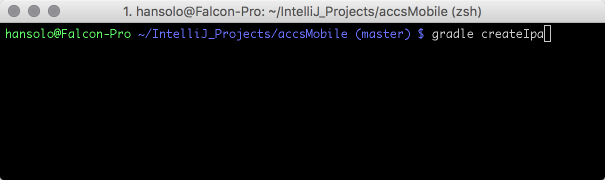
Figure 4. Compiling code for iOS
And to compile the code for Android, use the command shown in Figure 5:
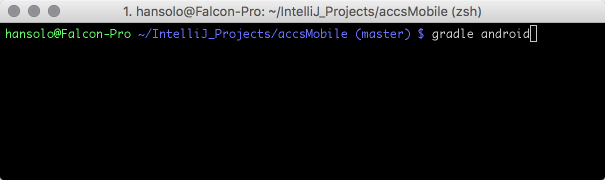
Figure 5. Compiling code for Android
The code for the mobile application can also be found on GitHub at https://github.com/HanSolo/accsmobile.
The mobile application attaches a listener to the so-called PositionService of the Gluon framework and every time the position changes, the application will update the map view. In addition, every 30 seconds the application will call our server application to get all locations from the database.
Move It to the Cloud
In principle, that's it—but wait. I told you that you don't need your own server to test this application, so let's see what it takes to move the server application to the cloud.
For this demo, I will use the new Oracle Application Container Cloud service, which you can find at https://cloud.oracle.com/acc.
The easiest way to test it is to make use of the trial offer, which will give you a 30-day trial of the service. To get access to the service, just follow the instructions on the website above.
For the onboarding, you have to provide your personal information along with a domain name and your mobile number so that Oracle can send you an SMS message with a specific code to submit the form.
After the onboarding is done, you will receive an email from Oracle with information on how to access your trial account.
When you click the link provided in the email from Oracle, you are taken to a website that looks like Figure 6:
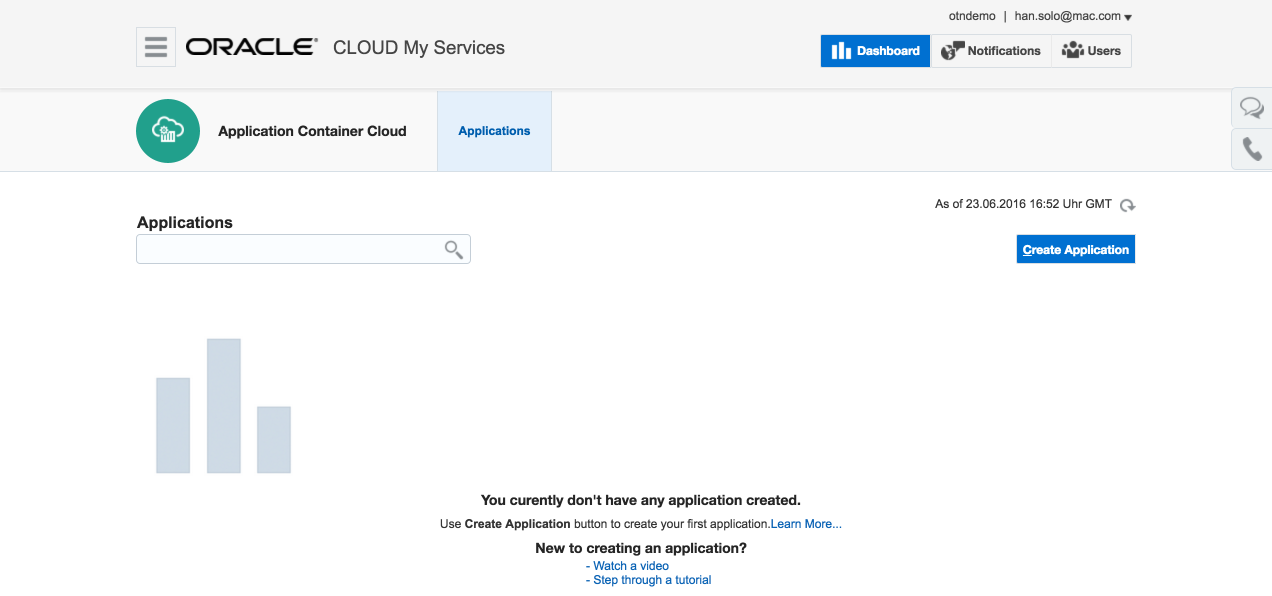
Figure 6. Website for Oracle Application Container Cloud service
As soon as the service is ready, you could create an application by clicking Create Application.
This will open another window, shown in Figure 7, where you have to choose between a Java SE application and a node.js application:
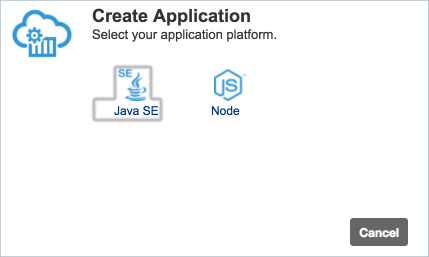
Figure 7. Window for selecting your application platform
After you select Java SE, you should see a screen like the screen shown in Figure 8:
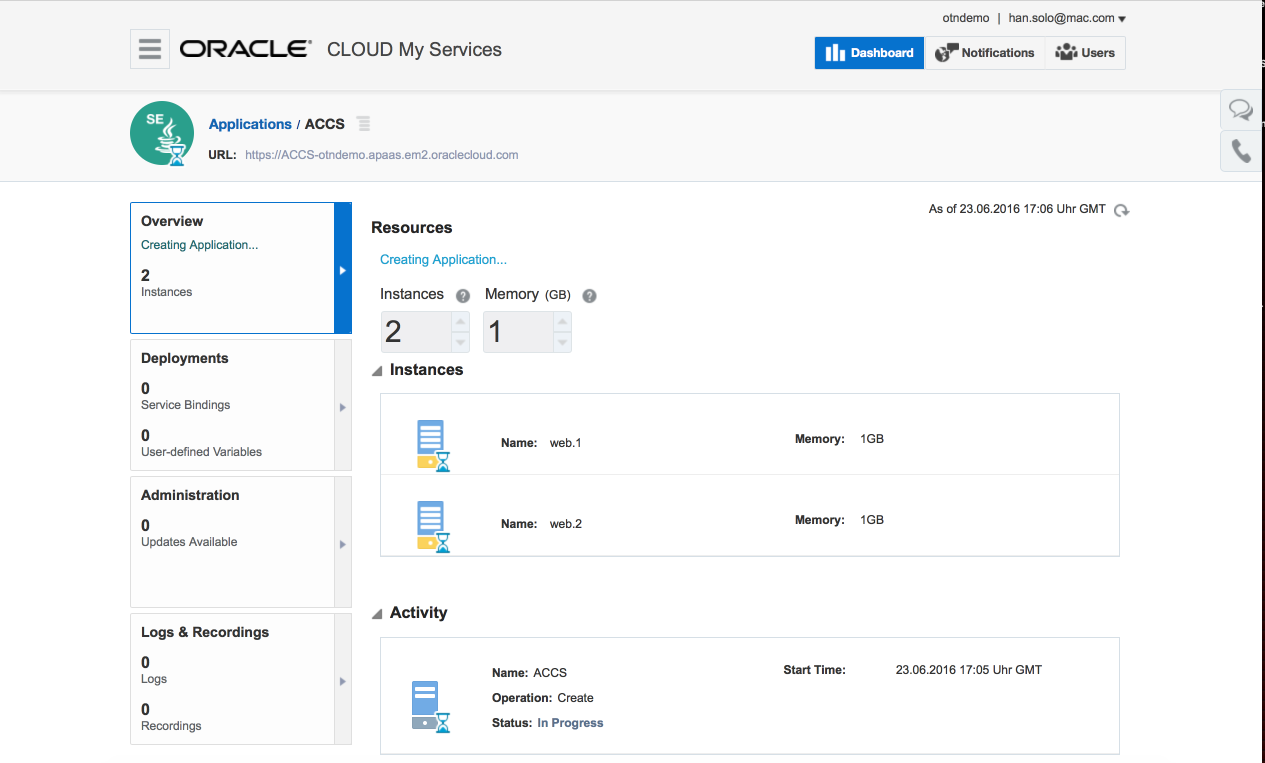
Figure 8. Screen for deciding the number of instances and the amount of memory
Here, you can decide how many instances (containers) you would like to use and how much memory each container should have available.
After the default application is created (which could take some time,) the first thing you should do is to set up the environment variables that our server application needs.
Remember, we have to set the following variables for our server application to run properly:
- PORT
- LOCATION_URL
- MLAB_API_KEY
Therefore, you can switch to the Deployments area where you can add custom environment variables. Because the PORT variable is already set, we just have to add LOCATION_URL and MLAB_API_KEY. If you've added them correctly, you should see something like Figure 9:
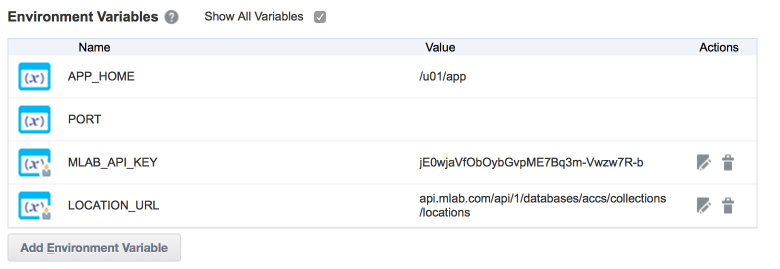
Figure 9. Setting the environment variables
When this is done, we have to prepare our server application so that it will run on the Oracle Application Container Cloud service. The good thing is that this is really easy to do. We simply have to create an additional file that must be named manifest.json and it should have the content shown in Listing 5:
{
"runtime" :
{
"majorVersion" : "8"
},
"command" : "java -jar accs-1.0.jar",
"release" :
{
"build" : "1.0",

"version" : "1.0.0"
},
"notes" : "initial release"
}
Listing 5. Content of the manifest.json file
In this file, we define the major JDK version we would like to use (here, JDK 8), the command that is needed to start our application (same as in our shell script), and some additional information such as the build, version number, and additional notes.
After you've created this file, create a zip file that contains your JAR file and the manifest.json file.
This zip file can now be uploaded into the Deployments area by clicking the Upload New button on the upper right corner.
After doing that, you just have to wait for the service to finish the container preparation. Then you should see something like in the Deployments area shown in Figure 10:
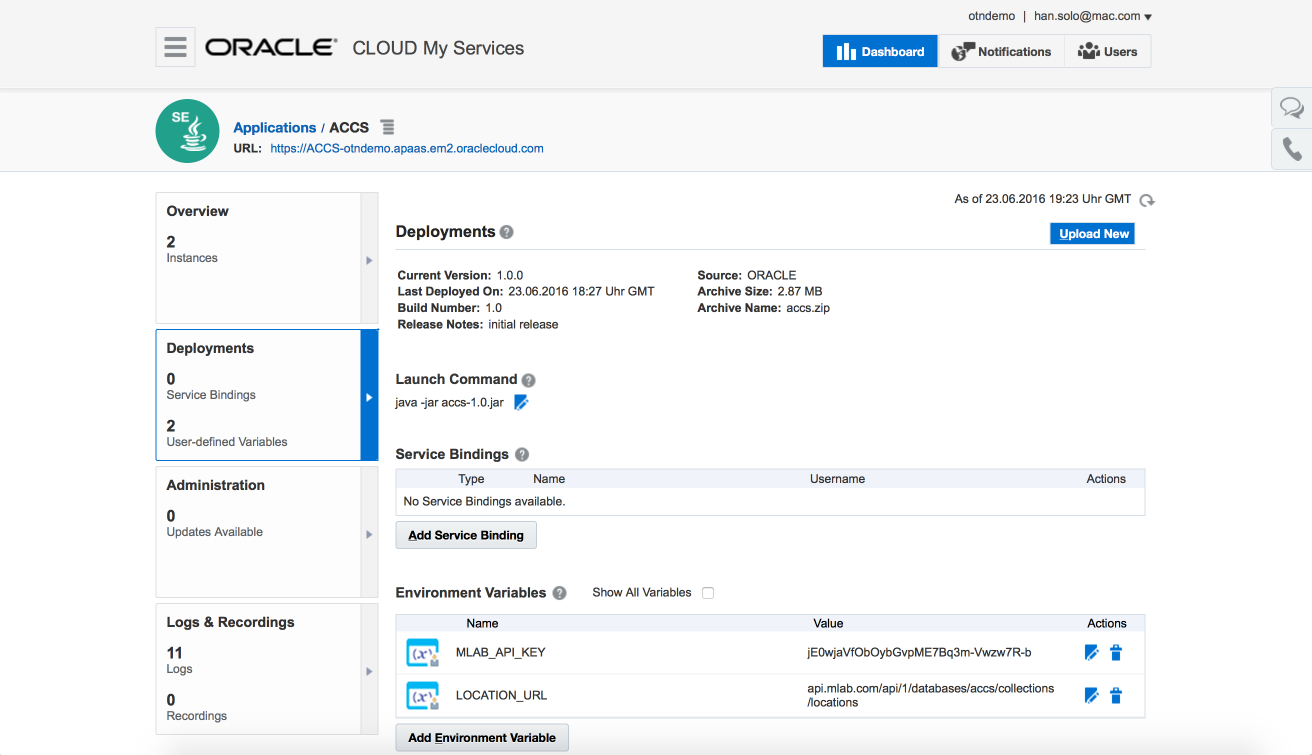
Figure 10. Deployments area showing that the app has been deployed
Here, you can see that our application is running because the correct JAR file is shown under the Launch Command area of the screen.
In principle, that's all we need to do. Now we can test our application with the mobile application. To do that, we just need to use the correct URL to access our server application.
If everything works, you should see your location show up in the list of locations.
The Desktop Application
Because it might also be interesting to see in a desktop application all the locations that are currently in the system, I've created a little demo that simply shows all active and old locations on a map view in a JavaFX application. I don't want to go into detail, so Figure 11 shows what it looks like.
The code for this application is also available on GitHub at https://github.com/HanSolo/accsdesktop.
With this application, we use the same approach to define the variables by using environment variables. You can build this application using Gradle, as shown in Figure 11:
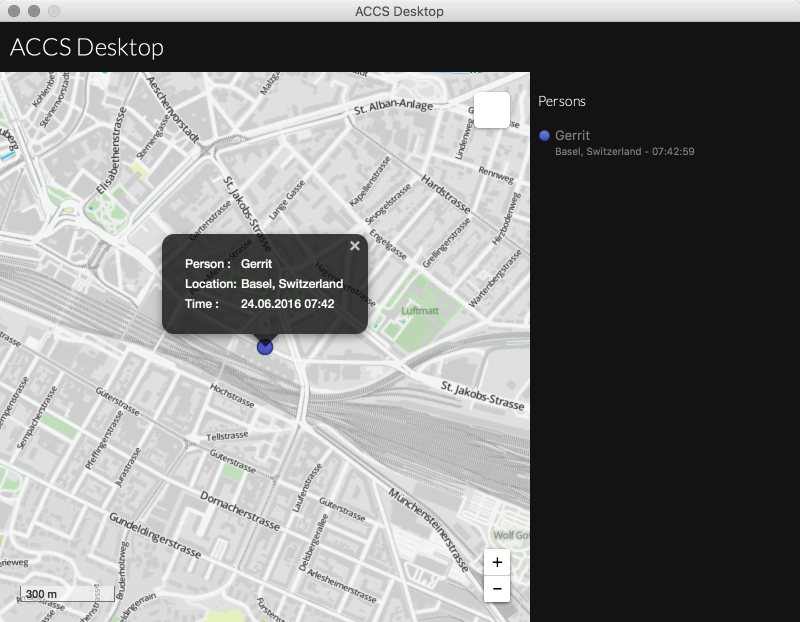
Figure 11. Building the desktop application
After the build is done, you will find a native application in the /build/distributions folder. To start that, you have to create another shell script that would look like Listing 6 (on Mac OS X):
#!/bin/bash
# Set Environment variable
launchctl setenv URL "https://accs-otndemo.apaas.em2.oraclecloud.com"
# Start ACCS Desktop client
open -a "AccsDesktop"
# Remove Environment variable
launchctl unsetenv URL
Listing 6. Shell script for starting the native application on Mac OS X
This shell script will set an environment variable URL before it starts our desktop application, and when it is finished, it will remove the URL environment variable.
Conclusion
I hope you have gotten an idea of how easy it is to move an existing Java SE–based application to the cloud using the Oracle Application Container Cloud service. I think this article has shown how easy it is to use Java on the server, the desktop, and mobile mobile devices by sharing a lot of code and knowledge. So you don't have to learn all the different platforms to create applications that can benefit from the cloud. At the moment, it is possible to use only port 80 or 443 to access the Oracle Application Container Cloud service. Also for calling services from the Oracle Application Container Cloud service, you can only use those ports. In the future, there should be more ports available, which would enable us to replace the polling of the REST service with a publish-subscribe MQTT–based approach for real-time updates.
See Also
About the Author
Gerrit Grunwald is a software engineer with more than 10 years of experience in software development. He has been involved in the development of Java desktop applications and controls. Grunwald is interested in Java on the desktop and Java-driven embedded technologies based on Oracle Java SE Embedded. He is a true believer in open source and has participated in popular projects such as JFXtras.org as well as his own projects (Medusa, Enzo, SteelSeries Swing, and SteelSeries Canvas).
Grunwald blogs regularly at http://harmonic-code.org on subjects related to the Internet of Things, Java, and JavaFX. He is an active member of the Java community: he founded and leads the Java User Group Münster (Germany), he is a JavaOne Rock Star, and he is a Java Champion. He is a speaker at conferences and user groups internationally and writes for several magazines.
Join the Conversation
Join the Java community conversation on Facebook, Twitter, and the Oracle Java Blog!