Skip to Main Content

Cloud Platform

Announcement

For appeals, questions and feedback about Oracle Forums, please email oracle-forums-moderators_us@oracle.com. Technical questions should be asked in the appropriate category. Thank you!

Modifying Resource Records in Standard DNS

Michael.R.Taylor-OracleFeb 13 2019 — edited Feb 22 2019

Dyn Standard DNS provides two separate interfaces for modifying DNS records: the Standard interface, which provides support for basic record types such as A, CNAME, MX and TXT records, and the Expert interface, which includes support for additional record types such as PTR, NS, SRV and more.

Switching Interfaces

You can switch between the Standard and Expert interfaces at any time using the Preferences button in the upper right of the page when viewing a Dyn Standard DNS zone. This setting is stored on a per zone basis, so some zones can be in the Standard interface and others can be in the Expert interface. No data is lost when switching between interfaces, but you cannot add, modify, or delete records other than A, CNAME, MX and TXT in the Standard interface.

Modifying Records in the Standard Interface

1.  Log in to your Dyn account and find the My Services option.Add Zone/Domain Services
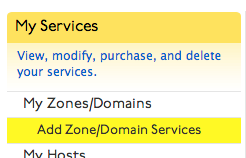
2.  Find the Zone you wish to add a record to and click Dyn Standard DNS Service to the right of the zone’s name.Screen Shot 2014-09-18 at 2.52.20 PM
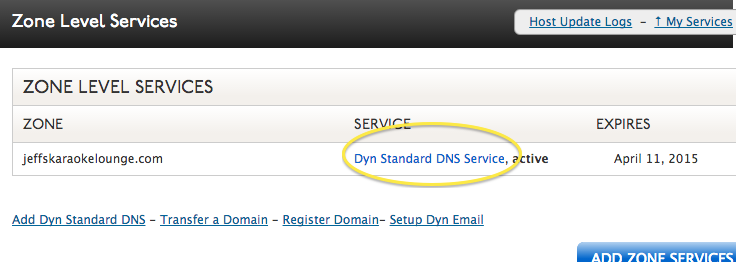
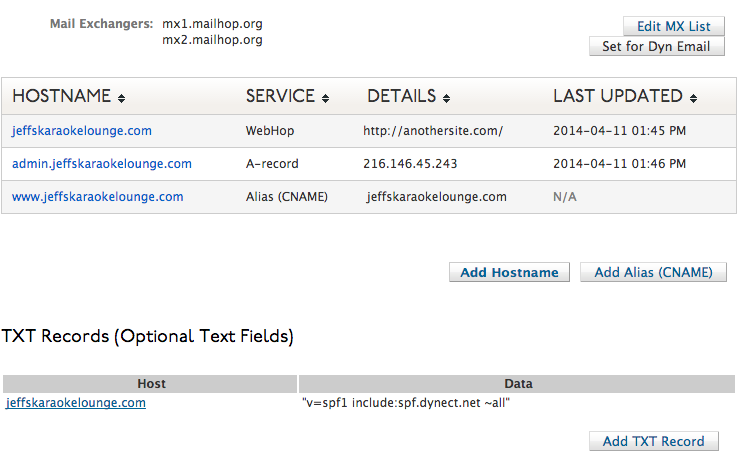
3.  The four record types that are available in the Standard Interface are A, CNAME, TXT and MX.

A Records, CNAMEs, Webhops, TXT
When you click the hostname of any of these records, an editor screen appears where you can make changes.

Edit MX List
When you click the Edit MX List button, a new box appears prompting for Mail Exchangers. Populate this field with your inbound mail servers’ FQDNs in the order in which you wish for them to be prioritized, then click Save Mail Exchangers. If you are unsure of what goes in these fields, please see our MX Recordsection on the Resource Records reference article.
Screen Shot 2014-09-18 at 2.54.10 PM
Changes to your Dyn Standard DNS zone will be committed when you’ve saved your changes. Your updated record will show up to our servers shortly, but may not resolve as quickly as the record may be cached by local resolvers or subject to a TTL that has not yet expired.

Modifying records in the Expert Interface

1.  Log into your Dyn account, locate the My Services option.Add Zone/Domain Services
2.  Locate the Zone you wish to add a record to, and click Dyn Standard DNS Service to the right of the zone’s name.Screen Shot 2014-09-18 at 2.52.20 PM
3.  Locate the record you wish to modify. Fill out the respective fields for the record you are creating.

  • Host is the name of the resource you are creating if you’re not creating the record at the apex of the zone.
  • TTL is Time To Live, expressed in seconds.
  • Data is where the record’s information goes.
Note: RFC 1034 prevents CNAME records from being created at the apex of a zone. If you need to set a Fully Qualified Domain Name (FQDN) at the apex of the zone, you will need to use a Webhop record to redirect over HTTP.

Creating MX records? Make sure that you set the priority as well as the FQDN of the mail server, and append it with a period. For example:  10 ASPMX.GOOGLE.COM.

Screen Shot 2014-09-18 at 2.56.12 PM
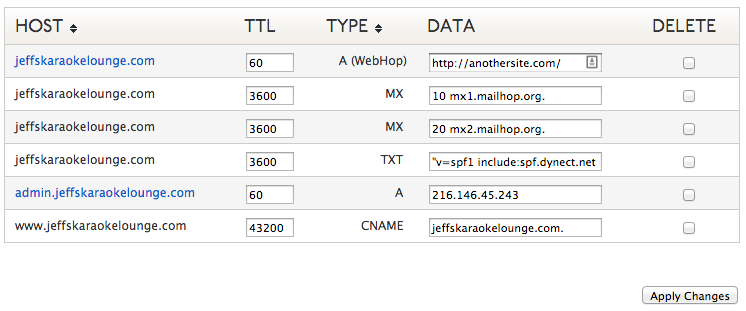
4.  Click Apply Changes. Your updated record will appear on our servers shortly, but may not resolve as quickly because the record may be cached by local resolvers or subject to a TTL that has not yet expired.

Comments

OrionNet
Api,

You can simply create new temporary tablespace in new location and set it as default temporarty tablespace. And similar you can do that with undo tablespace
sqlplus '/as sysdba'


SQL>CREATE TEMPORARY TABLESPACE temp2   TEMPFILE '/new_location/temp2_01.dbf' SIZE 64M REUSE AUTOEXTEND ON NEXT 28 MAXSIZE unlimited;

SQL>ALTER DATABASE DEFAULT TEMPORARY TABLESPACE temp2

#drop old temp tablespace
SQL>DROP TABLESPACE temp INCLUDING CONTENTS AND DATAFILES;


#undo tablespace

SQL>create undo tablespace undotbs2 datafile '/new_location/newundo02.dbf' size 2000m;

#Set new tablespace as undo tablespace
SQL> alter system set undo_tablespace= undotbs2 ;

#Drop old undotbs tablespace
SQL> drop tablespace undotbs including contents;
Regards
sb92075
I want to move my undo and temporary tablespace to new path because of space issue.
I am using Oracle 10g release 2 and working on production server can't take shutdown without prior permission.
Create new UNDO & TEMP tablespaces, switch to new TS, & then drop old ones.
Surachart Opun
About create/change/drop

UNDO:

SQL>show parameter undo

NAME TYPE VALUE
------------------------------------
undo_management string AUTO
undo_retention integer 900
undo_tablespace string UNDOTBS1

SQL> CREATE UNDO TABLESPACE undotbs2 DATAFILE '+DATA_NEWPATH' SIZE 100M AUTOEXTEND ON;

http://www.oracle-base.com/articles/9i/AutomaticUndoManagement.php

SQL> alter system set undo_tablespace=undotbs2;

*** after that can drop UNDOTBS1

TEMP:
SQL> CREATE TEMPORARY TABLESPACE TEMP TEMPFILE '+DATA_NEWPATH' SIZE 500M AUTOEXTEND ON NEXT 100M MAXSIZE unlimited EXTENT MANAGEMENT LOCAL UNIFORM SIZE 1M;

http://www.idevelopment.info/data/Oracle/DBA_tips/Tablespaces/TBS_3.shtml

SQL> ALTER DATABASE DEFAULT TEMPORARY TABLESPACE temp2;


*** after that can drop old temp tablespace -> DROP TABLESPACE temp INCLUDING CONTENTS AND DATAFILES
708725
Ya thanks a lot for the answer but I have one more query...

Mine is the production server and I can't shutdown so may I do all this operation when database is open?

How do I know that users are accessing the old Undo tablespace or temporary tablespace or not, because after checking that no one is using the old ones, I can drop it. So when can I drop old undo and temp tablespaces?
oradba11
If you are trying to drop these tablespace ..which is being use by some transactions ..oracle will not allow to do that..
Read some documents on google ..thay will clear you doubts also..

enjoy
1 - 5

Post Details

Added on Feb 13 2019
0 comments
597 views