by Gerrit Grunwald
See how easy it now is to create a mobile app based on JavaFX.
This article describes a fun little project that uses a Feather Huzzah ESP8266 board from Adafruit with some LEDs to build a mood light. To control this light, we will use a JavaFX app that runs on desktop, mobile, and embedded devices.
Mood lights are nice and cheap, and they usually come with some kind of remote control that enables you to either select the current color or select a color cycling mode for the light. The only problem that I have with them is the fact that they come without an API and they are not connected to the internet.
For that reason, I thought I'd build my own mood light that is hooked up to the internet and can be controlled from different devices, such as a mobile phone and a desktop computer.
The other advantage of building your own controllable mood light is that you can not only use it as a mood light but also as a build-server status light or for other purposes.
The Idea
The idea is to have a mobile/desktop application that can be used to switch the mood light on and off, set it to color cycling mode, and set it to one defined color. For the communication between the mood light and the application, we will use MQTT—a lightweight protocol that was invented by IBM and is now part of the Eclipse IoT project.
So the mood light should be able to receive commands via MQTT, and it should also send the current color when it is in color cycling mode to be able to visualize this color in our application. To keep things as simple as possible, the commands will just be strings.
For messages that will be sent from the application to the mood light, we will use the following format:
- Set the color to red:
ff0000 -> r:255 g:0 b:0
- Switch off the mood light:
000000 -> r:0 g:0 b:0
- Switch to color cycling mode:
mood -> cycling colors
For messages that will be sent from the mood light to the application, such as sending the current color (in this example, red), we will use the following format: 255,0,0.
You might wonder why the messages from the application to the mood light are in hex format and the messages from the mood light to the application are in RGB (red, green, blue) format. The reason is simply the fact that in JavaFX the toString() method of a Color object will give you the color in hex format, and parsing this to RGB format on the Feather Huzzah can easily be done as shown in Listing 1:
long hex = (long) strtol((char *)huzzahIncoming.lastread, NULL, 16);
int r = hex >> 16;
int g = hex >> 8 & 0xFF;
int b = hex & 0xFF;
Listing 1.
The reason why I send the color in RGB format from the mood light to the application is because I have the RGB values on the Feather Huzzah anyway, and that was the easiest way to send those values via MQTT.
The Hardware
First, let's take a look at the hardware that we will use to build the mood light. The light should be connected to the internet, which means it should come at least with a network connector or, even better, with a Wi-Fi connection. Because I would like to keep it small and simple, I've decided to go with the Feather Huzzah ESP8266 board from Adafruit, which is shown in Figure 1. The really nice thing about this device is its size and the fact that it comes with Wi-Fi onboard.
Another advantage is that in addition to using the NodeMCU Lua interpreter, you can program it using the Arduino IDE. And because it can run Arduino code, there are a huge number of existing libraries you can use.
You can find detailed instructions on how to set up the Arduino IDE for the Feather Huzzah at this Adafruit web page.
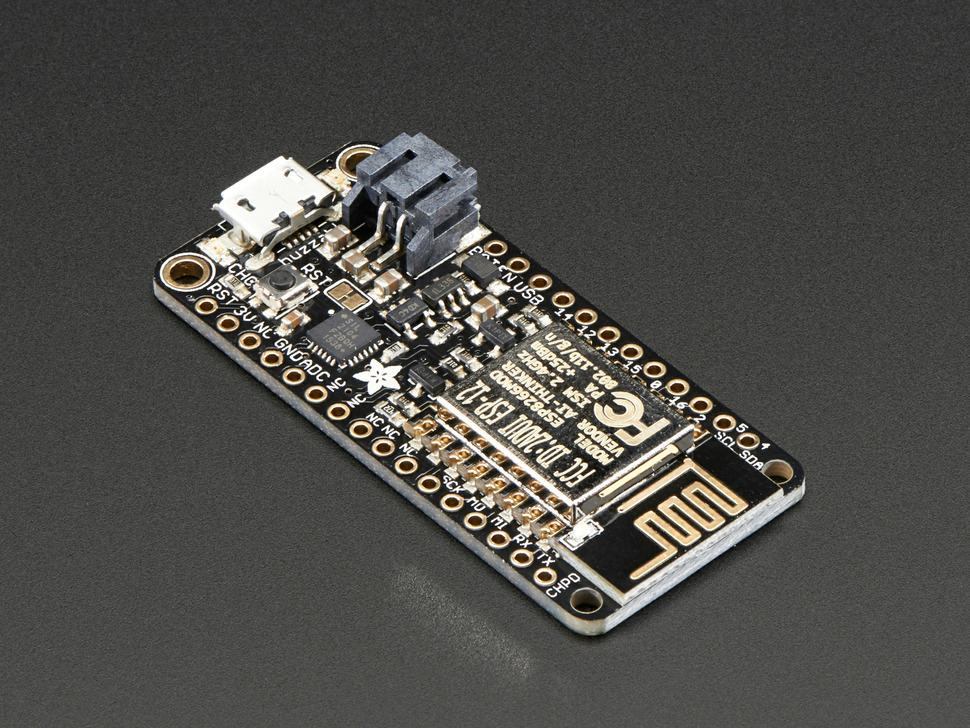
Figure 1. Feather Huzzah board from Adafruit
We also need some LEDs for our mood light and because we are using the Feather version of the Huzzah, we can use the so-called Feather Wing from Adafruit, which is a NeoPixel matrix (see Figure 2). This LED board is the perfect fit for our mood light because it is the same size as the Feather Huzzah board.
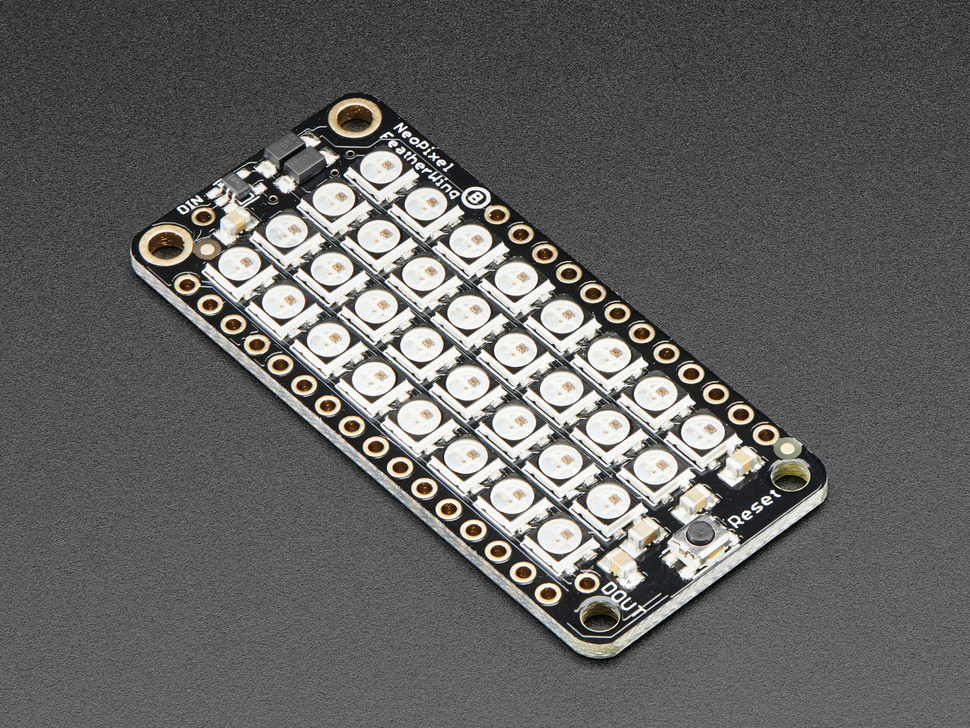
Figure 2. Feather Wing board from Adafruit
The Arduino Code
For communication with the mood light I will use MQTT, which is a lightweight publish-and-subscribe protocol. And, again, Adafruit offers a library that we can use, which is great. To set up MQTT, you will need an MQTT broker, and the good thing is that we can use a publicly available broker from Eclipse at iot.eclipse.org.
As mentioned before, the idea is to send color codes such as ff00ee to the ESP8266, which should react to the message by either setting the NeoPixels to the given color or switching on the color cycling mode.
When the ESP8266 is in color cycling mode, it will call a method named moodTransition() that, in principle, simply changes the hue of the color every 500 ms to cycle through the different colors. The problem here is that at the same time, the mood light should wait for incoming MQTT messages that might contain other commands. So we need to run the color cycling mode continuously while waiting for incoming messages and reacting to them. Because the ESP8266 doesn't have threads like we have with Java, we need a different approach.
We will make use of interrupts, which are really useful when important stuff should run in the background. One thing you have to keep in mind when using interrupts is that all variables that will be used inside and outside the Interrupt Service Routine (ISR) should be volatile. Being volatile will protect our variables from compiler optimization, which will ensure that they will be accessible from everywhere within our app. Keep in mind that being volatile is appropriate only for variables that are used inside and outside an ISR. When working with the interrupts, we will have to work with the cycle counter of the ESP8266.
Because the ESP8266 will run at 80 MHz (80,000,000 cycles each second), if we would like to call our moodTransition() method every half second we have to trigger our routine approximately every 40,000,000 cycle counts every time we call our handler.
The code to do this shown in Listing 2:
// The handler will be called
void inline handler (void) {
if (isMood) moodTransition(); // call moodTransition() if isMood
timer0_write(ESP.getCycleCount() + 40000000); // trigger interrupt in 500ms
}
Listing 2.
To attach the handler to the system, we need to add the code in Listing 3 to the setup() method:
// Attach interrupt that calls the handler every 500ms
void setup() {
...
noInterrupts(); // disable interrupts
timer0_isr_init(); // initialize timer0 interrupt
timer0_attachInterrupt(handler); // attach our handler to timer0
timer0_write(ESP.getCycleCount() + 40000000); // trigger interrupt in 500ms
interrupts(); // enable interrupts again
}
Listing 3.
To give you an idea of what the Arduino code is doing, here is a short overview:
- Set up the Wi-Fi connection.
- Connect to MQTT.
- Initialize the NeoPixels.
- Wait for commands such as
ff00ee or mood.
- Cycle through colors (when in color cycling mode, change the hue of the NeoPixels every 500ms and send the current color via an MQTT message).
- Otherwise, set the NeoPixels to the given color (
000000 switches off the NeoPixels).
The complete source code can be found on GitHub in the Arduino/MoodFx folder.
Setting Up the Feather Huzzah ESP8266
To set up the Feather Huzzah ESP8266 in the Arduino IDE, you should set the IDE to the settings shown in Figure 3:
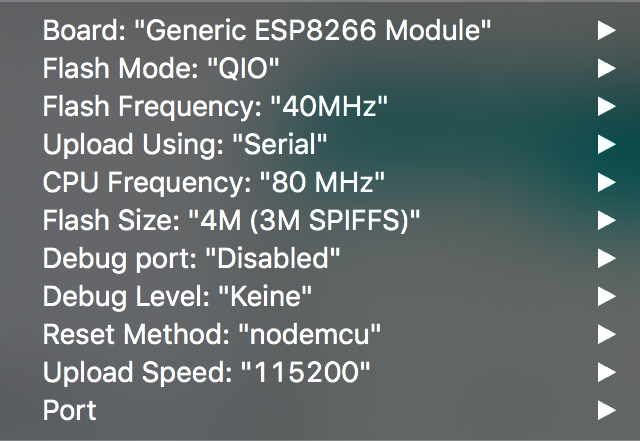
Figure 3. Feather Huzzah settings
After you load the MoodFX project into the Arduino IDE, you should adjust the parameters shown in Listing 4. Please make sure that you change the MQTT client ID to a unique name.
/************************* Wi-Fi related **************************************/
#define WLAN_SSID "WIFI SSID"
#define WLAN_PASSWORD "WIFI PASSWORD"
/************************* MQTT related **************************************/
volatile bool isConnecting = false;
const char MQTT_SERVER[] PROGMEM = "eclipse.iot.org"; // MQTT broker url
const int MQTT_PORT = 1883; // MQTT broker port
const char MQTT_CLIENTID[] PROGMEM = "MoodFX"; // MQTT client id
const char MQTT_USERNAME[] PROGMEM = ""; // MQTT username
const char MQTT_PASSWORD[] PROGMEM = ""; // MQTT password
const char MQTT_NEO_INPUT[] PROGMEM = "huzzah/1"; // Topic for incoming msg
const char MQTT_NEO_MSG[] PROGMEM = "huzzah/1/msg"; // Topic for outgoing msg
Listing 4.
The MQTT username and password are needed if you enabled authentication on your MQTT broker. On the Eclipse broker authentication is not needed. The topics you define here will also be used in the Java code.
Enabling Remote Control
Now that we have the ESP8266 code up and running, we can test it by sending commands such as 002242 or mood to it. For this you might want to use MQTT.fx from Jens Deters. Using this tool is nice, but it would be even better if we could control our mood light remotely using a mobile phone.
Therefore, we will create a little JavaFX application that will run on iOS, Android, and desktop devices. To make this possible, we will use the new Gluon Mobile framework that enables an app to run JavaFX applications on mobile platforms. The nice thing about Gluon Mobile is that you can write and test your application on your desktop device before deploying it to the real (mobile) device. With Gluon Mobile, you get an application framework that comes with a Material Design UI.
To control the light, I've created a custom JavaFX control app that looks like Figure 4:
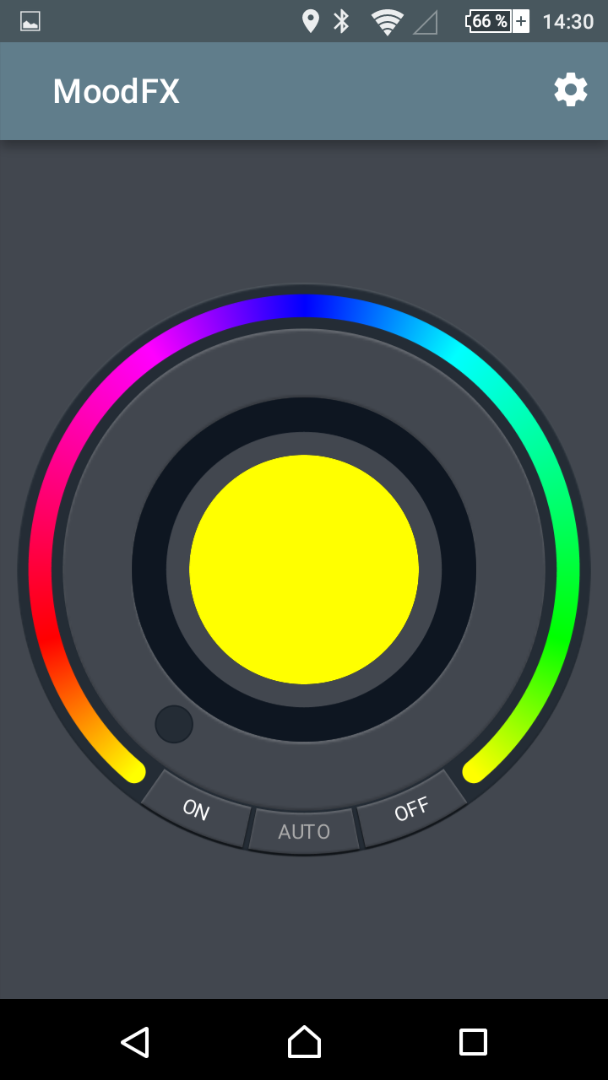
Figure 4. JavaFX control app
As you can see, the app has a gradient that shows the available colors and a ring-like selector that you can either click or drag with your finger to select the current color. In addition, there are three buttons:
- ON, to switch on the mood light and set it to the selected color
- OFF, to switch off the mood light (by sending
000000 to the mood light)
- AUTO, to set the mood light to color cycling mode (by sending
mood to the mood light)
Because this app also has to connect to MQTT to send and receive messages, we need another view that gives us the option to configure the MQTT connection. I kept it simple; it looks like Figure 5.

Figure 5. View for configuring the MQTT connection
On the configuration view, you can define the URL for your MQTT broker (it supports only TCP, not SSL), the port (usually 1883), a username and password (if you have set up authentication on your MQTT broker), and the lamp ID and topic.
Using the Gluon Mobile Framework
With the new Gluon Mobile framework, it is now very easy to create a mobile app based on JavaFX. The idea is to have one entry point in your application and create views for all the different parts of the application. Within these views, you can define not only the layout and UI but also things such as a menu and a so-called app bar with icons. To move from one view to another, Gluon Mobile offers two options: simply switching between the views or using predefined transitions to move from one view to another. It also offers the option to define your own transitions.
Gluon Mobile is a commercial product but a free version also is available, and if you plan to do an open source version of your application, you could also get an open source license.
The nice thing about Gluon Mobile is that even though Android is not capable of running Java 8, you can use Java 8 in your source code because Gluon Mobile uses retrolambda, which makes it possible to use Java 8 features (except streams) on Java 7.
To define our user interface in the Gluon Mobile View, we simply define all the nodes in our views scene graph (in our code, this will be done in the init() method) and add our main container, which is a BorderPane, to the view by calling, for example, setCenter(OUR_MAIN_CONTAINER).
As an example, let's take a look at the code of our main view. Listing 5 is the constructor and the init() method where we define the color selector control:
public MainView(final String NAME) {
 super(NAME);

 init();

 registerListeners();

 setBackground(new Background(new BackgroundFill(MoodFX.BACKGROUND\_COLOR,

                                                  CornerRadii.EMPTY,

                                                  Insets.EMPTY)));

 setCenter(mainPane);

 setShowTransitionFactory(SlideInLeftTransition::new);
}
private void init() {
 colorRegulator = ColorRegulatorBuilder.create()

                                       .onButtonOnPressed(e -> {

                                           colorRegulator.setAutomatic(false);

                                           sendUpdate(colorRegulator.getCurrentColor()); })

                                       .onButtonAutoClicked(e -> {

                                           if (colorRegulator.isAutomatic()) {

                                               sendUpdate(colorRegulator.getCurrentColor());

                                           } else {

                                               colorRegulator.setAutomatic(true);

                                               sendMoodMessage(true);

                                           } })

                                       .onButtonOffPressed(e -> {

                                           sendOffMessage();

                                           colorRegulator.setOn(false);

                                           colorRegulator.setAutomatic(false); })

                                       .onTargetSet(o ->

                                             sendUpdate(colorRegulator.getTargetColor()))

                                       .build();

 colorRegulator.setDisable(true);

 colorRegulator.setOn(false);

 mainPane = new StackPane(colorRegulator);

 StackPane.setAlignment(colorRegulator, Pos.TOP\_CENTER);

 mainPane.setPadding(new Insets(10));

 mainPane.setBackground(new Background(new BackgroundFill(MoodFX.BACKGROUND\_COLOR,

                                                          CornerRadii.EMPTY,

                                                           Insets.EMPTY)));
}
Listing 5.
So we first call the init() method to initialize our mainPane and after that is done, we add it to the view by calling setCenter(mainPane) in the constructor.
Building the same app for different platforms, such as mobile and desktop, is always critical because the UI design is often totally different on the different platforms. In this case, that was not a big problem because we simply have one control and need to adjust the screen size only for the desktop platform.
The Gluon Mobile framework gives us nice methods to achieve platform-dependent settings. In our main class that extends MobileApplication, we will find a method called postInit(). And like the name says, it will be called after the initialization, which means here we can add code to adjust things such as the application's width and height. The code in Listing 6 is used to set the app to a specific size on a desktop device and on an embedded device:
// Size to FullScreen on Desktop and Embedded
if (JavaFXPlatform.isDesktop()) {
 if (System.getProperty("os.arch").toUpperCase().contains("ARM")) {

     ((Stage) scene.getWindow()).setFullScreen(true);

     ((Stage) scene.getWindow()).setFullScreenExitHint("");

 } else {

     (scene.getWindow()).setWidth(500);

     (scene.getWindow()).setHeight(550);

 }
}
Listing 6.
As you can see in the code, we set the stage size to full screen on an embedded ARM device and to 500 x 550 pixels on desktop platforms.
With the new Gluon Mobile framework, it is really easy to create a mobile app using JavaFX, so give it a try and find out for yourself.
Because it doesn't make sense to go through all the code for this article, you can find the complete source code for this project on GitHub at https://github.com/HanSolo/MoodFX.
Building the App
The project uses Gradle as a build tool. For detailed instructions on how to build the app for different platforms, refer to the JavaFXPorts section of the Gluon website.
If you are interested in building the app for iOS and Android, you simply open a shell, go to the project folder, and type in the following command:
gradlew createIpa android
This command will build the iOS ipa files and the Android apk files under ./build/javafxports/ios and ./build/javafxports/android, respectively.
To build a native application for your platform, you could use the JavaFX Gradle plugin. Therefore, I added everything in the build.gradle file, and you simply have to enable the following line:
apply from : 'http://dl.bintray.com/content/shemnon/javafx-gradle/8.1.1/javafx.plugin'
Also enable the lines shown in Listing 7:
javafx {
 appID     = 'MoodFX'

 appName   = 'MoodFX'

 mainClass = 'eu.hansolo.mood.MoodFX'

  icons {

     shortcut = \[

             'icons/icon-16.png', 'icons/icon-16@2x.png',

             'icons/icon-32.png', 'icons/icon-32@2x.png',

             'icons/icon-64.png',

             'icons/icon-128.png', 'icons/icon-128@2x.png',

             'icons/icon-256.png', 'icons/icon-256@2x.png',

             'icons/icon-512.png', 'icons/icon-512@2x.png'

     \]

     volume = shortcut

     setup = 'icons/icon-32.png'

 }

  jfxDeploy {

     vendor    = 'Gerrit Grunwald'

     packaging = 'image'

 }
}
Listing 7.
If you are just interested in running the app on your desktop, you can use the following command:
gradlew run
This command will run the application on your desktop, and it should look like Figure 6:
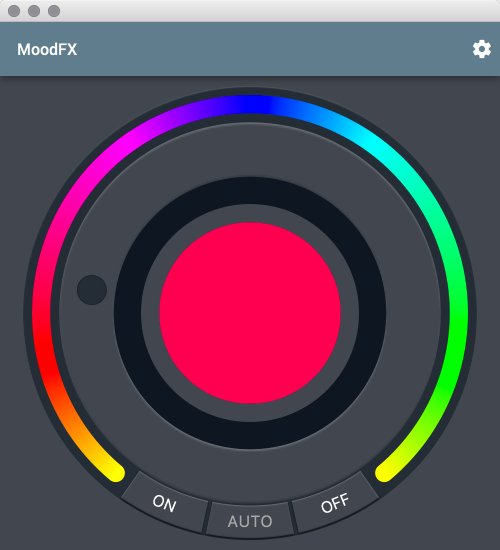
Figure 6. The running application
Conclusion
I hope this article gave you an idea of what you can do with JavaFX on mobile devices and that using JavaFX on mobile devices can be real alternative for native applications (not for all use cases, but at least for some). As mentioned before, the project is hosted on GitHub at https://github.com/HanSolo/MoodFX. Feel free to fork it and play around with it.
See Also
About the Author
Gerrit Grunwald is a software engineer with more than ten years of experience in software development. He has been involved in the development of Java desktop applications and controls, and he is interested in Java on desktop and Java-driven embedded technologies based on Oracle Java SE Embedded. Grunwald is a true believer in open source and has participated in popular projects such as JFXtras.org as well as his own projects (Medusa, Enzo, SteelSeries Swing, and SteelSeries Canvas). He blogs regularly on subjects related to the Internet of Things and JavaFX, and he is an active member of the Java community, where he founded and leads the Java User Group Münster (Germany). He is also a JavaOne Rock Star, a Java Champion, and a speaker at conferences and user groups internationally, and he writes for several magazines.
Join the Conversation
Join the Java community conversation on Facebook, Twitter, and the Oracle Java Blog!