by Jan Brosowski, Andris Perkons, and Pierre Reynes (with contributions from Victor Galis and Hans-Jürgen Denecke)
This article, Part 4 of the series, provides a practical guide to migrating Oracle Database instances as a part of an SAP migration using transportable tablespaces. This method performs an offline Oracle Database migration from file systems to the Oracle Exadata Storage Servers (storage cells) in Oracle SuperCluster or to an Oracle Automatic Storage Management destination.
|
Introduction
This article is Part 4 of a six-part series that provides best practices and recommendations for migrating a complete SAP system to an Oracle platform (in this example, to Oracle SuperCluster M7). A team of Oracle engineers and SAP experts worked together to test and tune different migration methods, compiling the step-by-step procedures and guidance given in these articles.
The articles in this "Best Practices for Migrating SAP Systems to Oracle Infrastructure" series are located here:
| |
|

in collaboration with

Oracle Optimized Solutions provide tested and proven best practices for how to run software products on Oracle systems. Learn more.
|
|
Understanding Transportable Tablespaces
Transportable tablespaces (TTS) provide a proven method for transferring Oracle Database instances for SAP systems from any source platform to any destination platform. Introduced with Oracle Database 10_g_, this approach offers a reliable choice for Oracle Database migrations between platforms with different endianness, particularly when a shorter downtime than that of the R3LOAD method is needed. In addition to a shorter downtime, a TTS migration typically requires very little SAP-specific knowledge.
The principal idea behind the TTS method is to export the Oracle Database instance's metadata that describes the database's data files in a platform-independent format, and then to make both the metadata and the data files available on the destination side of the migration. As an example, this article describes a migration of an Oracle Database instance to a file system based on Oracle Automatic Storage Management (Oracle ASM).
Generally, a TTS migration is executed in three phases: Export, Transport, and Import. This article explains the steps in each phase and their dependencies, providing detailed examples of the steps in a validated sample migration. It also examines the factors that influence the length of an overall Oracle Database migration using TTS. Beyond the procedure given here to migrate an Oracle Database instance, additional steps are necessary to move other components in the SAP environment (such as SAP file systems, binaries, configurations, and so on). Other tasks must also be performed after the Oracle Database migration is complete. (For details, refer to the other articles in this series.) Figure 1 gives an overview of the migration tasks and activities in a TTS approach.
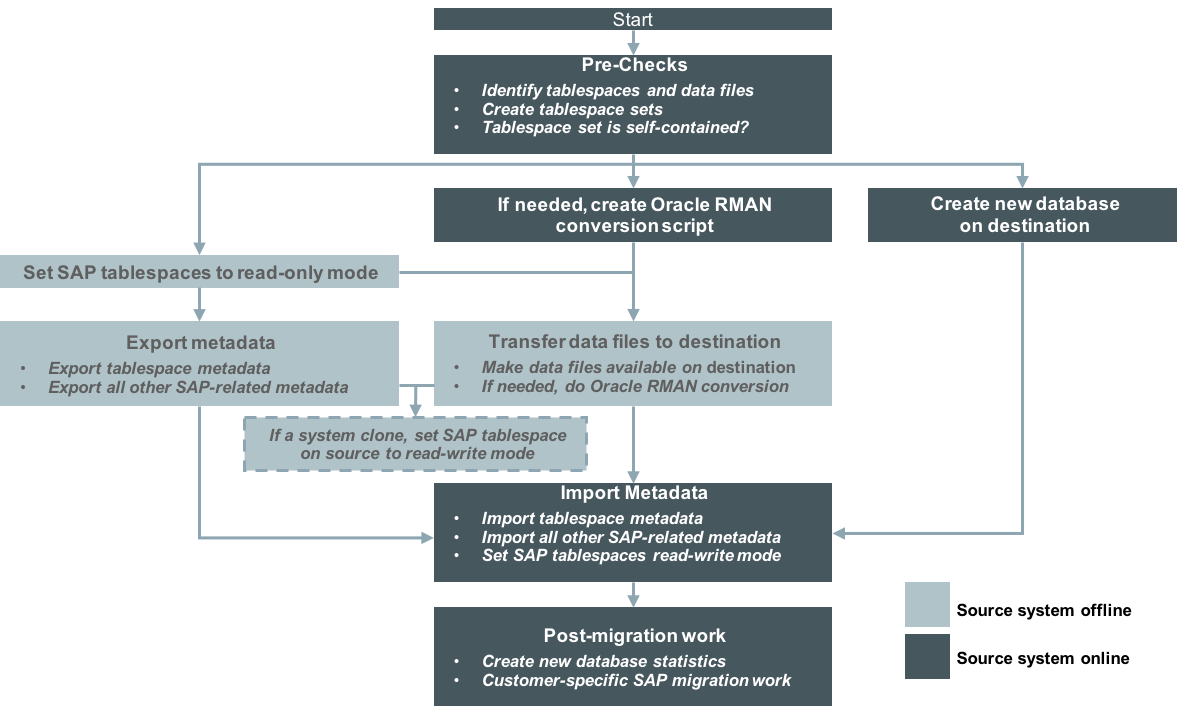
Figure 1. Overview of the TTS migration process.
As shown in Figure 1, a TTS migration can follow different paths:
- An export followed by a metadata import
- A transfer of data files between source and destination platform
- A combination of both if not all steps can be run in parallel
An important consideration when determining the flow of a migration process is the downtime required for the SAP system. As depicted in Figure 1, TTS imposes some amount of downtime from the step of exporting the metadata until the database is validated on the destination side. The total downtime is determined by how fast and how parallelized the steps can be. When using TTS for a system copy, the time it takes for the metadata export determines the downtime required on the source system.
There are several factors that influence the length of the export and import processes:
- The number of database objects. Only the metadata describing database objects is exported, so the total number of objects directly impacts the time spent for both metadata export and import.
- The bandwidth and method used to copy data files from source to destination. The size of data files in the file system, rather the amount of data in the database, is what's relevant in determining copy times. In addition, data files might contain some unused data blocks that have not yet been overwritten with useful data. The bandwidth of the interconnect also matters if data files are copied during the migration.
- CPU speed. Because the metadata export is a single-threaded process, a CPU capable of very high single-thread performance, such as Oracle's SPARC M7 processor, can greatly reduce the runtime of the export process.
Export Phase
Pre-Export Checks
Step 1. Identify all the tablespaces and data files that need to be transported.
As a first step, it is critical to identify the tablespaces and data files that need to be exported to the destination platform. To do this, log in to the Oracle Database instance for the SAP system as ora<SID> or user oracle (depending whether you are using the old or new user schema for software ownership).
SQL> set pagesize 1000;SQL> select tablespace_name,file_name from dba_data_files order by tablespace_name,file_name;TABLESPACE_NAME FILE_NAME-----------------------------------------------------PSAPSR3 /oracle/PR1/sapdata3/sr3_1/sr3.data1PSAPSR3 /oracle/PR1/sapdata3/sr3_10/sr3.data10PSAPSR3 /oracle/PR1/sapdata3/sr3_11/sr3.data11PSAPSR3 /oracle/PR1/sapdata3/sr3_12/sr3.data12PSAPSR3 /oracle/PR1/sapdata3/sr3_13/sr3.data13PSAPSR3 /oracle/PR1/sapdata3/sr3_14/sr3.data14PSAPSR3 /oracle/PR1/sapdata3/sr3_15/sr3.data15PSAPSR3 /oracle/PR1/sapdata3/sr3_16/sr3.data16PSAPSR3 /oracle/PR1/sapdata3/sr3_17/sr3.data17PSAPSR3 /oracle/PR1/sapdata3/sr3_18/sr3.data18PSAPSR3 /oracle/PR1/sapdata3/sr3_19/sr3.data19PSAPSR3 /oracle/PR1/sapdata3/sr3_2/sr3.data2PSAPSR3 /oracle/PR1/sapdata3/sr3_20/sr3.data20PSAPSR3 /oracle/PR1/sapdata3/sr3_21/sr3.data21PSAPSR3 /oracle/PR1/sapdata3/sr3_22/sr3.data22PSAPSR3 /oracle/PR1/sapdata3/sr3_23/sr3.data23PSAPSR3 /oracle/PR1/sapdata3/sr3_24/sr3.data24PSAPSR3 /oracle/PR1/sapdata3/sr3_25/sr3.data25PSAPSR3 /oracle/PR1/sapdata3/sr3_3/sr3.data3PSAPSR3 /oracle/PR1/sapdata3/sr3_4/sr3.data4PSAPSR3 /oracle/PR1/sapdata3/sr3_5/sr3.data5PSAPSR3 /oracle/PR1/sapdata3/sr3_6/sr3.data6PSAPSR3 /oracle/PR1/sapdata3/sr3_7/sr3.data7PSAPSR3 /oracle/PR1/sapdata3/sr3_8/sr3.data8PSAPSR3 /oracle/PR1/sapdata3/sr3_9/sr3.data9PSAPSR3740 /oracle/PR1/sapdata2/sr3740_1/sr3740.data1PSAPSR3740 /oracle/PR1/sapdata2/sr3740_10/sr3740.data10PSAPSR3740 /oracle/PR1/sapdata2/sr3740_11/sr3740.data11PSAPSR3740 /oracle/PR1/sapdata2/sr3740_12/sr3740.data12PSAPSR3740 /oracle/PR1/sapdata2/sr3740_13/sr3740.data13PSAPSR3740 /oracle/PR1/sapdata2/sr3740_14/sr3740.data14PSAPSR3740 /oracle/PR1/sapdata2/sr3740_15/sr3740.data15PSAPSR3740 /oracle/PR1/sapdata2/sr3740_16/sr3740.data16PSAPSR3740 /oracle/PR1/sapdata2/sr3740_17/sr3740.data17PSAPSR3740 /oracle/PR1/sapdata2/sr3740_18/sr3740.data18PSAPSR3740 /oracle/PR1/sapdata2/sr3740_2/sr3740.data2PSAPSR3740 /oracle/PR1/sapdata2/sr3740_3/sr3740.data3PSAPSR3740 /oracle/PR1/sapdata2/sr3740_4/sr3740.data4PSAPSR3740 /oracle/PR1/sapdata2/sr3740_5/sr3740.data5PSAPSR3740 /oracle/PR1/sapdata2/sr3740_6/sr3740.data6PSAPSR3740 /oracle/PR1/sapdata2/sr3740_7/sr3740.data7PSAPSR3740 /oracle/PR1/sapdata2/sr3740_8/sr3740.data8PSAPSR3740 /oracle/PR1/sapdata2/sr3740_9/sr3740.data9PSAPSR3USR /oracle/PR1/sapdata4/sr3usr_1/sr3usr.data1PSAPUNDO001 /oracle/PR1/sapdata1/undo_1/undo.data1PSAPUNDO001 /oracle/PR1/sapdata1/undo_2/undo.data2PSAPUNDO002 /oracle/PR1/sapdata1/undo002_1/undo002.data1SYSAUX /oracle/PR1/sapdata1/sysaux_1/sysaux.data1SYSTEM /oracle/PR1/sapdata1/system_1/system.data1SYSTEM /oracle/PR1/sapdata1/system_2/system.data250 rows selected.
Listing 1: Identifying tablespaces for migration.
Not all tablespaces must be transported. SYSTEM, SYSAUX, TEMP, and PSAPUNDO must be replaced by new empty tablespaces of the same type on the destination system. In Listing 1, the tablespaces PSAPSR3, PSAPSR3740, and PSAPSR3USR must be transported. Note that both the name and the number of tablespaces will differ for each database.
Step 2. Determine the character set.
While newer SAP systems (such as the source system in this migration example) are Unicode systems using UTF8 character sets for both the character and national character sets, older SAP systems might use different character sets. Because character set information is needed later during the creation of the destination database, it should be checked and noted:
SQL> select parameter, value from v$nls_parameters where parameter='NLS_CHARACTERSET';
PARAMETER VALUE
------------------------ -----------------------
NLS_CHARACTERSET UTF8
SQL>
Listing 2: Checking character set information.
Step 3. Move table SAPUSER to a transportable tablespace.
Note: This step is required only if moving from Oracle Database 11_g_ Release 2 to the same release on a different platform. Starting with Oracle Database 12_c_, the use of Secure Storage in File System (SSFS) is mandatory.
When upgrading from Oracle Database 11_g_ Release 2 to Oracle Database 12_c_, it's necessary to create an SSFS on the target environment that is accessible by all SAP ABAP system components. For details, read SAP DOC-49333 (SSFS Implementation for Oracle Database) and SAP Note 1622837 (New Connect Method of AS ABAP to Oracle via SSFS). (Access to SAP Notes requires logon and authentication to the SAP Service Marketplace.)
The table SAPUSER owned by user Oracle OPS$<SAPSID>ADM is usually located in the SYSTEM tablespace, which is not a transportable tablespace. For this reason, the table SAPUSER must be moved to a tablespace that can be transported, as in the following:
SQL> select tablespace_name from dba_tables where table_name='SAPUSER';
TABLESPACE_NAME
------------------------------
SYSTEM
SQL> alter table ops$rm1adm.sapuser move tablespace psapsr3usr;
Table altered.
SQL> select tablespace_name from dba_tables where table_name='SAPUSER';
TABLESPACE_NAME
------------------------------
PSAPSR3USR
Listing 3: Moving the SAPUSER table.
For a database enabled for SSFS, the SELECT command will output the following:
SQL> select tablespace_name from dba_tables where table_name='SAPUSER';
No row selected
Listing 4: Output of the SELECT command with SSFS enabled.
Step 4. Verify that the tablespace set is self-contained.
For transportable tablespaces, it is required that the set of tablespaces to be transported together is self-contained. Self-contained means that there are no dependencies to tablespaces beyond the set and that the only dependencies are between tablespaces within the set.
If the number of tablespaces is small, this check can be done manually:
SQL> dbms_tts.transport_set_check(‘PSAPSR3’,’PSAPSR3740’,’PSAPSR3USR’, true)
SQL> select violations from transport_set_violations;
Listing 5: Manually checking whether the tablespace set is self-contained.
If the number of tablespaces is large, the following ttscheck.sql script collects the names of all tablespaces that must be transported, starts the check procedure, and outputs violations, if they are any:
set serveroutput on;
declare
tslist varchar2(32767);
first boolean:=true;
begin
/* Create a comma separated list of all tablespaces that need to be transported.*/
for c in (select tablespace_name from dba_tablespaces where contents='PERMANENT' and tablespace_name != 'SYSTEM' and tablespace_name != 'SYSAUX') loop
if first = true then
first:=false;
else
tslist:=tslist||',';
end if;
tslist:=tslist||c.tablespace_name;
end loop;
/* Output of the tablespaces list, then start the transport check */
dbms_output.put_line('Checking: '||tslist);
dbms_tts.transport_set_check(to_clob(tslist),false,false);
/* Output violations if there are any.*/
for c in (select violations from transport_set_violations) loop
dbms_output.put_line(c.violations);
end loop;
end;
/
Listing 6: The ttscheck.sql script can be used to check whether the tablespace set is self-contained.
If the tablespaces to be migrated are self-contained, the script produces output such as the following:
SQL> @ttscheck.sql
Checking: PSAPSR3,PSAPSR3740,PSAPSR3USR
PL/SQL procedure successfully completed.
Listing 7: Output from the ttscheck.sql script if tablespace set is self-contained.
Data File Conversion
If the bit ordering or underlying storage architecture changes between the migration source and destination platforms, Oracle Recovery Manager (Oracle RMAN) offers a means of converting data files between platforms. To check whether a conversion is necessary, compare the endianness of both platforms, as in the following:
SQL > select platform_name, endian_format from V$TRANSPORTABLE_PLATFORM
PLATFORM_NAME ENDIAN_FORMAT
---------------------------------------- ---------------
Solaris[tm] OE (32-bit) Big
Solaris[tm] OE (64-bit) Big
Microsoft Windows IA (32-bit) Little
Linux IA (32-bit) Little
AIX-Based Systems (64-bit) Big
HP-UX (64-bit) Big
HP Tru64 UNIX Little
HP-UX IA (64-bit) Big
Linux IA (64-bit) Little
HP Open VMS Little
Microsoft Windows IA (64-bit) Little
IBM zSeries Based Linux Big
Linux x86 64-bit Little
Apple Mac OS Big
Microsoft Windows x86 64-bit Little
Solaris Operating System (x86) Little
IBM Power Based Linux Big
HP IA Open VMS Little
Listing 8: Comparing the endianness of both platforms.
Although a data file conversion script can be created manually, using Oracle RMAN to create one automatically is recommended. But even if the conversion script is created automatically with Oracle RMAN, the script file still typically requires some slight modifications.
Step 1. Create the conversion script with Oracle RMAN.
Because this article describes an Oracle Database migration to an Oracle ASM destination and new data files must be created in Oracle ASM anyway, the actual data file conversion is performed on the target platform. On the source side, Oracle RMAN first collects the data needed to create the new data files on the target and puts the needed commands into the conversion script /oracle/conv.rman. On the source platform, the structure of the Oracle RMAN command is as follows (the command sequence is also included in the script create_conversion_script.rman):
convert database on target platform
convert script '/oracle/conv.rman'
new database 'PR3'
format '+DATAC1';
Listing 9: The script create_conversion_script.rman contains the Oracle RMAN command on the source platform.
The values for the database name and format are determined by the target database. In this case, the Oracle ASM volume "+DATAC1" specifies the destination database, which is renamed from PR1 to PR3. The CONVERT SCRIPT parameter defines the name of the conversion script that will be executed manually on the destination host to convert data file copies in batch mode. (For more information, see "Transporting Data Across Platforms" in the Oracle Database Backup and Recovery User's Guide.)
Running the Oracle RMAN script on the source platform builds the conversion script /oracle/conv.rman for the target:
$ rman target /
Recovery Manager: Release 12.1.0.2.0 - Production on Mon Mar 14 11:09:00 2016
Copyright (c) 1982, 2014, Oracle and/or its affiliates. All rights reserved.
connected to target database: PR1 (DBID=994759330)
RMAN> @create_conversion_script.rman
RMAN> convert database on target platform
2> convert script '/oracle/conv.rman'
3> new database 'PR3'
4> format '+DATAC1';
Starting conversion at source at 14-MAR-16
[…]
Edit init.ora file /oracle/PR1/121/dbs/init_+DATAC1.ora. This PFILE will be used to create the database on the target platform
Run RMAN script '/oracle/conv.rman' on target platform to convert data files
To recompile all PL/SQL modules, run utlirp.sql and utlrp.sql on the target platform
To change the internal database identifier, use DBNEWID Utility
Finished conversion at source at 14-MAR-16
RMAN> **end-of-file**
Listing 10: Running the Oracle RMAN script on the source platform.
Step 2. Modify the created script.
The generated conversion script often includes statements that must be modified to match specifics of the destination platform. The script also typically includes information about tablespaces that will not be migrated (UNDO, SYS, and so forth), and should be tuned according to the target platform's ability to parallelize tasks.
Common modifications that are needed include
- Entering the correct location for the PFILE on the destination host. Although the Oracle RMAN script generates a PFILE, this PFILE is not usable and will be replaced by an SAP-compliant PFILE in a later step.
- Changing the PARALLELISM value to a reasonable value. This value is determined by the capability of the I/O system in the destination platform, the number of data files to import, and the number of available threads. In the example given here, the PARALLELISM value is set to 16 because the destination platform has 16 parallel threads available. (Note that each SPARC M7 processor has 32 cores with eight hardware threads per core. Cores are typically allocated to virtual machines, also known as Oracle VM Server for SPARC logical domains.)
- Verifying that the path to the data files is correct on the destination platform.
Appendix A provides an example of the conversion script generated by Oracle RMAN along with a modified version.
Metadata Export for SAP Database Objects
Exporting metadata for the database objects owned by the SAPSR3 user requires downtime of the entire SAP system, because the SAP-related tablespaces must be put in read-only mode. During the metadata export process, data files can also be copied or converted. Make sure that the file systems for the source database are accessible on the target system (for example, via NFS mounts).
Step 1. Set the tablespaces to read-only mode.
The source database must be open and mounted. Set the SAP-specific tablespaces that must be transferred to the destination database to read-only mode:
SQL> select tablespace_name, status from dba_tablespaces;
TABLESPACE_NAME STATUS
------------------------------ ---------
SYSTEM ONLINE
SYSAUX ONLINE
PSAPUNDO001 ONLINE
PSAPTEMP ONLINE
PSAPSR3 ONLINE
PSAPSR3740 ONLINE
PSAPSR3USR ONLINE
PSAPUNDO002 ONLINE
8 rows selected.
SQL> alter tablespace PSAPSR3 read only;
Tablespace altered.
SQL> alter tablespace PSAPSR3740 read only;
Tablespace altered.
SQL> alter tablespace PSAPSR3USR read only;
Tablespace altered.
SQL> select tablespace_name, status from dba_tablespaces;
TABLESPACE_NAME STATUS
------------------------------ ---------
SYSTEM ONLINE
SYSAUX ONLINE
PSAPUNDO001 ONLINE
PSAPTEMP ONLINE
PSAPSR3 READ ONLY
PSAPSR3740 READ ONLY
PSAPSR3USR READ ONLY
PSAPUNDO002 ONLINE
8 rows selected.
Listing 11: Setting SAP-specific tablespaces to read-only mode.
Step 2. Create a directory for dump files from the Oracle Database Data Pump Export utility (expdp).
Data Pump Export dump files require a directory in which they will be created. It is easier to define it once in Oracle Database rather than to check that all parameter files were created in the correct destination:
SQL> create directory migrate_pr1 as '/export/home/oracle/EXPORTFILES';
Directory created.
Listing 12: Creating a directory for Data Pump Export dump files.
If you are using a dump directory on a NFS-shared file system, make sure that the correct NFS mounting options (as recommended for Oracle RMAN and the Data Pump feature of Oracle Database) are in effect. Whenever possible, Oracle Direct NFS (dNFS) should be enabled to improve throughput and overall performance of Oracle RMAN backup and restore operations.
Step 3. Export using Data Pump.
The metadata export is performed in two parts—exporting the dictionary data and then exporting the metadata—which can be performed in parallel. Remember that it's the number of database objects (such as tables, indexes, views, and synonyms), rather than the database size, that largely determines the time required for the export process.
Step 3.1. Export dictionary data.
The first part of the Data Pump Export process is to export the dictionary data for the tables owned by SAPSR3. (If you are exporting an older database, also include owner='ops$SIDadm'). By excluding unnecessary tables, tablespaces, and statistics, the dictionary data parameter file limits the set of objects that are actually exported:
$ cat tts_export_dict.par
full=y
exclude=table:"in( select table_name from dba_tables where owner='SAPSR3')"
exclude=tablespace
exclude=statistics
compression=none
directory=migrate_pr1
dumpfile=dict.dmp
logfile=ttsexpdict.log
status=60
$ expdp par=tts_export_dict.par
Listing 13: Excluding unnecessary tables, tablespaces, and statistics.
To shorten the Data Pump Export runtime, follow these general recommendations:
- Use an SAP-conforming SPFILE and set an EVENT parameter in the SPFILE.
- Use a reasonable degree of parallelism. As mentioned previously, this value depends on the number of CPU cores available during the export and on the I/O capabilities of the storage system. As a starting point, set the degree of parallelism to the number of available CPU cores. If the export process is still too slow, increase the degree of parallelism while monitoring the utilization of the disk subsystem.
After starting the expdp command to export the dictionary data, the Data Pump Export operation begins. At any time, dialog mode can be activated by pressing CTRL+C. Doing so does not stop the export and displays additional information. Some useful subcommands include
**status**. Provides information about the status of the Data Pump Export process and its worker threads. Setting status to 60, for example, refreshes status information every 60 seconds.**cont**. The Data Pump Export process exits dialog mode.**EXIT_CLIENT**. The Data Pump Export process continues to work in the background while displaying a shell. This enables logout without discontinuing the export operation.
See "Data Pump Export" in the Oracle Database Utilities documentation for more information.
Step 3.2. Export tablespace metadata.
The second part of the metadata export process is to export the metadata of the SAP-specific tablespaces. In the migration example scenario, these tablespaces are PSAPSR3, PSAPSR3740, and PSAPSR3USR. To speed up the export, it might make sense to execute several exports in parallel. To decide how to reasonably allocate the number of export tasks, look at the number of tables in the SAP-specific tablespaces.
SQL> select tablespace_name, count(*) from dba_tables group by tablespace_name order by tablespace_name;
TABLESPACE_NAME COUNT(*)
------------------------------ ----------
PSAPSR3 82474
PSAPSR3740 5361
PSAPSR3USR 26
SYSAUX 461
SYSTEM 823
Listing 14: Checking the number of tables in the SAP-specific tablespaces.
Given the table counts shown in Listing 14, there's no significant benefit from exporting tablespaces in parallel. In this case, all tablespaces can be exported in a single export task:
$ cat tts_export_tablespaces.par
directory=migrate_pr1
dumpfile=tbs_all.dmp
transport_tablespaces=PSAPSR3,PSAPSR3740,PSAPSR3USR
transport_full_check=Y
logfile=tts_export_tablespaces.log
Listing 15: Creating a single export task.
A single expdp job then exports the required tablespaces:
$ expdp parfile=tts_export_tablespaces.par
Listing 16: Starting a single expdp job to export the tablespaces.
Listing 17 shows another example.
SQL> select tablespace_name, count(*) from dba_tables group by tablespace_name order by tablespace_name;
TABLESPACE_NAME COUNT(*)
------------------------------ ----------
PSAPSR3 47474
PSAPSR3740 40361
PSAPSR3USR 26
SYSAUX 461
SYSTEM 823
Listing 17: Another example of checking the number of tables.
Given the table counts in Listing 17, it makes sense to do two exports: one for PSAPSR3, and a second for PSAPSR3740 and PSAPSR3USR combined. This approach distributes the load fairly equally. Modify the parameter files as necessary to specify the tablespaces to be exported, as in the following:
$ cat tts_export_tablespaces_1.par
directory=migrate_pr1
dumpfile=tbs_PSAPSR3.dmp
transport_tablespaces=PSAPSR3
transport_full_check=Y
logfile=tts_export_tablespaces_1.log
$ cat tts_export_tablespaces_2.par
directory=migrate_pr1
dumpfile=tbs_PSAPSR3740_USR.dmp
transport_tablespaces=PSAPSR3740,PSAPSR3USR
transport_full_check=Y
logfile=tts_export_tablespaces_2.log
Listing 18: Creating two export tasks.
Next, start an expdp job for each set of tablespaces that needs to be exported, either using separate shells or executing one command after another using the EXIT_CLIENT command:
[shell1] $ expdp parfile=tts_export_tablespaces_1.par
[shell2] $ expdp parfile=tts_export_tablespaces_2.par
Listing 19: Starting an expdp job for two sets of tablespaces.
While the Data Pump Export jobs are running, it's possible to check their status either by attaching to the expdp client again, or by issuing an SQL statement in the database:
SQL> SELECT owner_name, job_name, rtrim(operation) "OPERATION", rtrim(job_mode) "JOB_MODE", state, attached_sessions
**FROM dba\_datapump\_jobs**
ORDER BY 1,2;
Listing 20: Checking the status of an export using an SQL statement.
For the tablespace export process, follow these general recommendations:
- Use an SAP-conforming SPFILE during the export and set an SAP-specific EVENT in the SPFILE.
- Oracle Database instances for SAP systems tend to have quite a large number of objects although they are small in size. Because the number of objects determines how long a single export job runs, make sure to distribute the load by defining multiple
expdp jobs. If distributing the load is not an option (for example, if there are very few tablespaces or a very uneven distribution of tables across tablespaces), long runtimes can result.
- Data Pump Export applies compression to all metadata by default. On older CPUs, this can especially lead to longer runtimes for all
expdp jobs. To turn off compression, add COMPRESSION=NONE to all parameter files.
- Data Pump Export jobs can be killed with the KILL_JOB command on the command line. This might be necessary if a job does not finish properly. (See My Oracle Support Note 336014.1.)
When using transportable tablespaces to create a system copy, the source system can be put online again after the export processes complete (for all of the dictionary data and tablespace exports). Switch the tablespaces back to read-write mode:
SQL> alter tablespace PSAPSR3 read write;
Tablespace altered.
SQL> alter tablespace PSAPSR3740 read write;
Tablespace altered.
SQL> alter tablespace PSAPSR3USR read write;
Tablespace altered.
Listing 21: Switching the tablespaces back to read-write mode.
At this point, the SAP system on the source can be restarted using the startSAP script.
Import Phase
The next steps take place on the destination system. For the import phase, the destination system must be able to access the data files (outlined in Listing 1 in the "Pre-Export Checks" section) and the metadata dump files that were created by the Data Pump Export jobs.
An NFS file system is a simple way of making file systems containing SAP data available from a source to a destination system. Using NFS requires reasonably fast network connections between the servers. Of course, a storage filer between both systems (or other shared storage accessible by both sides) can also be used. Other methods (such as copying using scp, mounting a CIFS file system, or rsync) can also accomplish the same goal.
Critical tasks in the import phase require that the following tasks be done:
- Source data files are first converted to destination data files that reside on storage cells on the Oracle SuperCluster.
- A PFILE is created that is suitable for the import operation and for running the database under SAP.
- A new Oracle Database instance is built on the destination system and tablespaces that have not been moved from the source (specifically the SYSTEM, SYSAUX, UNDO, and TEMP tablespaces) are created in the new database.
After constructing the new database, additional steps are necessary to create catalog entries and users, and to perform other post-database-creation steps. The remainder of this article describes the steps for completing these tasks.
Step 1. Copy and convert data files for tablespaces using the modified Oracle RMAN data file conversion script.
The first step of the import phase can be performed even when the tablespaces on the source database are still in read-only mode. In this example, the data files of the source system are made available on the destination system, and then they are imported into the Oracle ASM file system using Oracle RMAN (see Listing 22). The data files are renamed as they are moved into Oracle ASM.
RMAN> @conv.rman
Starting conversion at target at 21-MAR-16
using channel ORA_DISK_1
using channel ORA_DISK_2
using channel ORA_DISK_3
using channel ORA_DISK_4
using channel ORA_DISK_5
using channel ORA_DISK_6
using channel ORA_DISK_7
using channel ORA_DISK_8
using channel ORA_DISK_9
using channel ORA_DISK_10
using channel ORA_DISK_11
using channel ORA_DISK_12
channel ORA_DISK_1: starting datafile conversion
input file name=/export/MIGRATION/TTS/PR1/sapdata3/sr3_11/sr3.data11
[...]
converted datafile=+DATAC1/PR3/DATAFILE/psapsr3740.403.907077927
channel ORA_DISK_7: datafile conversion complete, elapsed time: 00:00:07
Finished conversion at target at 21-MAR-16
Listing 22: Output from Oracle RMAN data file conversion.
Extract the new data filenames and Oracle ASM grid names of the data files from the output of the conversion process. These names are required later during the metadata import process for the tablespaces.
Step 2. Create a PFILE.
In the sample migration described in this article, a PFILE must be created that is both suitable for the import and later for running the database under SAP. The example PFILE in Listing 23 shows several optimizations that are commonly defined for SAP environments. In particular, settings specified in SAP Note 1888485 are implemented for the import process because they help to optimize performance.
PR3.__data_transfer_cache_size=0
PR3.__db_cache_size=28521267200
PR3.__java_pool_size=469762048
PR3.__large_pool_size=335544320
PR3.__oracle_base='/oracle/PR3/121'#ORACLE_BASE set from environment
PR3.__pga_aggregate_target=8589934592
PR3.__sga_target=32212254720
PR3.__shared_io_pool_size=536870912
PR3.__shared_pool_size=2147483648
PR3.__streams_pool_size=134217728
*._awr_mmon_deep_purge_all_expired=TRUE#SAP RECOMMENDED SETTINGS - SAP NOTE 1888485
*._fix_control='5099019:ON','5705630:ON','6055658:OFF','6120483:OFF','6399597:ON','6430500:ON','6440977:ON','6626018:ON','6972291:ON','7168184:OFF','7658097:ON','8937971:ON','9196440:ON','9495669:ON','13077335:ON','13627489:ON','14255600:ON','14595273:ON','18405517:2'#SAP RECOMMENDED SETTINGS - SAP NOTE 1888485
*._ktb_debug_flags=8#SAP RECOMMENDED SETTINGS - SAP NOTE 1888485
*._mutex_wait_scheme=1#SAP RECOMMENDED SETTINGS - SAP NOTE 1888485
*._mutex_wait_time=10#SAP RECOMMENDED SETTINGS - SAP NOTE 1888485
*._optim_peek_user_binds=FALSE#SAP RECOMMENDED SETTINGS - SAP NOTE 1888485
*._optimizer_adaptive_cursor_sharing=FALSE#SAP RECOMMENDED SETTINGS - SAP NOTE 1888485
*._optimizer_aggr_groupby_elim=FALSE#SAP RECOMMENDED SETTINGS - SAP NOTE 1888485
*._optimizer_compute_index_stats=FALSE
*._optimizer_extended_cursor_sharing_rel='NONE'#SAP RECOMMENDED SETTINGS - SAP NOTE 1888485
*._optimizer_reduce_groupby_key=FALSE
*._optimizer_use_feedback=FALSE#SAP RECOMMENDED SETTINGS - SAP NOTE 1888485
*._securefiles_concurrency_estimate=50#SAP RECOMMENDED SETTINGS - SAP NOTE 1888485
*._suppress_identifiers_on_dupkey=TRUE#SAP RECOMMENDED SETTINGS - SAP NOTE 1888485
*._use_single_log_writer='TRUE'#SAP RECOMMENDED SETTINGS - SAP NOTE 1888485
*.compatible='12.1.0.2.0'
*.control_file_record_keep_time=30
*.control_files='+DATAC1/PR3/cntrlPR3_1.dbf','+RECOC1/PR3/cntrlPR3_2.dbf'
*.db_block_size=8192
*.db_create_file_dest='+DATAC1'
*.db_create_online_log_dest_1='+RECOC1'
*.db_files=1500
*.db_name='PR3'
*.DB_RECOVERY_FILE_DEST='+RECOC1'
*.DB_RECOVERY_FILE_DEST_SIZE=40G
*.db_unique_name='PR3'
*.event='10027','10028','10142','10183','10191','10995 level 2','38068 level 100','38085','38087','44951 level 1024'#SAP RECOMMENDED SETTINGS - SAP NOTE 1888485