by Jan Brosowski, Victor Galis, Gia-Khanh Nguyen, and Pierre Reynes
This article is Part 3 of a three-part series that describes steps for setting up SAP on Oracle SuperCluster in a highly available configuration. This article provides procedures for installing the SAP ABAP components in zone clusters configured and managed by Oracle Solaris Cluster.
Table of Contents
Introduction
Installing and Configuring SAP Components
Preparing the Environment for SAP Installation
Installing SAP Components
Setting Up Zone Cluster Resources for ABAP Stack Instances
Final Thoughts
See Also
About the Authors
|
Introduction
This article is Part 3 of a three-part series that provides best practices and recommendations for setting up highly available SAP systems on Oracle engineered systems. A team of Oracle engineers and SAP experts used Oracle SuperCluster M7 in a sample deployment to compile and test the step-by-step procedures and recommendations provided in this article series.
To achieve high availability (HA), it is necessary to put mission-critical SAP components under the control of Oracle Solaris Cluster, creating a cluster of two or more nodes. Oracle Solaris Cluster can then orchestrate failover or disaster recovery strategies while managing infrastructure resources such as database, network connectivity, and shared storage.
| |
|

in collaboration with

Oracle Optimized Solutions provide tested and proven best practices for how to run software products on Oracle systems. Learn more.
|
|
This article series ("Setting up Highly Available SAP Systems on Oracle SuperCluster") divides software installation and configuration tasks into three articles:
- Part 1: Configuring Virtualization for SAP on Oracle SuperCluster. The first article describes the steps needed to prepare virtual environments on the Oracle SuperCluster M7. These virtual environments are separate, isolated I/O domains that help to improve application resiliency. Two pairs of I/O domains are created on the two physical nodes (Figure 1): one domain pair for SAP components and application servers that require advanced HA, and a second pair for application servers that are not mission-critical.
- Part 2: Deploying and Configuring Oracle Solaris Cluster for SAP on Oracle SuperCluster. The second article describes the steps for installing the Oracle Solaris Cluster software and configuring two zone clusters across the nodes (Figure 1). The first zone cluster is dedicated to the most-critical SAP components: the ABAP Central Services instance (ASCS) and Enqueue Replication Server instance (ERS). The second zone cluster is used for the SAP Primary Application Server (PAS) and any other mission-critical Additional Application Servers (AAS).
- Part 3: Installing Highly Available SAP with Oracle Solaris Cluster on Oracle SuperCluster. Part 3 is this article, which gives step-by-step procedures for installing SAP ABAP stack components in the zone clusters and configuring them for HA. Oracle Solaris Cluster implements the concept of logical hostnames that are used to monitor network access availability and, if necessary, can move an IP address (managed as a resource) transparently to other nodes.
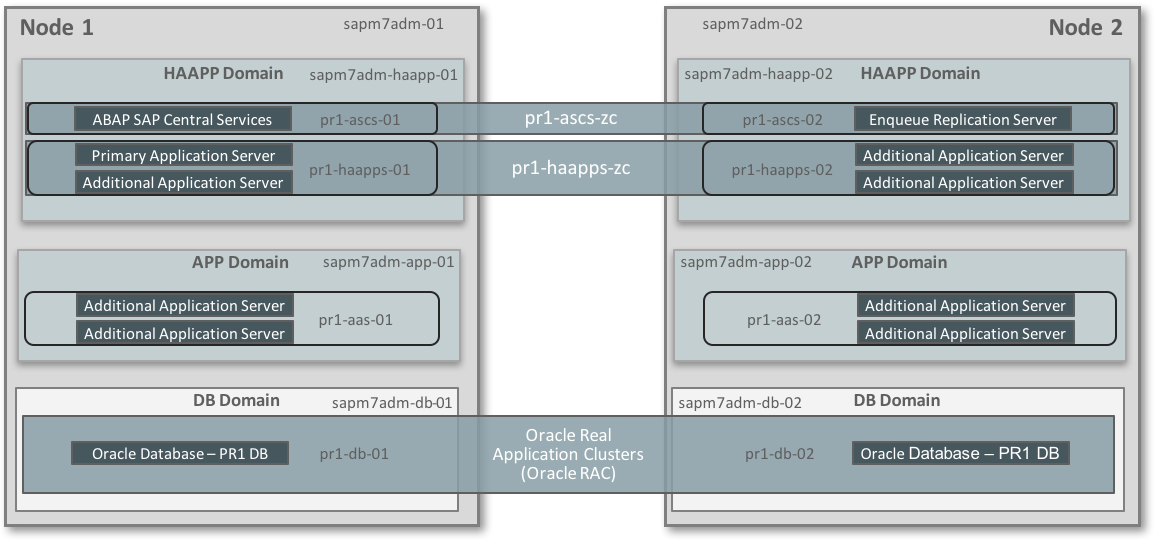
Figure 1. An HA configuration for SAP uses the zone clustering capabilities of Oracle Solaris Cluster.
Installing and Configuring SAP Components
To achieve the highest service levels for SAP applications, Oracle Solaris Cluster is used to monitor the status of zone cluster nodes containing the most-critical SAP software components. Part 2 in this series details the procedures used to create two zone clusters:
pr1-ascs-zc for the SAP ABAP Central Services instance (ASCS) and Enqueue Replication Server instance (ERS)pr1-haapps-zc for the SAP Primary Application Server (PAS) and other application servers that require the highest levels of availability
This article describes the steps for installing the SAP components and configuring logical hostnames, which are shared IP addresses that the Oracle Solaris Cluster software manages as a cluster resource. A logical hostname is defined for each SAP application server that requires the highest service availability levels. Clients configured to access the logical hostname via its IP address are not aware of the node's actual identity, and Oracle Solaris Cluster can transparently move the logical hostname and the corresponding application server across nodes as needed, setting the IP address "down" on the first node and "up" on the other node and restarting the corresponding SAP component.
Preparing the Environment for SAP Installation
Before installing the SAP components, it is necessary to perform the following preliminary steps, which are described in more detail in subsequent sections:
- Create logical hostnames for the zone clusters. These are the virtual hosts for the ASCS, ERS, PAS, D01, and D02 servers. (D01 and D02 are examples of mission-critical Additional Application Servers [AAS] in this sample deployment.)
- Prepare file systems for SAP component installation. On each Oracle Solaris Zone, create
/sapmnt/<SID>, /usr/sap/, /usr/SAP/<SID>, /oracle, and other customer-specific file systems, as needed.
- Create highly available Oracle Solaris Cluster storage resources that will monitor the NFS-mounted file systems required for the SAP NetWeaver stack.
- Create Oracle Solaris projects by following the instructions given in SAP Note 724713 - Parameter Settings for Oracle Solaris 10 and above (access to SAP Notes requires logon and authentication to the SAP Marketplace).
- Validate zone cluster operation. Verify that zone clusters operate properly and that the status of a node changes between up and down.
Creating Logical Hostnames for Zone Clusters
The first step is to add network addresses to Oracle Solaris Cluster, configuring IP addresses that will be under Oracle Solaris Cluster control. Select the zone cluster, then select the Solaris Resources tab, and click Add under Network Resources. For all hostnames that are to be managed as logical hostnames, repeat this step, entering all network addresses to be added to the zone cluster, including addresses for both the external 10 GbE and internal InfiniBand (IB) network interfaces (Figure 2).
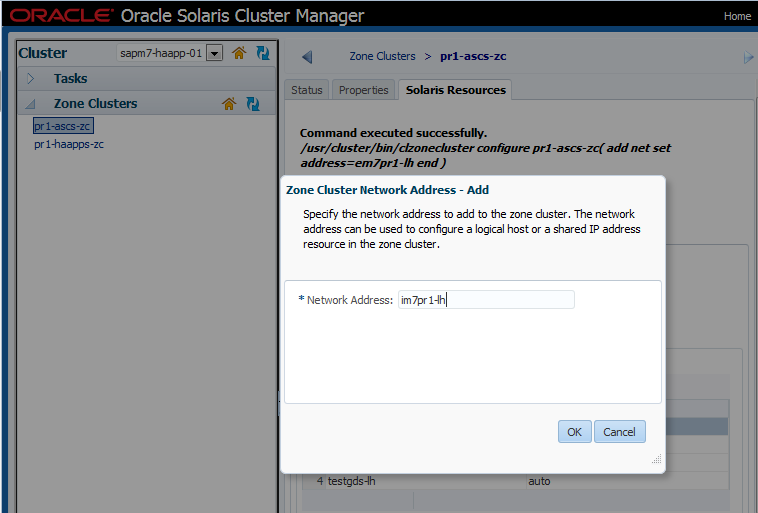
Figure 2. Enter a network address to be added to the zone cluster.
Repeat this step for all IP addresses managed by Oracle Solaris Cluster (logical hostnames), both external 10 Gbe and internal IB. In our project we used em7pr1-lh, im7pr1-lh, empr1-ers-lh, im7pr1-ers-lh, em7pr1-pas-lh, im7pr1-pas-lh, em7pr1-d01-lh, im7pr1-d01-lh, em7pr1-d02-lh, and im7pr1-d02-lh.
Perform the steps shown in Figure 3 through Figure 11 to create a logical hostname resource for the zone cluster pr1-ascs-zc. This zone cluster has two nodes: em7pr1-ascs-01 and em7pr1-ascs-02. The logical hostname for this zone cluster (im7pr1-lh) is specified in Figure 7. The logical hostname resource is assigned to a resource group (ascs-rg, Figure 9) so that Oracle Solaris Cluster can manage all resources in the group as a unit, relocating all resources as a unit if a failover or switchover is initiated for that group.
Note: SAP limits the length of all hostnames used in a SAP installation to 13 characters or less. The name of the resource is not relevant; only the hostname as resolved by DNS needs to meet this requirement. For this example installation, we initially used a naming convention for one hostname (em7pr1-ascs-lh) that did not meet this requirement, so we later applied a different naming convention just for the ASCS logical hostname (im7pr1-lh, as shown in Figure 7). Because multiple teams are often involved in defining and managing hostnames and corresponding IP addresses, review the entire list of allocated hostnames and IP resources to make sure that they meet SAP requirements. For more details, refer to SAP Note 611361 – "Hostnames of SAP server" (access to SAP Notes requires logon and authentication to the SAP Marketplace).
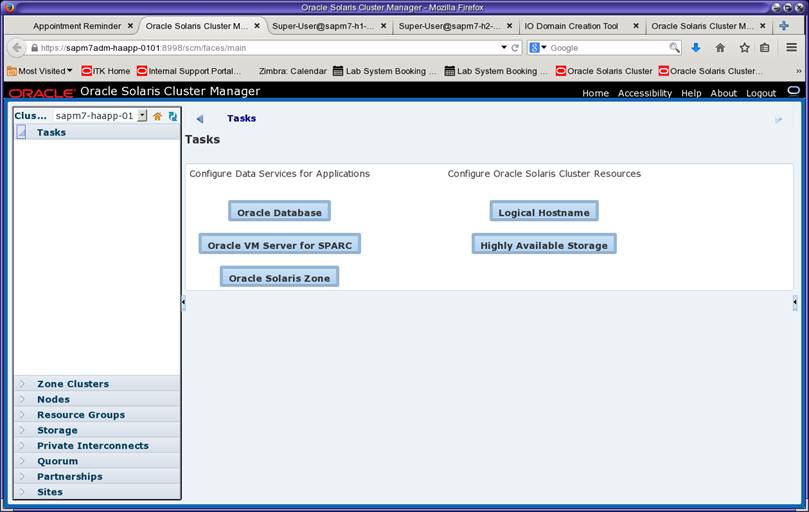
Figure 3. Under Tasks, select the Logical Hostname wizard.
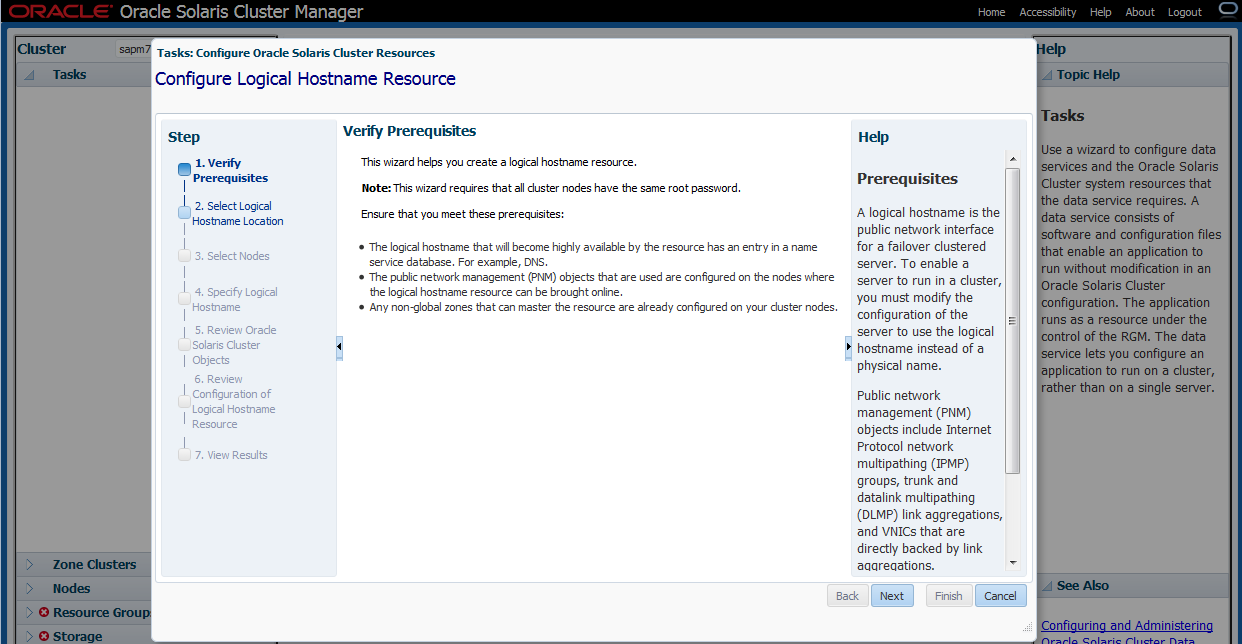
Figure 4. Verify the prerequisites for configuring a logical hostname resource.
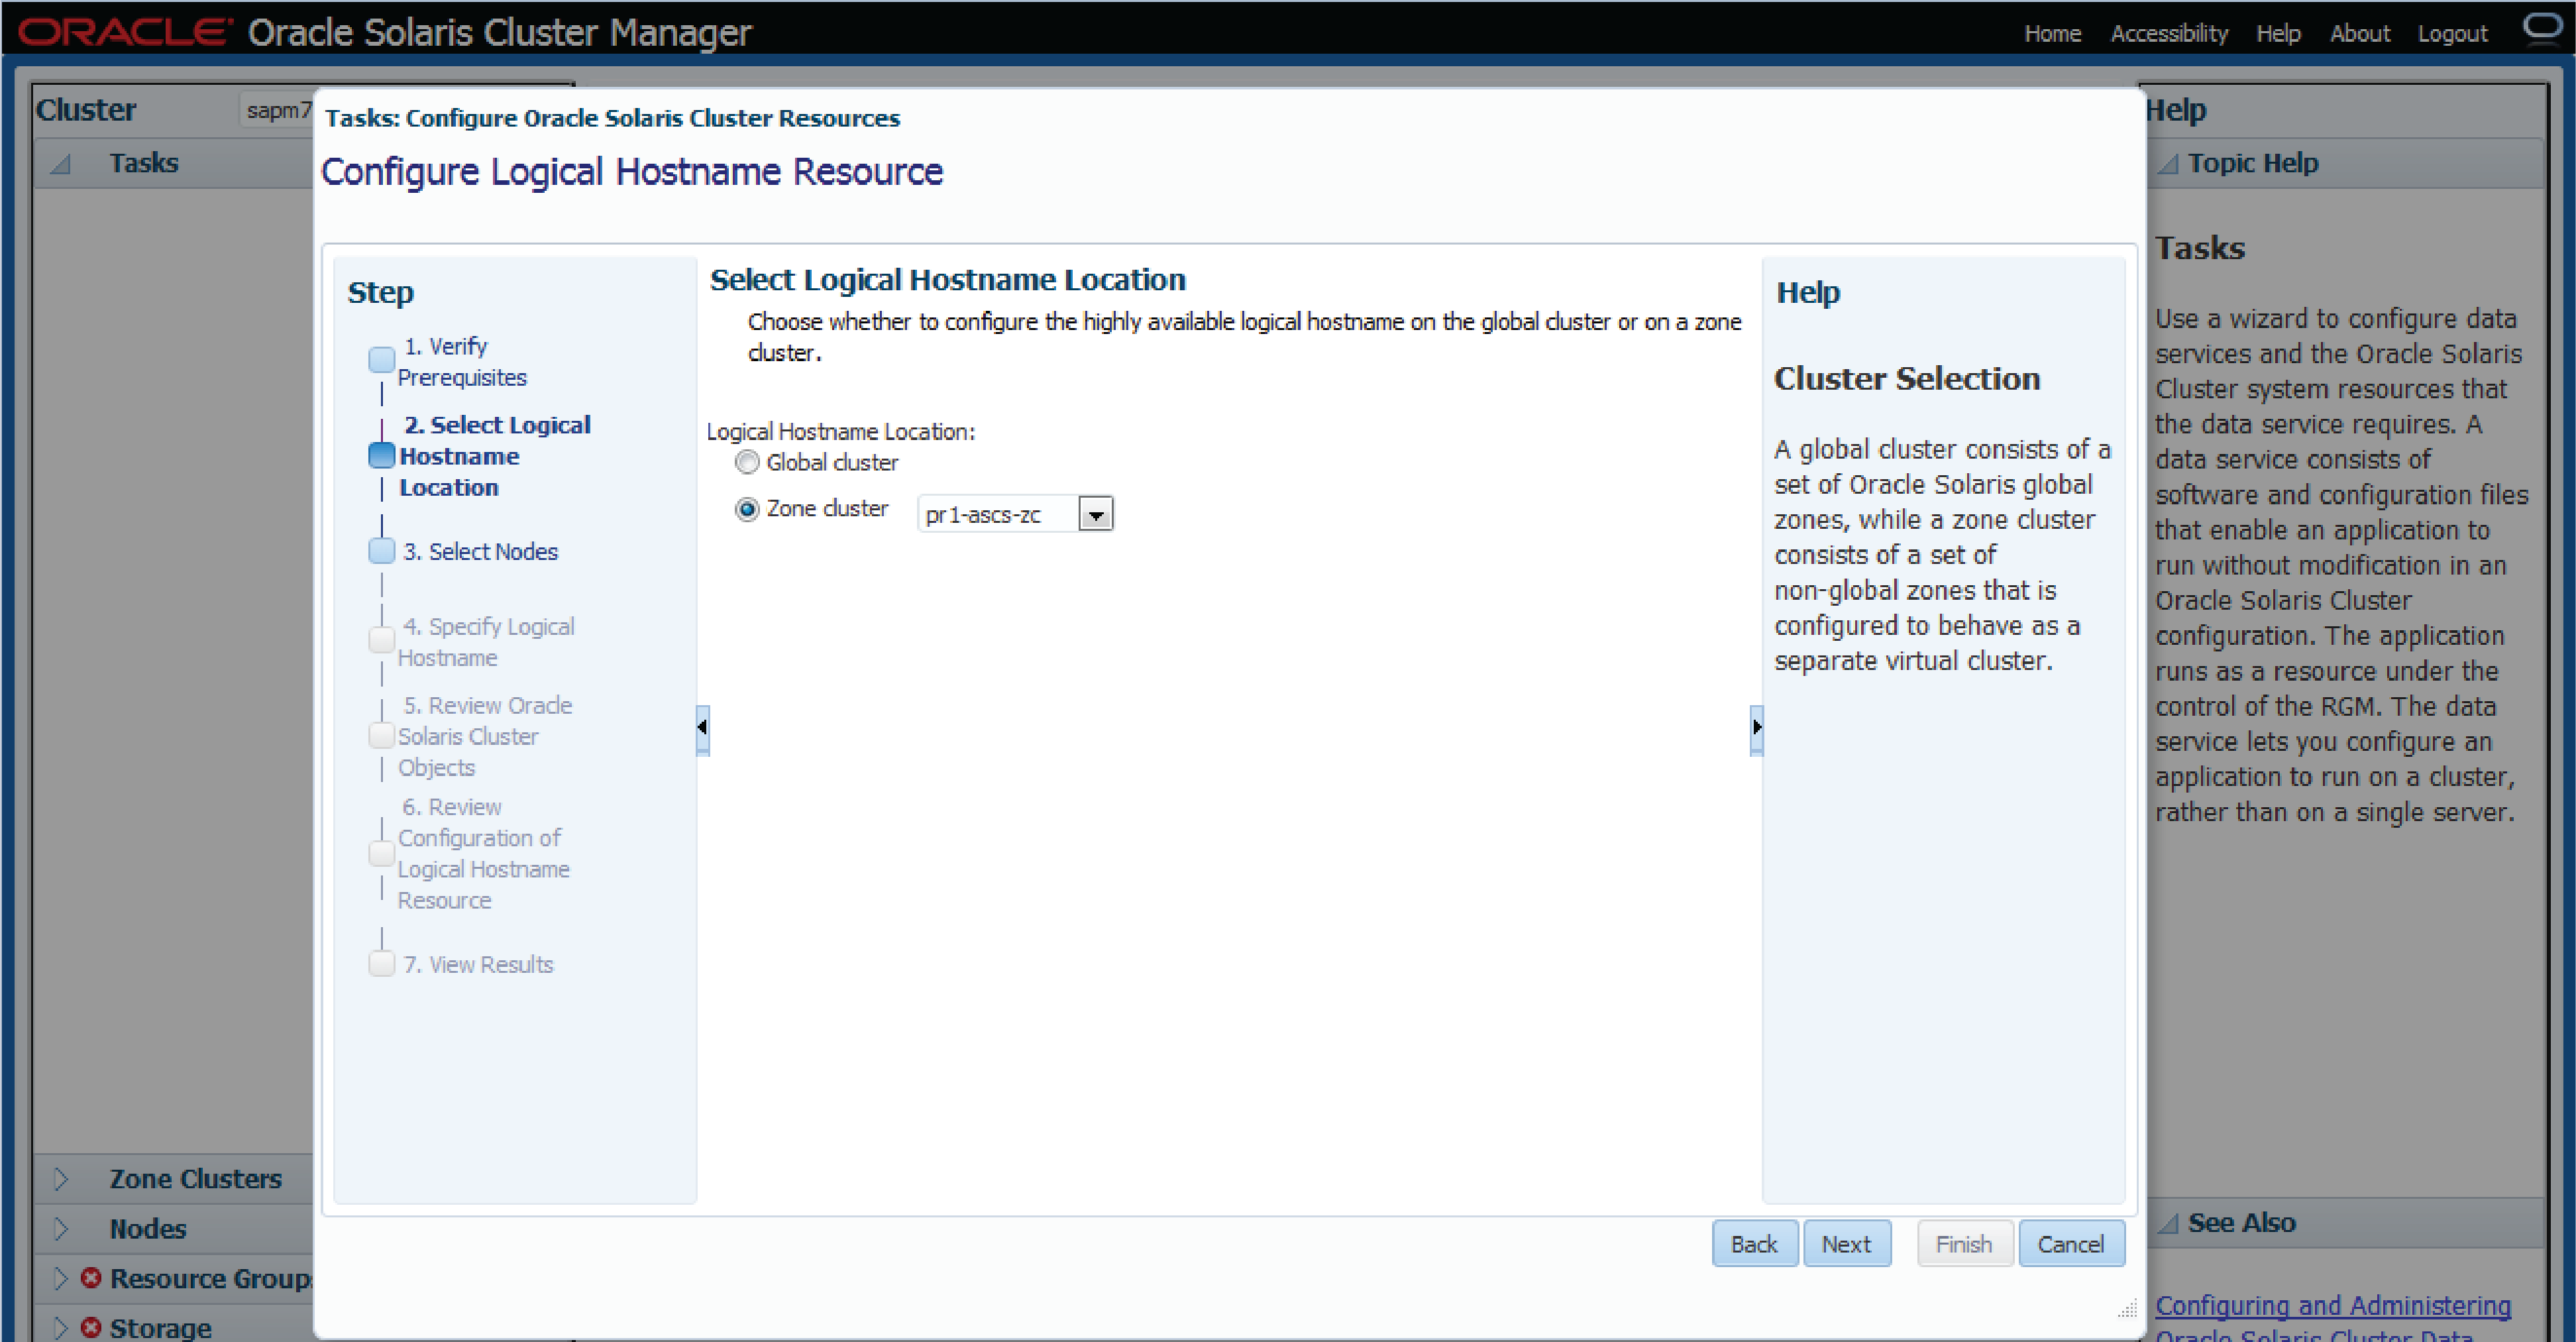
Figure 5. Select "Zone cluster" as the logical hostname location.
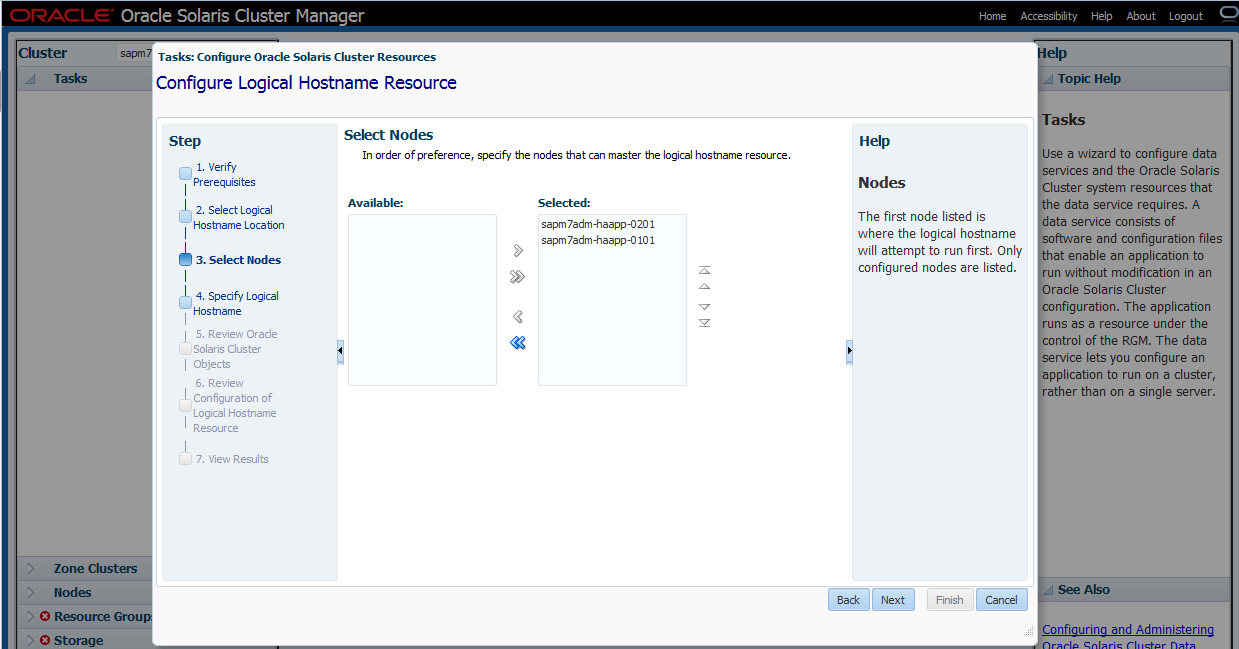
Figure 6. Select the zone cluster nodes for the logical hostname.
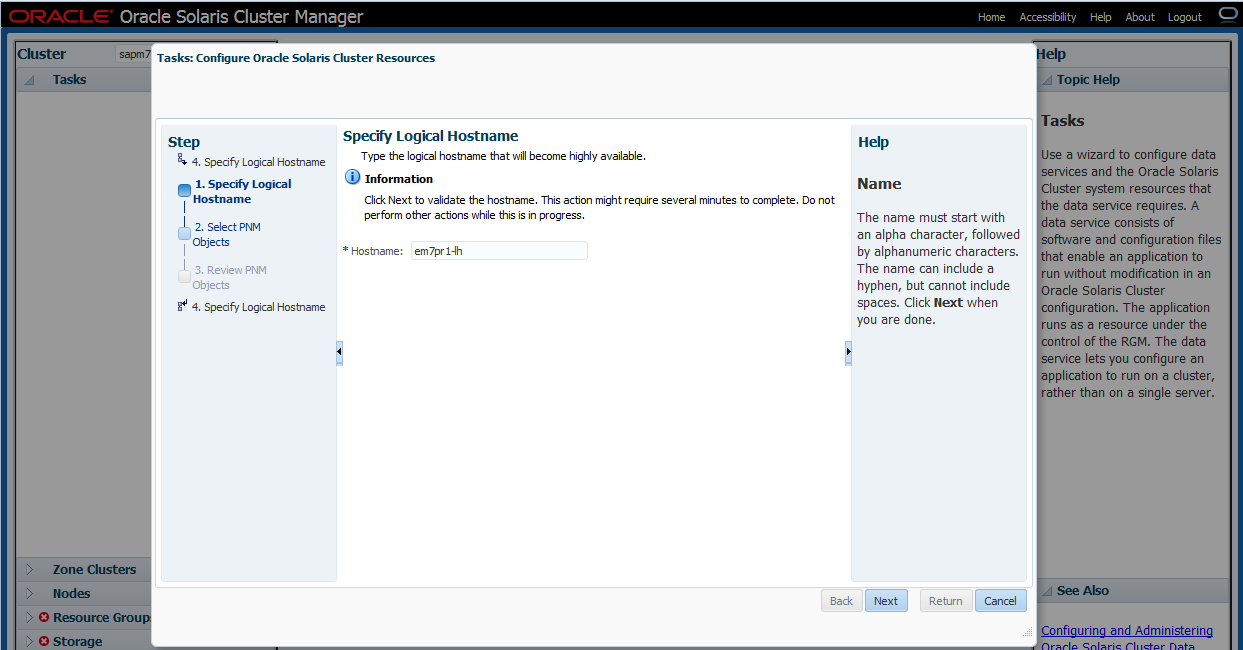
Figure 7. Enter a name for the logical hostname.
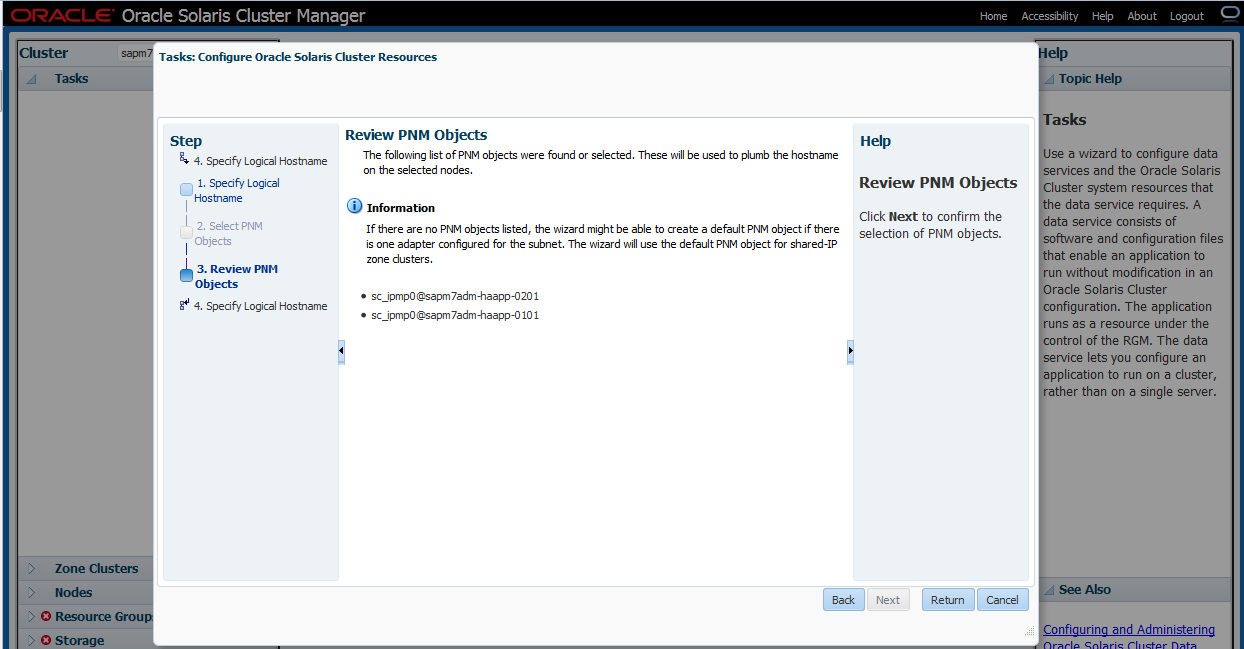
Figure 8. Review PNM (Public Network Management) objects (there are none).
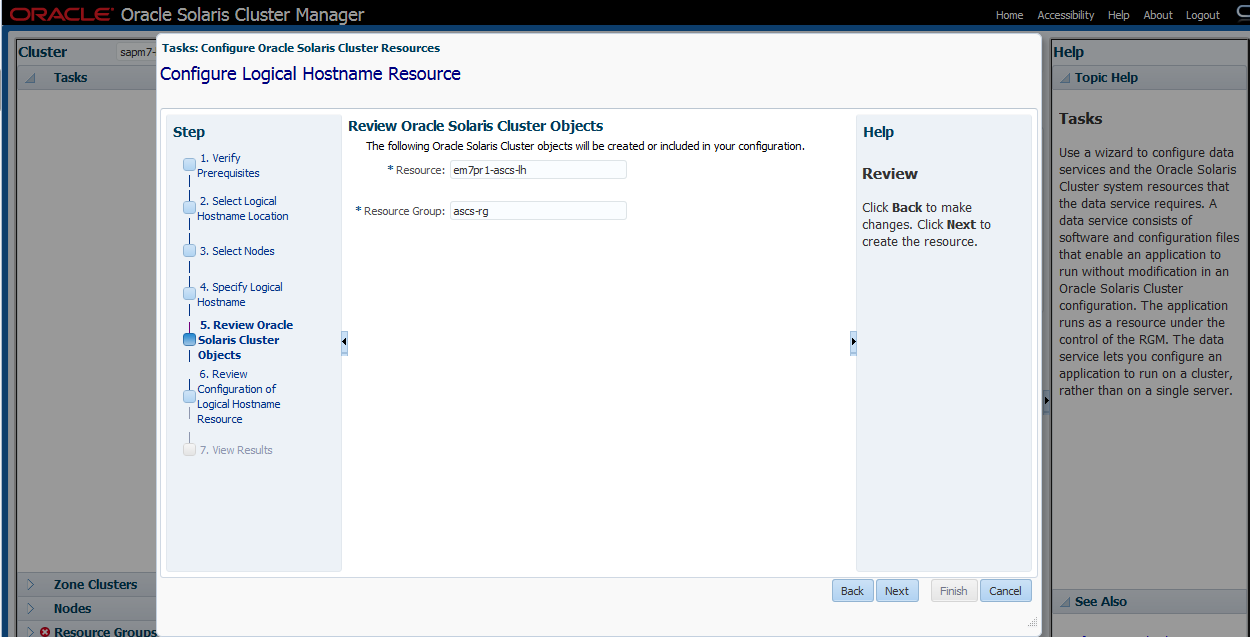
Figure 9. Enter a resource group name.
Modify the resource group name to reflect your naming convention; the default value is harder to use.
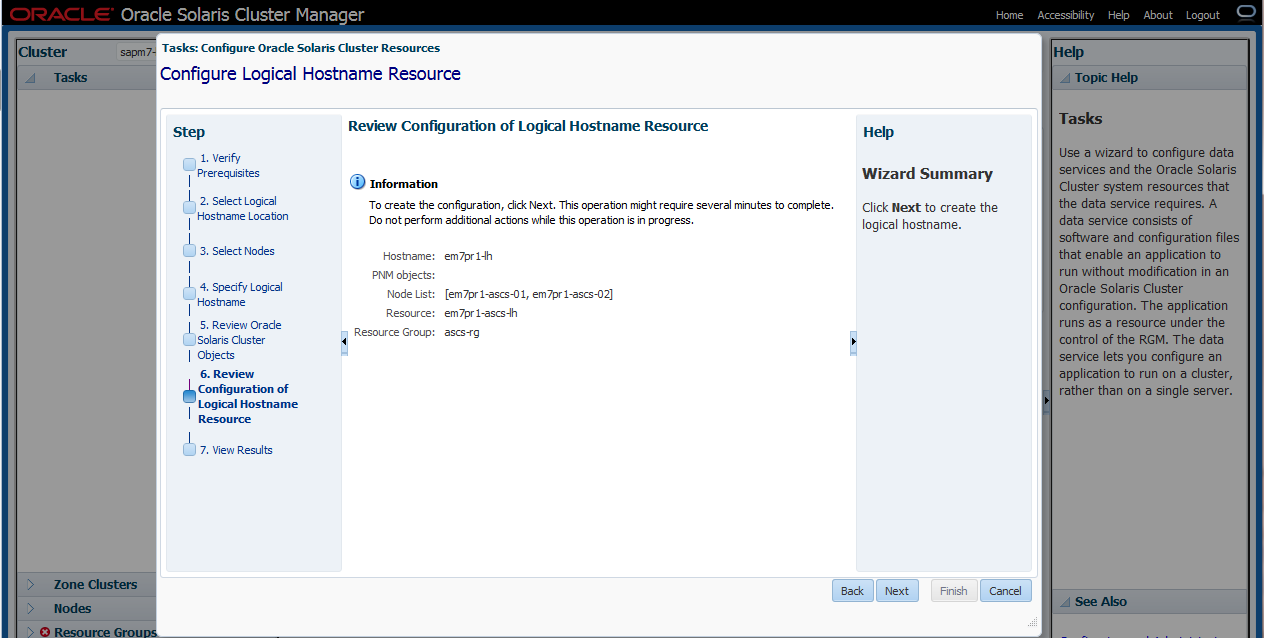
Figure 10. Review the configuration summary and click Next.
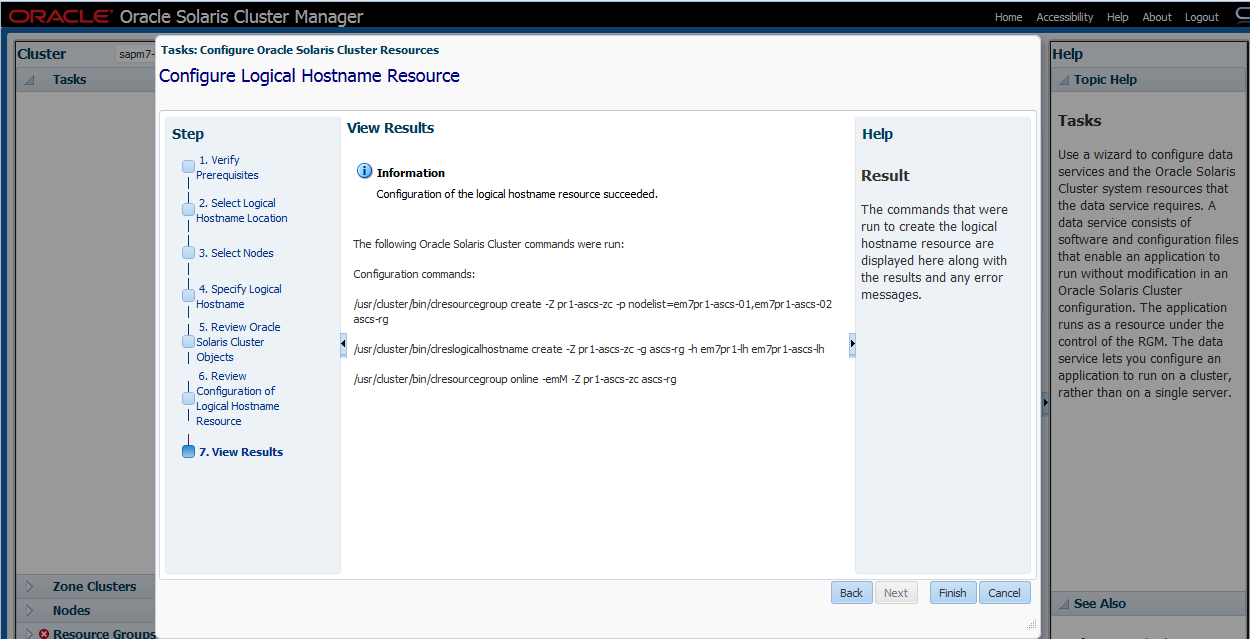
Figure 11. View the results screen, which shows the command-line interface (CLI) commands.
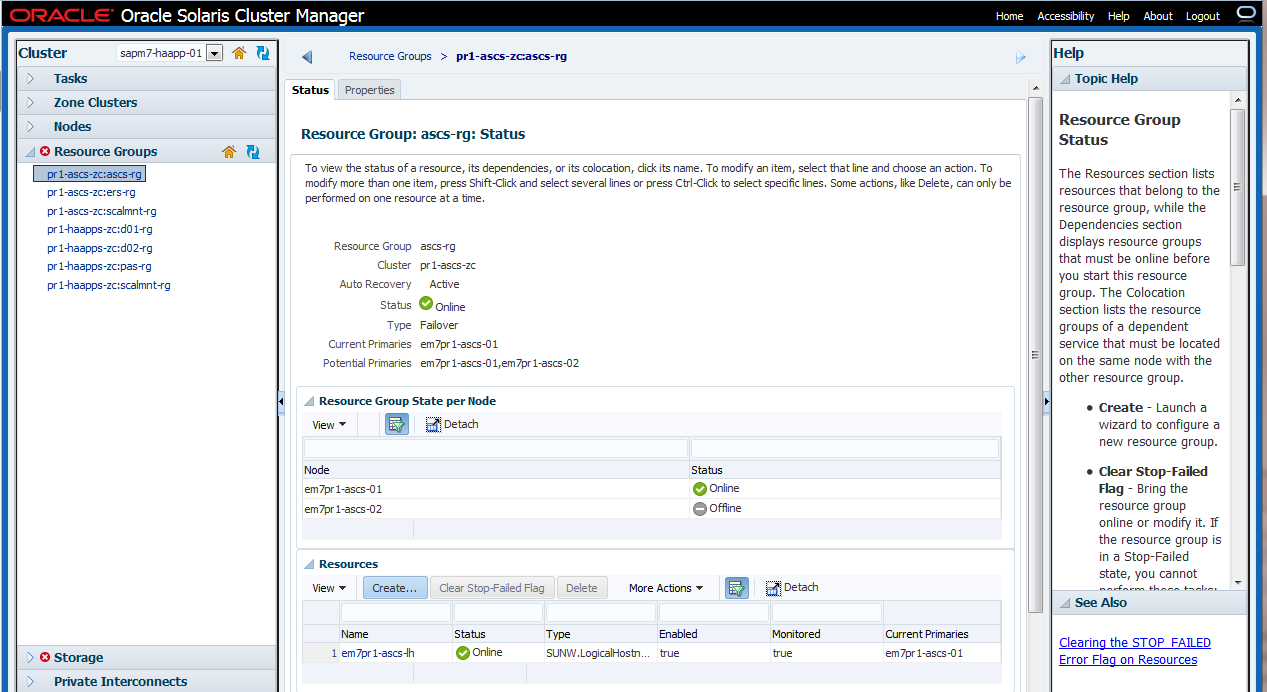
Figure 12. View the created ASCS resource group.
A resource group called ascs-rg (containing the logical hostname resource em7pr1-ascs-lh) is now defined in zone cluster pr1-ascs-zc. Oracle Solaris Cluster can manage all the resources associated with the ASCS server in the ascs-rg resource group.
Logical hostnames need to be created for the InfiniBand (IB) hosts as well. These will be part of the same resource group, so they are active on the same node together. Figure 13 through Figure 17 show the steps to create the resource im7pr1-ascs-lh of type logical hostname in the ascs-rg resource group. To create a new logical hostname resource in the same resource group, click the Create button (Figure 13).
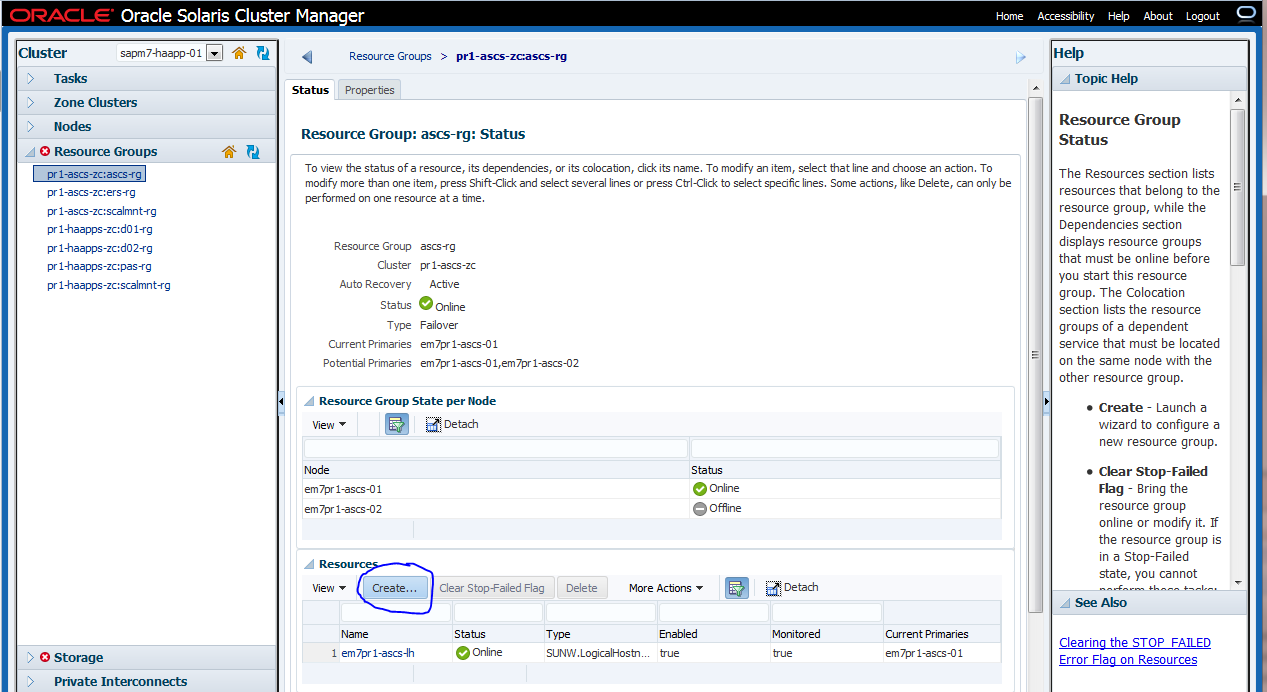
Figure 13. Under Resources, click Create to add a new logical hostname resource for ASCS.

Figure 14. Specify settings for the new resource in the resource group.
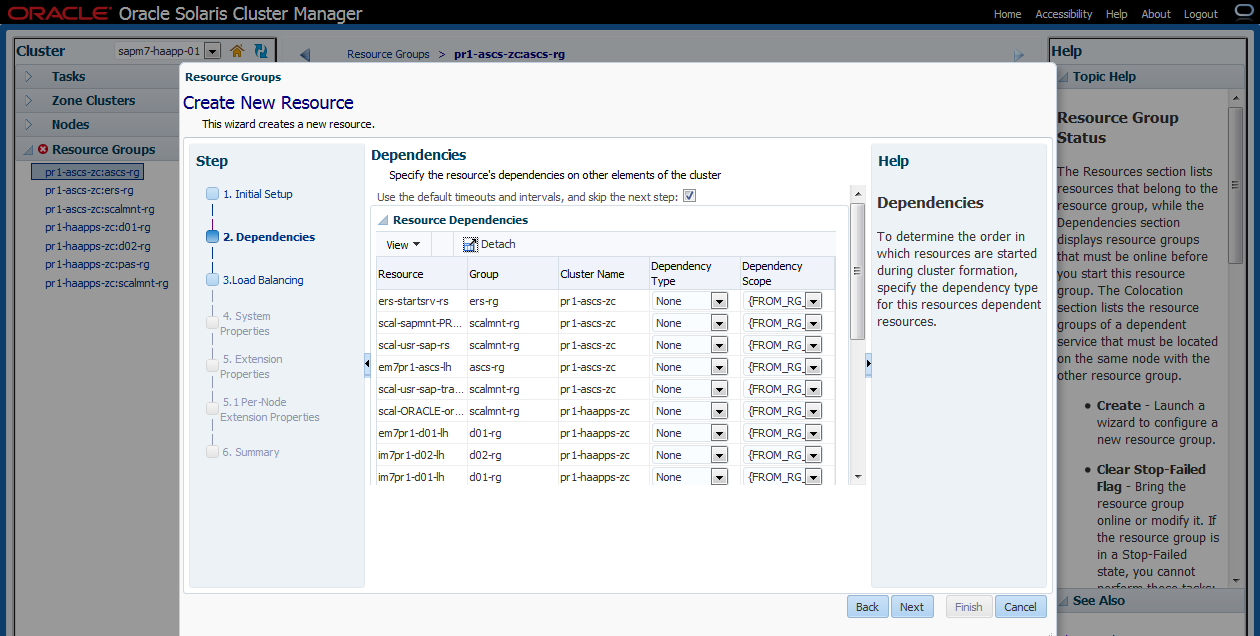
Figure 15. Specify dependencies for the resource.
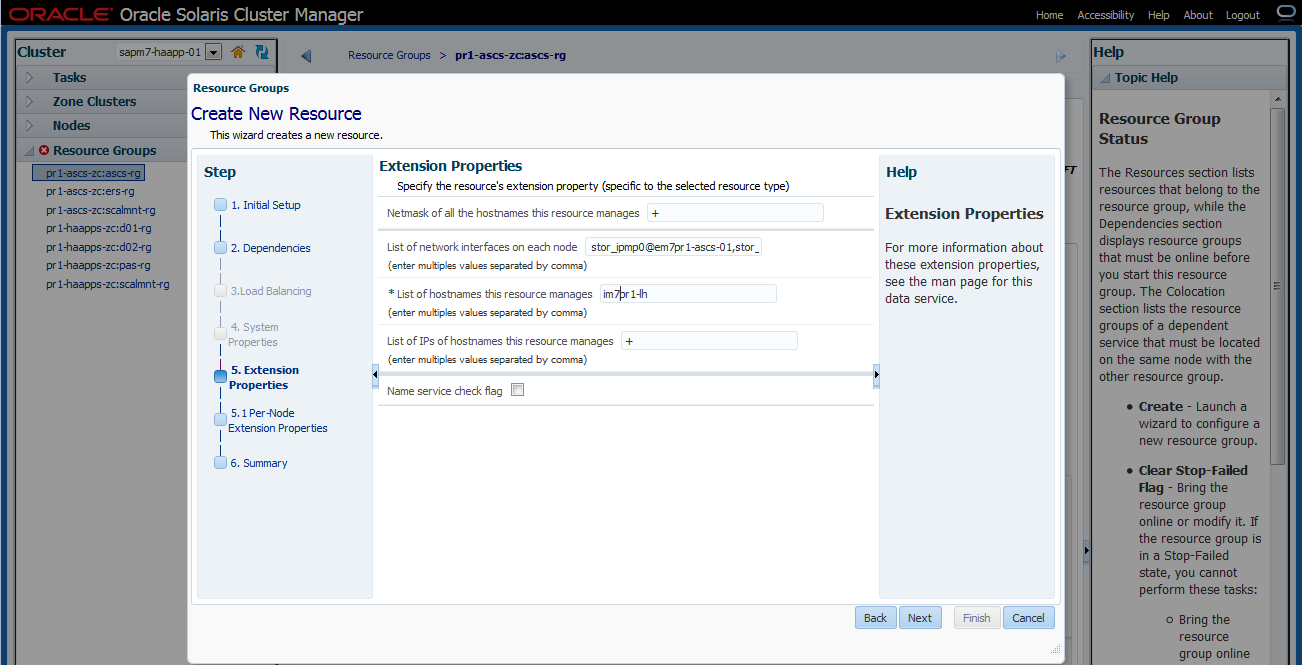
Figure 16. List the network interfaces on each node.

Figure 17. The logical hostname resources are created for the ASCS resource group.
Configure resource groups and logical hostnames as needed for the project, creating one resource group for every SAP component that needs to be managed by Oracle Solaris Cluster. In our project, we configured resource groups ascs-rg and ers-rg in zone cluster pr1-ascs-zc, along with resource groups pas-rg, d01-rg, and d02-rg in zone cluster pr1-haapps-zc, with corresponding logical hostnames.
Prepare the File Systems for SAP Component Installation
On Oracle SuperCluster, you have the option to allocate and configure storage on the internal Oracle ZFS Storage Appliance for SAP file systems such as /sapmnt, /usr/sap, and /usr/sap/trans. For Oracle SuperCluster M7, special care needs to be taken to understand I/O requirements for application file systems because the internal storage appliance is also used to provide root file systems for all Oracle VM Server for SPARC logical domains (LDOMs) and Oracle Solaris Zones. It is recommended to use an external Oracle ZFS Storage Appliance (connected via InfiniBand) for both SAP file systems and backup/recovery. Table 1 shows how local storage was configured in the example installation.
Table 1. Example Storage Appliance Configuration
| Head | Project | File System | Appliance Mount Point | Mounted from Zone |
| 1 | PR1 | sapbackup | /export/sapm7/PR1/sapbackup | sapm7zdbadm1c1 (192.168.30.51)
sapm7zdbadm1c2 (192.168.30.52) |
| 1 | PR1 | sapmnt | /export/sapm7/PR1/sapmnt | pr1-ascs-zc (192.168.30.21, 192.168.30.22)
pr1-haapps-zc (192.168.30.31, 192.168.30.32)
pr1-aas-01 (192.168.30.41)
pr1-aas-02 (192.168.30.42) |
| 1 | PR1 | stage | /export/sapm7/PR1/stage | sapm7zdbadm1c1 (192.168.30.51)
sapm7zdbadm1c2 (192.168.30.52) |
| 1 | PR1 | usr-sap | /export/sapm7/PR1/usr-sap | pr1-ascs-zc (192.168.30.21, 192.168.30.22) |
| 1 | PR1 | usr-sap-aas-01 | /export/sapm7/PR1/usr-sap-aas-01 | pr1-haapps-zc (192.168.30.31, 192.168.30.32) |
| 1 | PR1 | oracle | /export/sapm7/PR1/oracle | All + Database |
Configure Appliance NFS for Oracle Solaris Cluster HA Storage
The next series of steps create highly available Oracle Solaris Cluster storage for the file systems required for the SAP NetWeaver stack.
Step 1. Create mount points and configure /etc/vfstab.
In the example configuration, zone cluster nodes were created using Oracle Solaris Unified Archives from the source system, and each node had a /etc/vfstab file from the corresponding source node. In the Oracle SuperCluster M7 storage appliance heads, we created the same shares and projects as in the source Oracle ZFS Storage Appliance. For this reason, the content of the /etc/vfstab files requires only a simple host name substitution (Listing 1).
root@em7pr1-ascs-01:~# sed -e 's,izfssa-01,sapm7-h1-storIB,' -e 's,izfssa-02,\
sapm7-h2-storIB,' -e 's,sapt58,sapm7,' /etc/vfstab > /etc/vfstab.converted
root@em7pr1-ascs-01:~# mv /etc/vfstab /etc/vfstab.org
root@em7pr1-ascs-01:~# cp /etc/vfstab.converted /etc/vfstab
root@em7pr1-ascs-02:~# mv /etc/vfstab /etc/vfstab.org
root@em7pr1-ascs-02:~# scp root@em7pr1-ascs-01:/etc/vfstab /etc
Password:
vfstab 100% |*****************************| 1050 00:00
Listing 1: Configuring mounts by modifying /etc/vfstab files on both nodes.
Step 2. Set NFS exceptions in the critical projects.
Oracle Solaris Cluster can fence NFS mounts from nodes that are not active in the cluster (due to a cluster node failure, for example). Fencing prevents rogue processes from modifying or locking shared files, and releases file locks from fenced-out nodes, allowing for a quick restart of failed processes on a different node.
Each zone cluster needs to be added separately to the NFS exception list for each share. The list should contain IP addresses for the ASCS and HAAPP zone cluster nodes, along with those for the Oracle Database zones for the PR1 system.
root@em7pr1-ascs-01:~# l=""
root@em7pr1-ascs-01:~# for ip in `grep 192.168.28 /export/software/hosts | egrep \
"pr1|c1-" | egrep -v "\-lh|vip" | awk '{ print $1 }'`; do l="$l""@$ip/32:"; done
root@em7pr1-ascs-01:~# echo $l
@192.168.28.101/32:@192.168.28.102/32:@192.168.28.152/32:@192.168.28.153/32:
@192.168.28.154/32:@192.168.28.155/32:@192.168.28.160/32:@192.168.28.161/32:
Listing 2: Building an NFS exception list.
Copy the string output produced in Listing 2 and paste it into the commands shown in Listing 3, which are executed in each of the respective storage appliance heads. Note that the netmask is 32, so each IP address is treated individually. Each IP address should appear twice in the string (once for the root= property and once for rw= property):
# ssh root@sapm7-h1-storadm
Password:
Last login: Wed Jan 25 21:07:17 2017 from 10.129.112.124
sapm7-h1-storadm:> shares
sapm7-h1-storadm:shares> select PR1
sapm7-h1-storadm:shares PR1> set sharenfs="sec=sys,root=@192.168.28.101/32:@192.168.28.102/32:@192.168.28.152/32:\
@192.168.28.153/32:@192.168.28.154/32:@192.168.28.155/32:@192.168.28.160/32:\
@192.168.28.161/32,rw=@192.168.28.101/32:@192.168.28.102/32:@192.168.28.152/32:\
@192.168.28.153/32:@192.168.28.154/32:@192.168.28.155/32:@192.168.28.160/32:\
@192.168.28.161/32"
sharenfs = sec=sys,root=@192.168.28.101/32:@192.168.28.102/32:@192.168.28.152/32:
@192.168.28.153/32:@192.168.28.154/32:@192.168.28.155/32:@192.168.28.160/32:
@192.168.28.161/32,rw=@192.168.28.101/32:@192.168.28.102/32:@192.168.28.152/32:
@192.168.28.153/32:@192.168.28.154/32:@192.168.28.155/32:@192.168.28.160/32:
@192.168.28.161/32 (uncommitted)
sapm7-h1-storadm:shares PR1> commit
sapm7-h2-storadm:shares ORACLE> get sharenfs
sharenfs = sec=sys,root=@192.168.28.101/32:@192.168.28.105/32:@192.168.28.102/32:
@192.168.28.106/32,rw=@192.168.28.101/32:@192.168.28.105/32:@192.168.28.102/32:
@192.168.28.106/32
sapm7-h2-storadm:shares ORACLE> set sharenfs="sec=sys,root=@192.168.28.101/32:@192.168.28.105/32:@192.168.28.102/32:\
@192.168.28.106/32:@192.168.28.154/32:@192.168.28.155/32:@192.168.28.160/32:\
@192.168.28.161/32,rw=@192.168.28.101/32:@192.168.28.105/32:@192.168.28.102/32:\
@192.168.28.106/32:@192.168.28.154/32:@192.168.28.155/32:@192.168.28.160/32:\
@192.168.28.161/32"
sharenfs = sec=sys,root=@192.168.28.101/32:@192.168.28.105/32:@192.168.28.102/32:
@192.168.28.106/32:@192.168.28.154/32:@192.168.28.155/32:@192.168.28.160/32:
@192.168.28.161/32,rw=@192.168.28.101/32:@192.168.28.105/32:@192.168.28.102/32:
@192.168.28.106/32:@192.168.28.154/32:@192.168.28.155/32:@192.168.28.160/32:
@192.168.28.161/32 (uncommitted)
sapm7-h2-storadm:shares ORACLE> commit
sapm7-h2-storadm:shares ORACLE> done
sapm7-h2-storadm:shares> select TRANS
sapm7-h2-storadm:shares TRANS> set sharenfs="sec=sys,root=@192.168.28.101/32:@192.168.28.102/32:@192.168.28.152/32:\
@192.168.28.153/32:@192.168.28.154/32:@192.168.28.155/32:@192.168.28.160/32:\
@192.168.28.161/32,rw=@192.168.28.101/32:@192.168.28.102/32:@192.168.28.152/32:\
@192.168.28.153/32:@192.168.28.154/32:@192.168.28.155/32:@192.168.28.160/32:\
@192.168.28.161/32"
sharenfs = sec=sys,root=@192.168.28.101/32:@192.168.28.102/32:@192.168.28.152/32:
@192.168.28.153/32:@192.168.28.154/32:@192.168.28.155/32:@192.168.28.160/32:
@192.168.28.161/32,rw=@192.168.28.101/32:@192.168.28.102/32:@192.168.28.152/32:
@192.168.28.153/32:@192.168.28.154/32:@192.168.28.155/32:@192.168.28.160/32:
@192.168.28.161/32 (uncommitted)
sapm7-h2-storadm:shares TRANS> commit
Listing 3: Configuring the NFS exception list on the appliance heads.
Note: The CLI for the internal Oracle ZFS Storage Appliance heads can be reached using IB hostnames from any of the global and non-global zones within Oracle SuperCluster.
Step 3. Mount the file systems in both zone cluster nodes.
Because the zone cluster nodes were created using Unified Archives from the source system, each node inherited mount points from the corresponding source nodes, as shown in Listing 4.
root@em7pr1-ascs-01:~# ls /export/software /sapmnt/PR1 /usr/sap
/export/software:
/sapmnt/PR1:
/usr/sap:
root@em7pr1-ascs-01:~# mount /export/software
root@em7pr1-ascs-01:~# mount /sapmnt/PR1
root@em7pr1-ascs-01:~# mount /usr/sap
root@em7pr1-ascs-01:~# ls /usr/sap
root@em7pr1-ascs-01:~# mkdir /usr/sap/trans
root@em7pr1-ascs-01:~# mount /usr/sap/trans
root@em7pr1-ascs-01:~# df -h -F nfs
Filesystem Size Used Available Capacity Mounted on
sapm7-h2-storIB:/export/SOFTWARE/software
6.9T 22G 6.9T 1% /export/software
sapm7-h1-storIB:/export/sapm7/PR1/sapmnt
6.8T 31K 6.8T 1% /sapmnt/PR1
sapm7-h1-storIB:/export/sapm7/PR1/usr-sap
6.8T 32K 6.8T 1% /usr/sap
sapm7-h2-storIB:/export/sapm7/TRANS/trans
6.9T 31K 6.9T 1% /usr/sap/trans
root@em7pr1-ascs-02:~# mount /export/software
root@em7pr1-ascs-02:~# mount /sapmnt/PR1
root@em7pr1-ascs-02:~# mount /usr/sap
root@em7pr1-ascs-02:~# mount /usr/sap/trans
root@em7pr1-ascs-02:~# df -h -F nfs
Filesystem Size Used Available Capacity Mounted on
sapm7-h2-storIB:/export/SOFTWARE/software
6.9T 22G 6.9T 1% /export/software
sapm7-h1-storIB:/export/sapm7/PR1/sapmnt
6.8T 31K 6.8T 1% /sapmnt/PR1
sapm7-h1-storIB:/export/sapm7/PR1/usr-sap
6.8T 32K 6.8T 1% /usr/sap
sapm7-h2-storIB:/export/sapm7/TRANS/trans
6.9T 31K 6.9T 1% /usr/sap/trans
Listing 4: Mounting files systems on both zone cluster nodes.
Step 4. Configure the Oracle Solaris Cluster NFS workflow in the Oracle ZFS Storage Appliance.
Configure the Oracle Solaris Cluster NFS workflow in the storage appliance. Note that the workflow needs to be executed only in the first appliance head (Listing 5).
# ssh root@sapm7-h1-storadm
Password:
Last login: Wed Jan 25 21:07:17 2017 from 10.129.112.124
sapm7-h1-storadm:> maintenance workflows
sapm7-h1-storadm:maintenance workflows> ls
Properties:
showhidden = false
Workflows:
WORKFLOW NAME OWNER SETID ORIGIN VERSION
workflow-000 Clear locks root false Oracle Corporation 1.0.0
workflow-001 Configure for Oracle Solaris Cluster NFS root false Oracle Corporation 1.0.0
workflow-002 Unconfigure Oracle Solaris Cluster NFS root false Oracle Corporation 1.0.0
workflow-003 Configure for Oracle Enterprise Manager Monitoring root false Sun Microsystems, Inc. 1.1
workflow-004 Unconfigure Oracle Enterprise Manager Monitoring root false Sun Microsystems, Inc. 1.0
sapm7-h1-storadm:maintenance workflows> select workflow-001
sapm7-h1-storadm:maintenance workflow-001> execute
sapm7-h1-storadm:maintenance workflow-001 execute (uncommitted)> set password=welcome1
password = ********
sapm7-h1-storadm:maintenance workflow-001 execute (uncommitted)> set changePassword=false
changePassword = false
sapm7-h1-storadm:maintenance workflow-001 execute (uncommitted)> commit
OSC configuration successfully completed.
sapm7-h1-storadm:maintenance workflow-001> ls
Properties:
name = Configure for Oracle Solaris Cluster NFS
description = Sets up environment for Oracle Solaris Cluster NFS
uuid = 92ed26fa-1088-4d4b-ceca-ebad58fc42d7
checksum = 15f4188643d7add37b5ad8bda6d9b4e7210f1cd66cd890a73df176382e800aec
installdate = 2015-11-25 02:30:55
owner = root
origin = Oracle Corporation
setid = false
alert = false
version = 1.0.0
scheduled = false
sapm7-h1-storadm:> configuration users
sapm7-h1-storadm:configuration users> ls
Users:
NAME USERNAME UID TYPE
Super-User root 0 Loc
Oracle Solaris Cluster Agent osc_agent 2000000000 Loc
Listing 5: Configuring the Oracle Solaris Cluster NFS workflow in the appliance.
We can verify that the defined workflow executed successfully because the user osc_agent was created.
Step 5. Add a NAS device to each zone cluster.
At this point, we are ready to add the Oracle ZFS Storage Appliance as a NAS device for each zone cluster. Add the Oracle ZFS Storage Appliance to Oracle Solaris Cluster. On the Zone Clusters pane, select the zone cluster pr1-ascs-zc, and add the NAS device sapm7-h1-storIB to the zone cluster, as shown in Figure 18 through Figure 22.
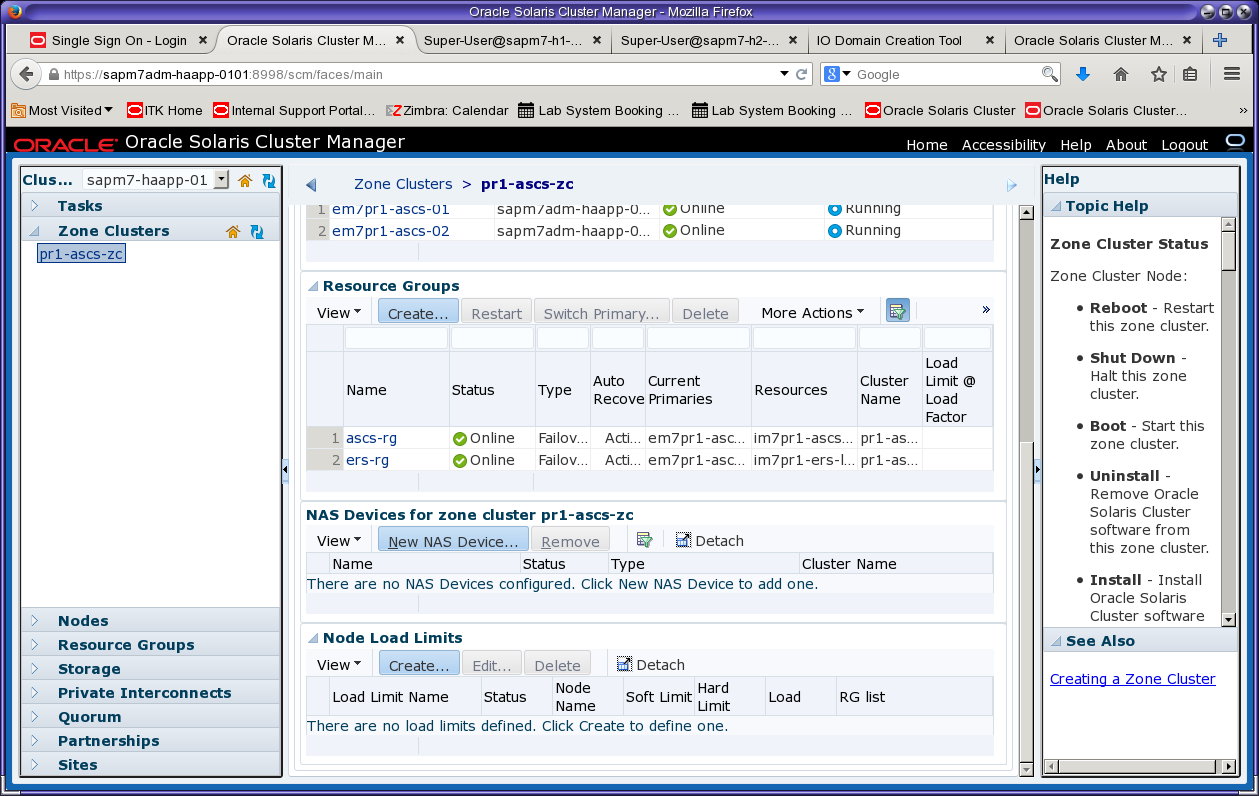
Figure 18. Select the zone cluster pr1-ascs-zc and click New NAS Device to add a device.
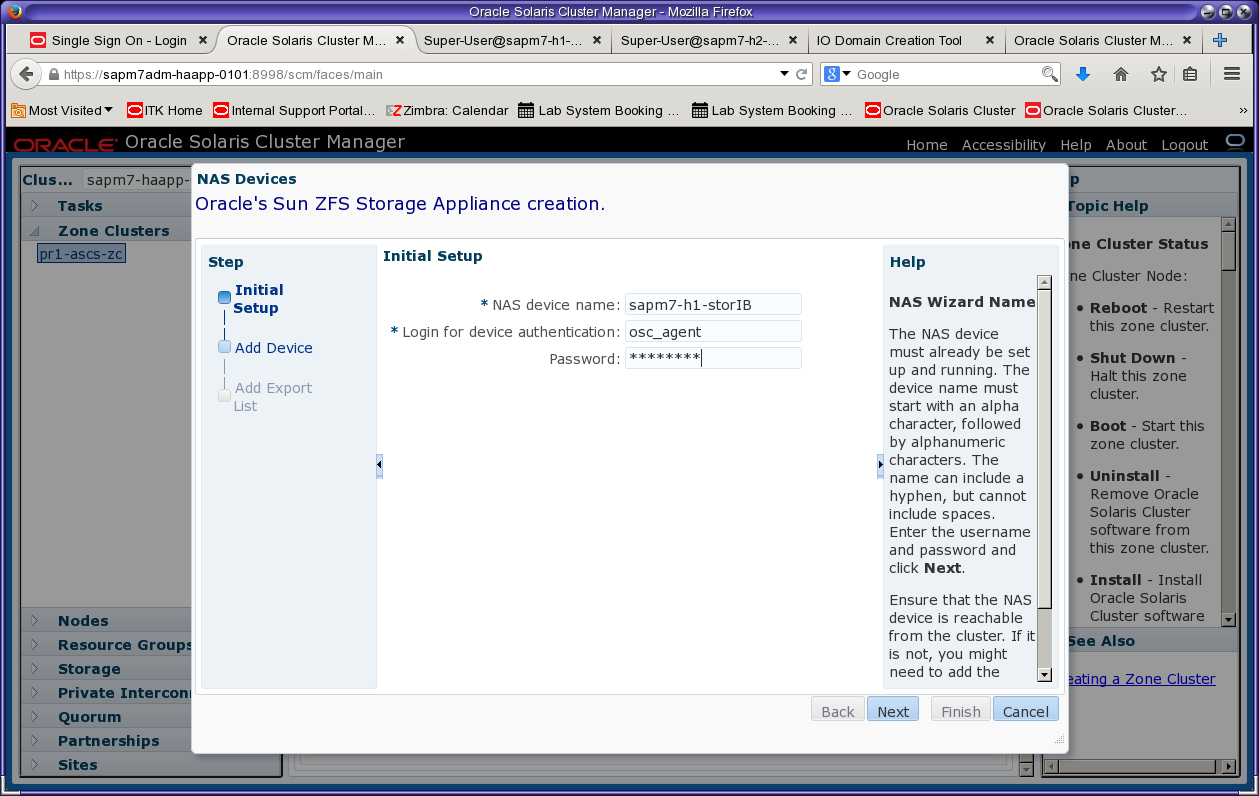
Figure 19. Specify the IB name of the appliance head and the workflow username and password from Step 4.
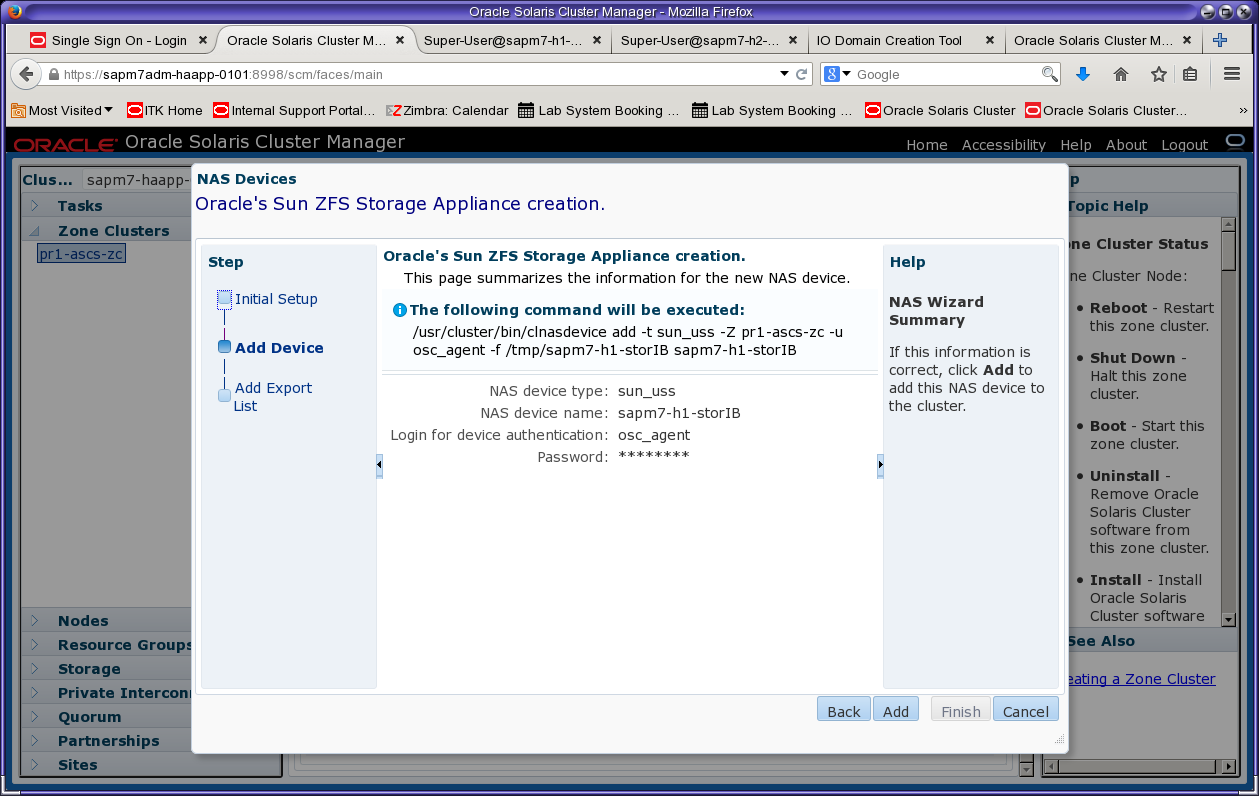
Figure 20. Review the summary and click Add.
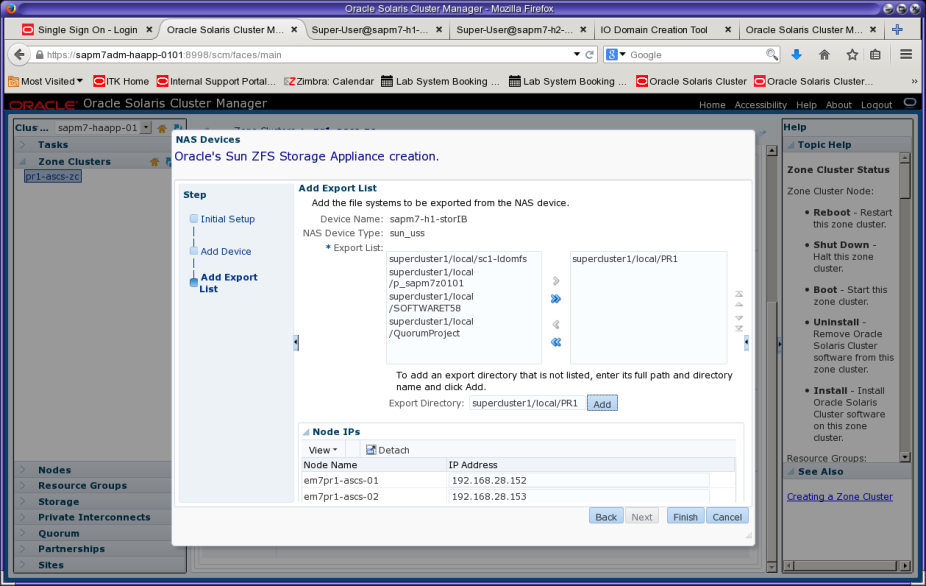
Figure 21. Validate the file system export list on the Oracle ZFS Storage Appliance head.
In some cases, the export list (Figure 21) will not contain all shared file systems. If this occurs, the export entries can be entered manually or later added as a property. A bug might not allow adding both IP addresses and shared exported file systems at the same time. For this reason, the PR1 project might not be discovered in the wizard (see bug "19982694 - listrwprojects client i/f not listing projects that have extra IPs"). To work around this problem, simply add the IP addresses first and then use Edit (on the Zone Clusters pane) to add the exported file systems.
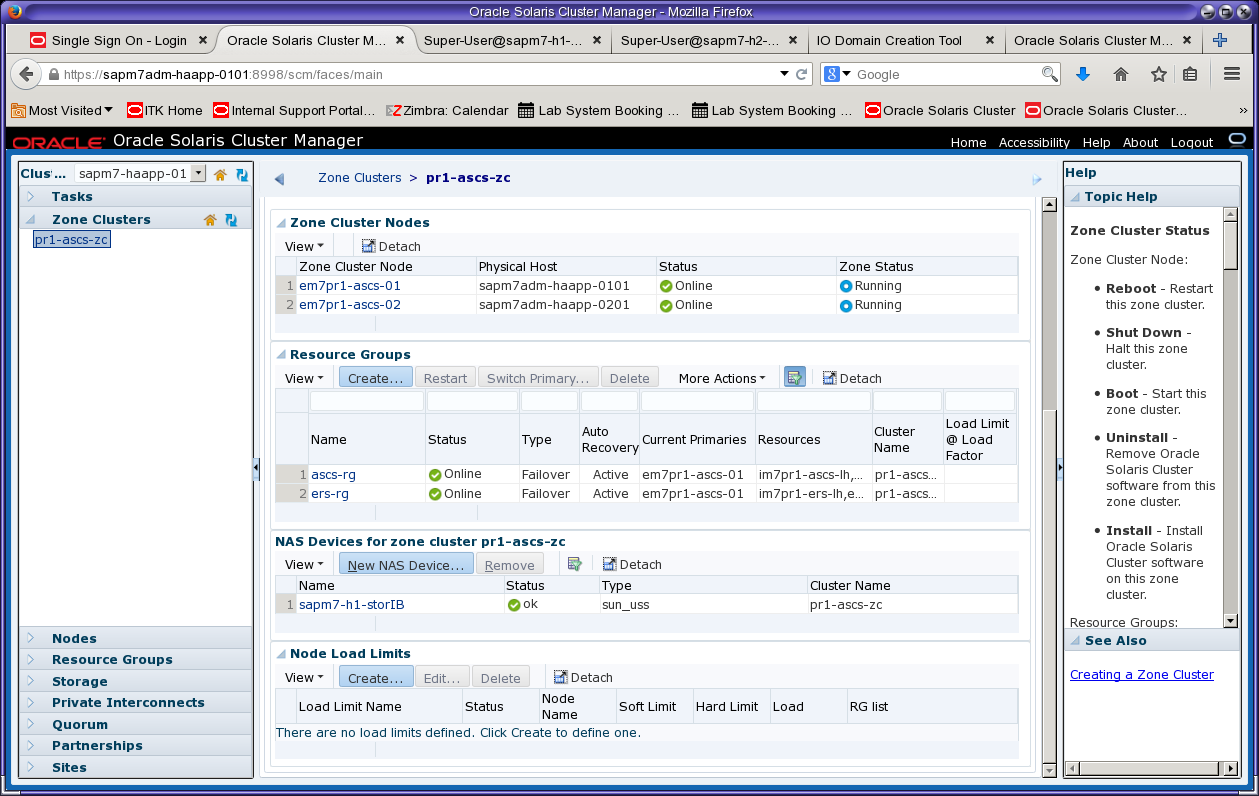
Figure 22. The wizard reports the status of the new NAS device as OK.
Step 6. Check the resulting NAS configuration.
Verify the NAS configuration:
root@em7pr1-ascs-01:~# clnas show -v -d all
=== NAS Devices ===
Nas Device: sapm7-h1-storIB
Type: sun_uss
userid: osc_agent
nodeIPs{em7pr1-ascs-02}: 192.168.28.153
nodeIPs{em7pr1-ascs-01}: 192.168.28.152
Project: supercluster1/local/PR1
File System: /export/sapm7/PR1/oracle
File System: /export/sapm7/PR1/sapbackup
File System: /export/sapm7/PR1/sapmnt
File System: /export/sapm7/PR1/stage
File System: /export/sapm7/PR1/usr-sap
File System: /export/sapm7/PR1/usr-sap-aas-01
File System: /export/sapm7/PR1/usr-sap-aas-02
File System: /export/sapm7/PR1/usr-sap-haapps
Listing 6: Checking the NAS configuration on an ASCS zone cluster node.
Step 7. Add the second storage appliance head.
The second Oracle ZFS Storage Appliance head can also be added using the wizard. The alternate method is to use these CLI commands:
root@em7pr1-ascs-01:~# clnas add -t sun_uss -p userid=osc_agent \
-p "nodeIPs{em7pr1-ascs-02}"=192.168.28.153 \
-p "nodeIPs{em7pr1-ascs-01}"=192.168.28.152 \
sapm7-h2-storIB
Enter password:
root@em7pr1-ascs-01:~# clnas find-dir sapm7-h2-storIB
=== NAS Devices ===
Nas Device: sapm7-h2-storIB
Type: sun_uss
Unconfigured Project: supercluster2/local/sc1-ldomfs
Unconfigured Project: supercluster2/local/p_sapm7z0201
Unconfigured Project: supercluster2/local/SOFTWARE
Listing 7: Adding the second storage appliance head to the ASCS zone cluster using CLI commands.
The TRANS and ORACLE projects might not be discovered because of a bug (see bug "19982694 - listrwprojects client i/f not listing projects that have extra IPs"). To work around this problem, add the exported file system for TRANS as shown in Listing 8 (only TRANS is used by the ASCS zone cluster).
root@em7pr1-ascs-01:~# clnas add-dir -d supercluster2/local/TRANS sapm7-h2-storIB
root@em7pr1-ascs-01:~# clnas show -v -d all
=== NAS Devices ===
Nas Device: sapm7-h1-storIB
Type: sun_uss
userid: osc_agent
nodeIPs{em7pr1-ascs-02}: 192.168.28.153
nodeIPs{em7pr1-ascs-01}: 192.168.28.152
Project: supercluster1/local/PR1
File System: /export/sapm7/PR1/oracle
File System: /export/sapm7/PR1/sapbackup
File System: /export/sapm7/PR1/sapmnt
File System: /export/sapm7/PR1/stage
File System: /export/sapm7/PR1/usr-sap
File System: /export/sapm7/PR1/usr-sap-aas-01
File System: /export/sapm7/PR1/usr-sap-aas-02
File System: /export/sapm7/PR1/usr-sap-haapps
Nas Device: sapm7-h2-storIB
Type: sun_uss
nodeIPs{em7pr1-ascs-01}: 192.168.28.152
nodeIPs{em7pr1-ascs-02}: 192.168.28.153
userid: osc_agent
Project: supercluster2/local/TRANS
File System: /export/sapm7/TRANS/trans
Listing 8: Adding the TRANS project to the second appliance head.
Step 8. Check prerequisites for NFS file systems.
Before creating storage resources for the NFS file systems, check that the desired file systems are mounted on both nodes:
root@em7pr1-ascs-01:~# df -h -F nfs
Filesystem Size Used Available Capacity Mounted on
sapm7-h2-storIB:/export/SOFTWARE/software
6.9T 22G 6.9T 1% /export/software
sapm7-h1-storIB:/export/sapm7/PR1/sapmnt
6.8T 42K 6.8T 1% /sapmnt/PR1
sapm7-h1-storIB:/export/sapm7/PR1/usr-sap
6.8T 43K 6.8T 1% /usr/sap
sapm7-h2-storIB:/export/sapm7/TRANS/trans
6.9T 42K 6.9T 1% /usr/sap/trans
root@em7pr1-ascs-02:~# df -h -F nfs
Filesystem Size Used Available Capacity Mounted on
sapm7-h2-storIB:/export/SOFTWARE/software
6.9T 22G 6.9T 1% /export/software
sapm7-h1-storIB:/export/sapm7/PR1/sapmnt
6.8T 42K 6.8T 1% /sapmnt/PR1
sapm7-h1-storIB:/export/sapm7/PR1/usr-sap
6.8T 43K 6.8T 1% /usr/sap
sapm7-h2-storIB:/export/sapm7/TRANS/trans
6.9T 42K 6.9T 1% /usr/sap/trans
Listing 9: Checking NFS mounts on both nodes.
In addition, check that the file systems to be managed by cluster resources have "no" defined as the mount option for mounting at boot time:
root@em7pr1-ascs-01:~# grep " no " /etc/vfstab
sapm7-h1-storIB:/export/sapm7/PR1/sapmnt - /sapmnt/PR1 nfs - no rw,bg,hard,rsize=32768,wsize=32768,proto=tcp,vers=3
sapm7-h1-storIB:/export/sapm7/PR1/usr-sap - /usr/sap nfs - no rw,bg,hard,rsize=32768,wsize=32768,proto=tcp,vers=3
sapm7-h2-storIB:/export/sapm7/TRANS/trans - /usr/sap/trans nfs - no rw,bg,hard,rsize=32768,wsize=32768,proto=tcp,vers=3
root@em7pr1-ascs-02:~# grep " no " /etc/vfstab
sapm7-h1-storIB:/export/sapm7/PR1/sapmnt - /sapmnt/PR1 nfs - no rw,bg,hard,rsize=32768,wsize=32768,proto=tcp,vers=3
sapm7-h1-storIB:/export/sapm7/PR1/usr-sap - /usr/sap nfs - no rw,bg,hard,rsize=32768,wsize=32768,proto=tcp,vers=3
sapm7-h2-storIB:/export/sapm7/TRANS/trans - /usr/sap/trans nfs - no rw,bg,hard,rsize=32768,wsize=32768,proto=tcp,vers=3
Listing 10: Checking NFS mount options on both nodes.
Confirm that the corresponding projects have been added (in the previous zone cluster NAS procedure):
root@em7pr1-ascs-01:~# clnas show -v -d all | grep Project
Project: supercluster1/local/PR1
Project: supercluster2/local/TRANS
Listing 11: Checking projects for the zone clusters.
Configuring a Highly Available Storage Resource Group
Using a highly available storage resource can improve the availability of SAP services. In an Oracle Solaris Cluster environment, the resource type ScalMountPoint enables access to highly available NFS file systems. (For information, see "Configuring Failover and Scalable Data Services on Shared File Systems" in the Oracle Solaris Cluster documentation.)
Figure 23 through Figure 31 show how to use the Oracle Solaris Cluster Manager browser interface to create a ScalMountPoint resource for the transport directory /usr/sap/trans. From the Tasks pane, select the Highly Available Storage wizard to begin creating the resource group and resources.
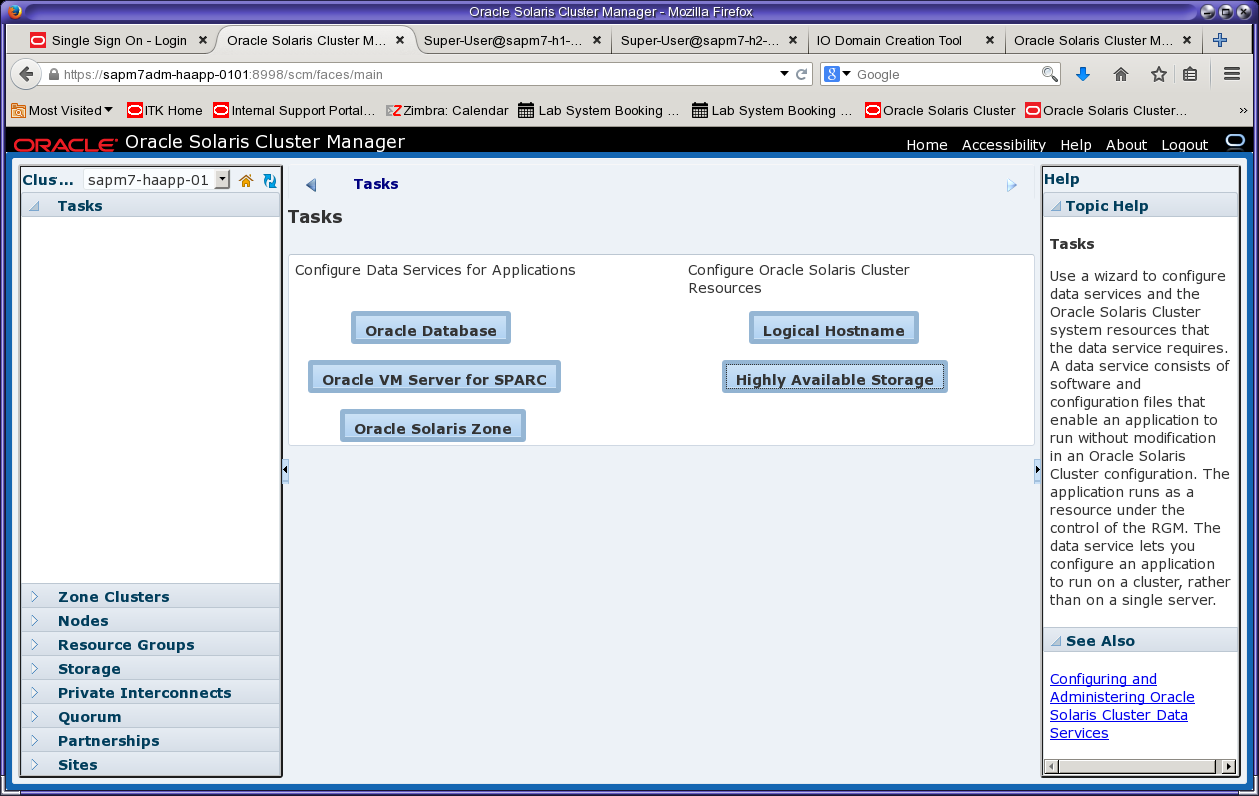
Figure 23. Select the Highly Available Storage wizard from the Tasks menu.
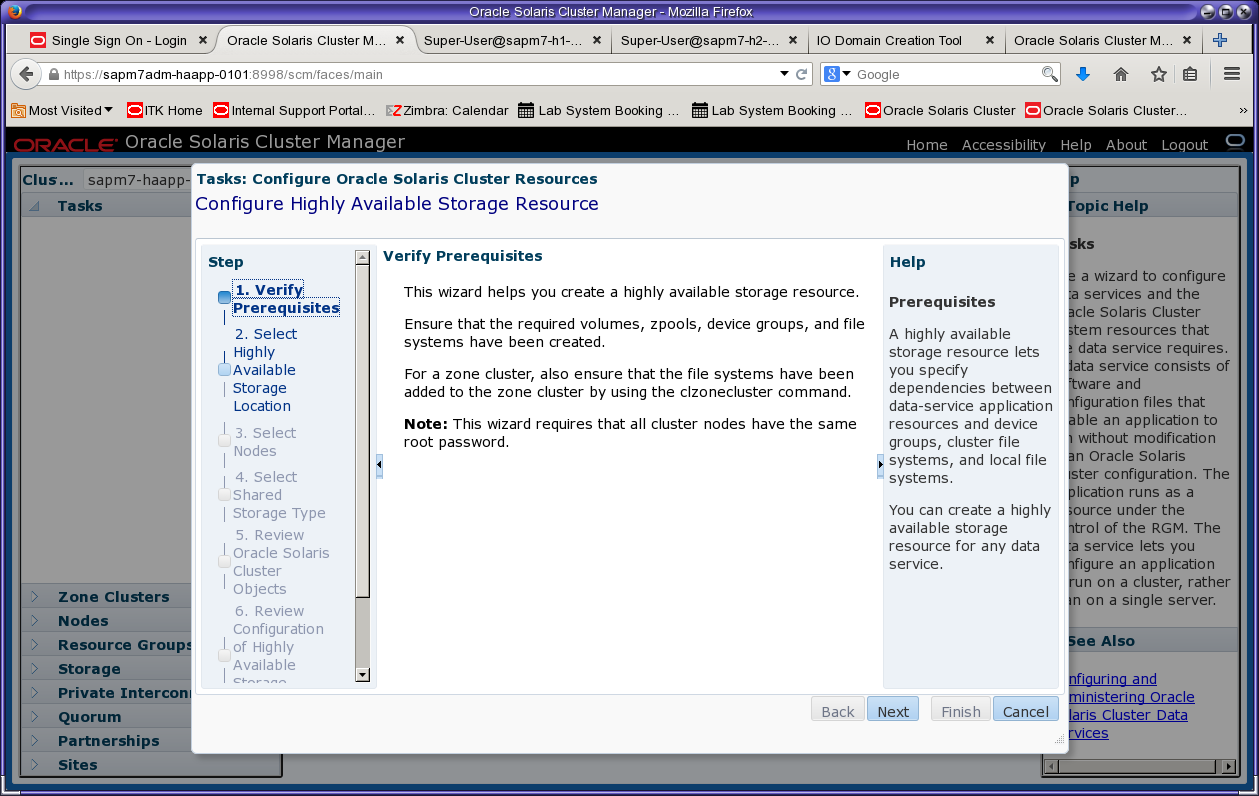
Figure 24. Review the prerequisites.
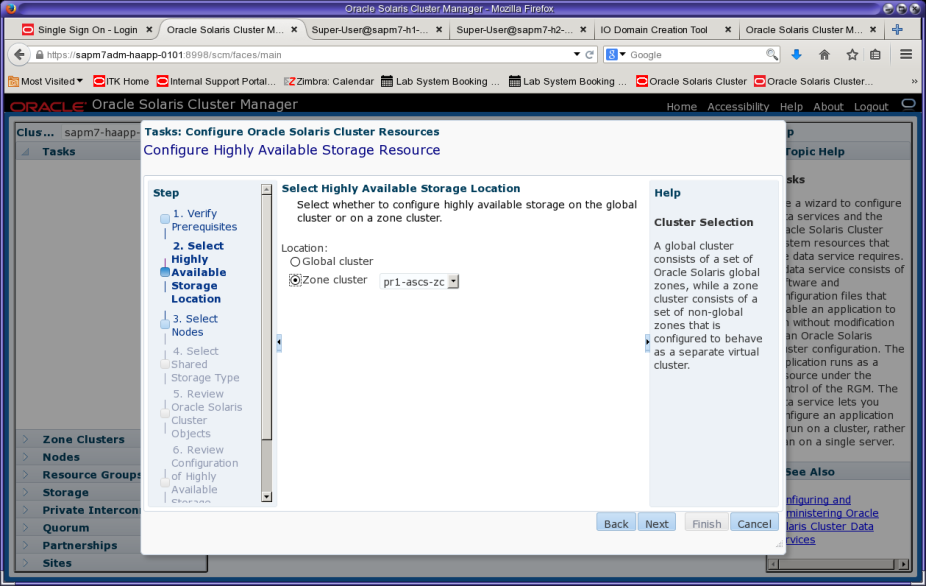
Figure 25. Specify the zone cluster for the storage resource.
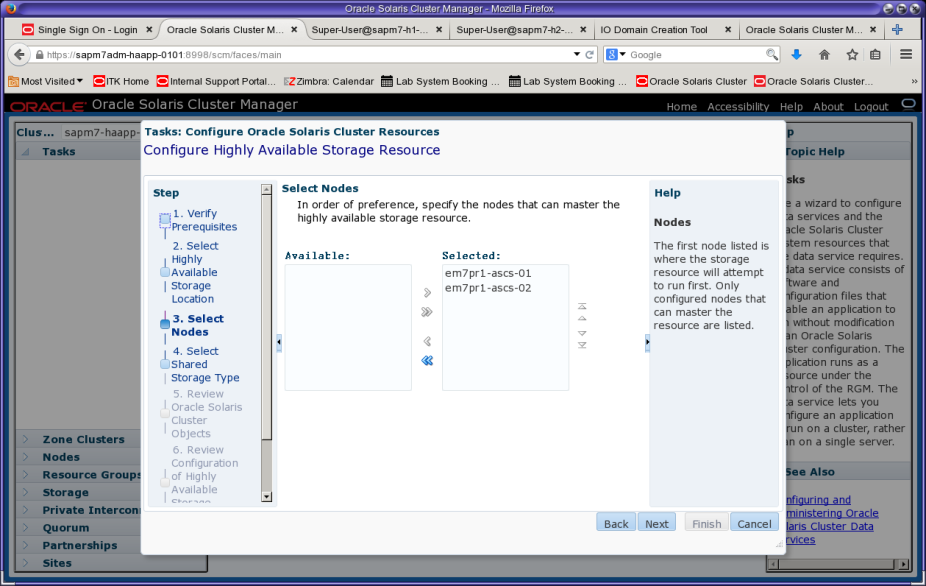
Figure 26. All cluster zones are preselected as zones that can master the HA storage resource.
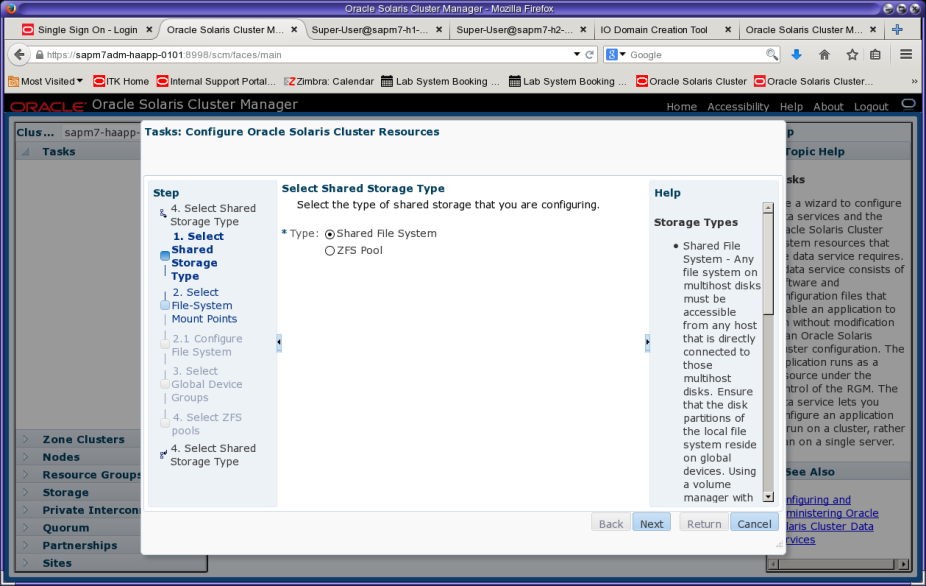
Figure 27. Select "Shared File System" as the shared storage type, which will be a ScalMountPoint type.
In selecting file system mount points (Figure 28), make sure to select all three rows using Crtl-left-click. Press the Return key to get to the next screen.
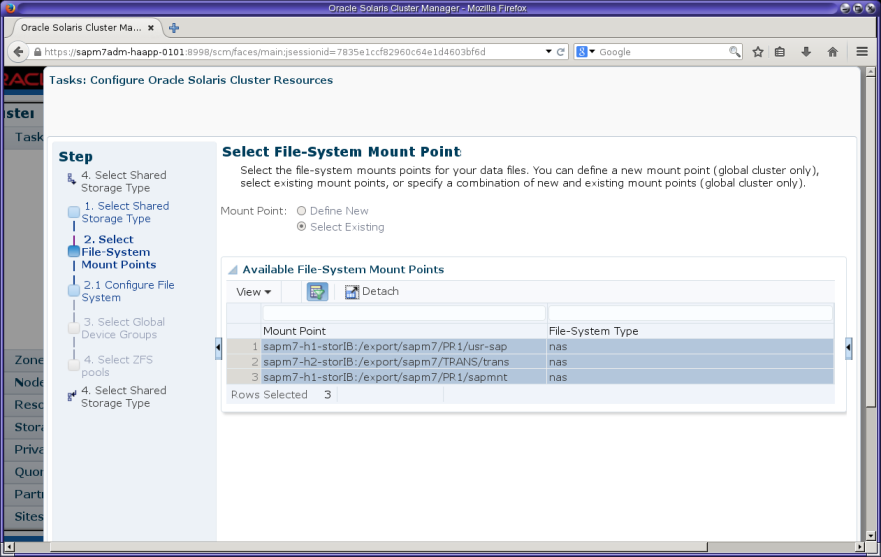
Figure 28. Select the mount points and press Return.
Before creating the Oracle Solaris Cluster resources, it is recommended to shorten the resource names (listed in the resource name column) by editing each name.
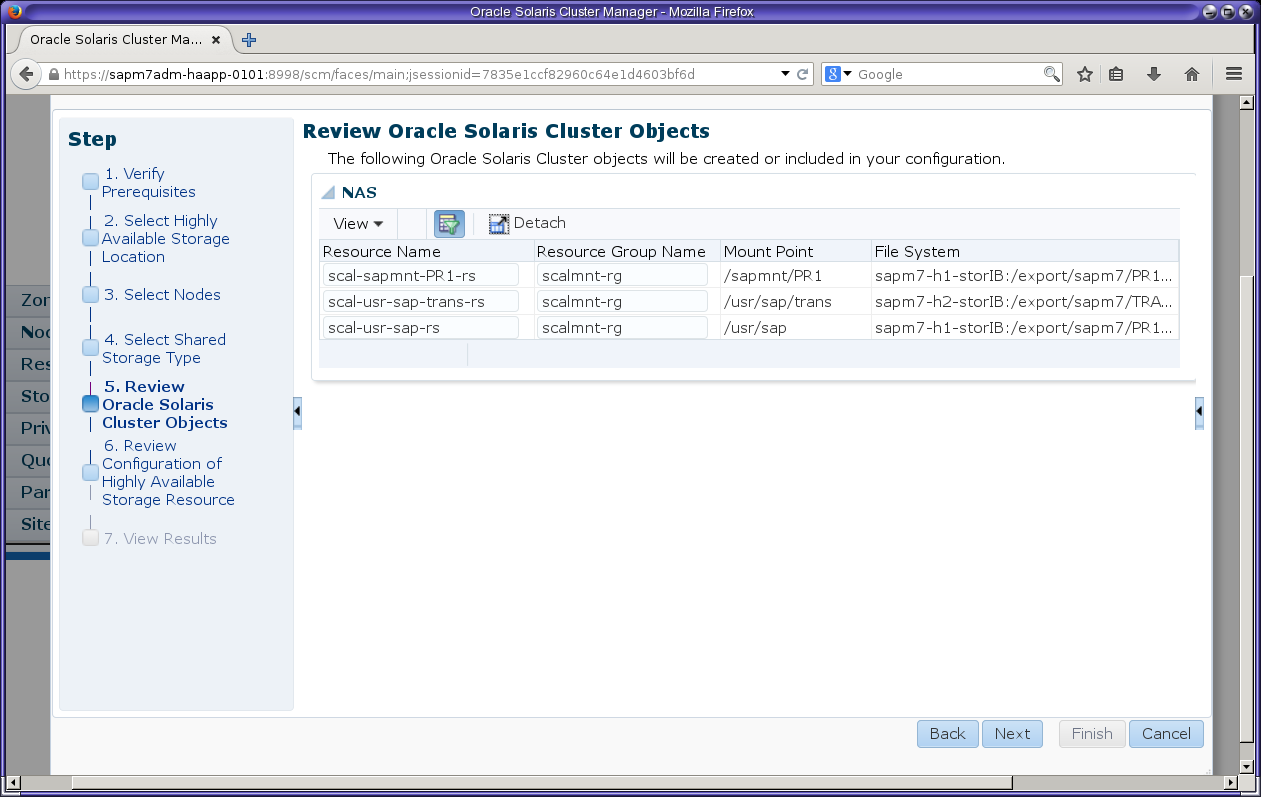
Figure 29. Review the settings for the ScalMountPoint resource.
Navigate to the resource scal-usr-sap-trans-rs and check that there is an offline restart resource dependency set on the scal-usr-sap-rs resource. This is because there is a nested mount point: /usr/sap/trans is mounted after /usr/sap is mounted. Setting this dependency enforces that order (the wizard automatically creates this dependency because it detects this relationship).
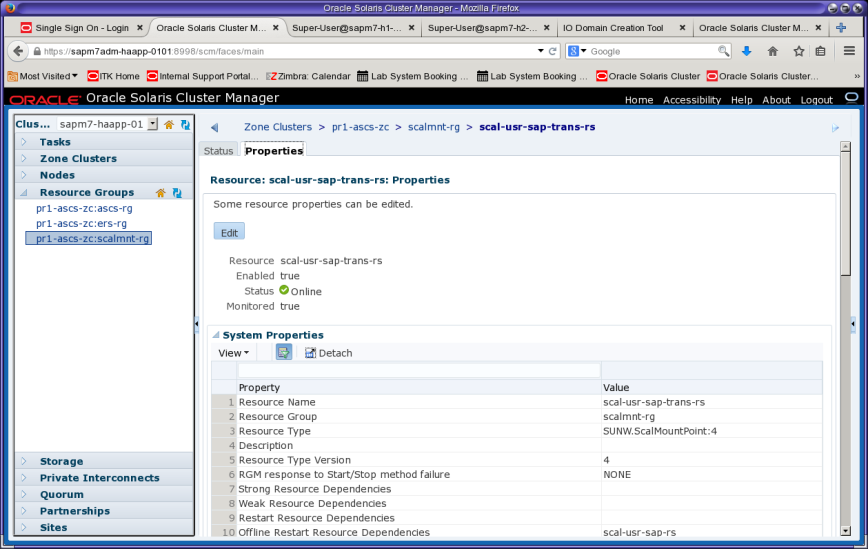
Figure 30. Check properties for scal-usr-sap-trans-rs.
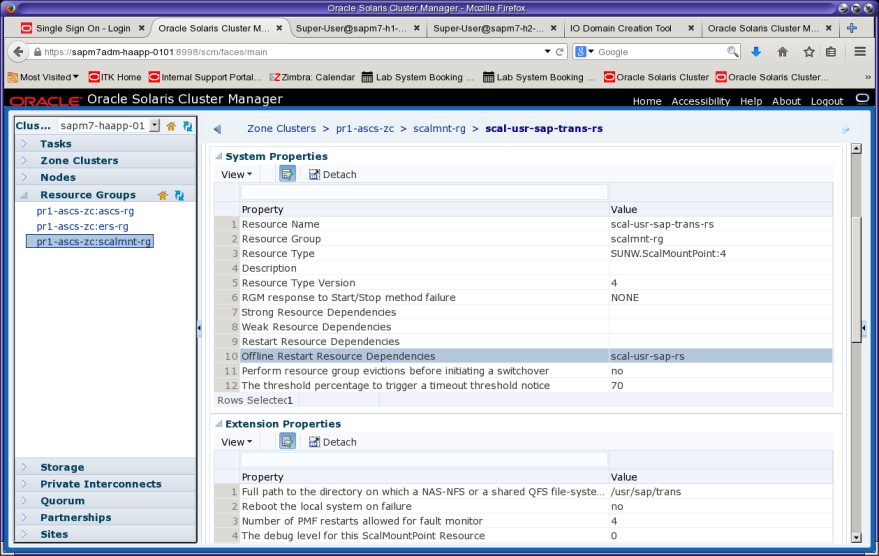
Figure 31. Verify the dependency for scal-usr-sap-trans-rs.
Creating Oracle Solaris Projects
Oracle Solaris projects can be created by following the instructions in SAP Note 724713 - Parameter Settings for Oracle Solaris 10 and above (access to SAP Notes requires logon and authentication to the SAP Marketplace). In the example installation, Oracle Solaris Zones were installed using Unified Archives. Thus, entries for the required projects were created during zone installation.
Verify that the file /etc/project has an entry for project user.root and an entry for project PR1 (the SAP SID) in the zone where the SAP application servers will be installed:
#**cat /etc/project**
system:0::::
user.root:1::::process.max-file-descriptor=(basic,65536,deny);process.max-sem-nsems=
(priv,4096,deny);project.max-sem-ids=(priv,2048,deny);project.max-shm-ids=
(priv,2048,deny);project.max-shm-memory=(priv,18446744073709551615,deny)
noproject:2::::
default:3::::
group.staff:10::::
PR1:700:SAP System PR1:pr1adm::process.max-file-descriptor=(basic,65536,deny);
process.max-sem-nsems=(priv,4096,deny);project.max-sem-ids=(priv,3072,deny);
project.max-shm-ids=(priv,2048,deny);project.max-shm-memory=(priv,18446744073709551615,deny)
Listing 12: Verifying project entries.
If Unified Archives were not used to install the zone, add the project values to /etc/project manually. Project entries are not required for installing (A)SCS and ERS.
Verifying Zone Cluster Operation
This section provides steps to validate that the zone clusters operate properly when the status of a node changes from up or down.
Validate the operation of the first zone cluster node. First check the initial state of the zone cluster resource groups and the sharenfs parameters of the PR1 and TRANS projects on the Oracle ZFS Storage Appliance:
root@em7pr1-ascs-02:~# clrg status
=== Cluster Resource Groups ===
Group Name Node Name Suspended Status
---------- --------- --------- ------
ascs-rg em7pr1-ascs-01 No Online
em7pr1-ascs-02 No Offline
ers-rg em7pr1-ascs-01 No Online
em7pr1-ascs-02 No Offline
scalmnt-rg em7pr1-ascs-01 No Online
em7pr1-ascs-02 No Online
sapm7-h1-storadm:shares PR1> get sharenfs
sharenfs = sec=sys,root=@192.168.28.101/32:@192.168.28.102/32:@192.168.28.152/32:@192.168.28.153/32:
@192.168.28.154/32:@192.168.28.155/32:@192.168.28.160/32:@192.168.28.161/32,
rw=@192.168.28.101/32:@192.168.28.102/32:@192.168.28.152/32:@192.168.28.153/32:
@192.168.28.154/32:@192.168.28.155/32:@192.168.28.160/32:@192.168.28.161/32
sapm7-h2-storadm:shares TRANS> get sharenfs
sharenfs = sec=sys,root=@192.168.28.101/32:@192.168.28.102/32:@192.168.28.152/32:@192.168.28.153/32:
@192.168.28.154/32:@192.168.28.155/32:@192.168.28.160/32:@192.168.28.161/32,
rw=@192.168.28.101/32:@192.168.28.102/32:@192.168.28.152/32:@192.168.28.153/32:
@192.168.28.154/32:@192.168.28.155/32:@192.168.28.160/32:@192.168.28.161/32
Listing 13: Checking initial status.
In a terminal window on node 2, observe syslog messages:
root@sapm7adm-haapp-0201:~# tail -f /var/adm/messages | \
egrep "Success|died|joined|RG_OFFLINE|RG_ONLINE"
Listing 14: Monitoring syslog messages on node 2.
Manually fail the first zone cluster node (Listing 15).
root@em7pr1-ascs-01:~# date; uadmin 1 0
Fri Mar 11 14:58:01 PST 2016
uadmin: can't turn off auditd
[Connection to zone 'pr1-ascs-zc' pts/2 closed]
Listing 15: Forcing the failure of the ASCS zone cluster node.
As shown in the syslog output (Listing 16), both resource groups ascs-rg and ers-rg fail over to node 2. As a result, the status of these groups changes to RG_OFFLINE on node1 and RG_ONLINE on node 2:
Mar 11 14:58:36 sapm7adm-haapp-0201 {fence=Success., 0={message=Success., name=supercluster2/local/TRANS}}
Mar 11 14:58:36 sapm7adm-haapp-0201 {fence=Success., 0={message=Success., name=supercluster1/local/PR1}}
Mar 11 14:58:37 sapm7adm-haapp-0201 cl_runtime: [ID 848921 kern.notice] NOTICE: Membership: Node 'em7pr1-ascs-01' (node id 2) of cluster 'pr1-ascs-zc' died.
Mar 11 14:58:37 sapm7adm-haapp-0201 Cluster.RGM.pr1-ascs-zc.rgmd: [ID 529407 daemon.notice] resource group scalmnt-rg state on node em7pr1-ascs-01 change to RG_OFFLINE
Mar 11 14:58:37 sapm7adm-haapp-0201 Cluster.RGM.pr1-ascs-zc.rgmd: [ID 529407 daemon.notice] resource group ers-rg state on node em7pr1-ascs-01 change to RG_OFFLINE
Mar 11 14:58:37 sapm7adm-haapp-0201 Cluster.RGM.pr1-ascs-zc.rgmd: [ID 529407 daemon.notice] resource group ascs-rg state on node em7pr1-ascs-01 change to RG_OFFLINE
Mar 11 14:58:38 sapm7adm-haapp-0201 Cluster.RGM.pr1-ascs-zc.rgmd: [ID 529407 daemon.notice] resource group ers-rg state on node em7pr1-ascs-02 change to RG_ONLINE
Mar 11 14:58:39 sapm7adm-haapp-0201 Cluster.RGM.pr1-ascs-zc.rgmd: [ID 529407 daemon.notice] resource group ascs-rg state on node em7pr1-ascs-02 change to RG_ONLINE
Listing 16: Observing resource group failover.
Check the NFS export status of the PR1 and TRANS projects. Note that the command must be entered twice because the first time it uses the previously cached value. The status of ro=@192.168.28.152/32 means that the first zone cluster node has been fenced off for NFS write access (and that IP address has been removed from the rw list).
sapm7-h1-storadm:shares PR1> **get sharenfs**
sharenfs = sec=sys,root=@192.168.28.101/32:@192.168.28.102/32:@192.168.28.152/32:
@192.168.28.153/32:@192.168.28.154/32:@192.168.28.155/32:@192.168.28.160/32:
@192.168.28.161/32,rw=@192.168.28.101/32:@192.168.28.102/32:@192.168.28.152/32:
@192.168.28.153/32:@192.168.28.154/32:@192.168.28.155/32:@192.168.28.160/32:
@192.168.28.161/32
sapm7-h1-storadm:shares PR1> **get sharenfs**
sharenfs = sec=sys,root=@192.168.28.101/32:@192.168.28.102/32:@192.168.28.152/32:
@192.168.28.153/32:@192.168.28.154/32:@192.168.28.155/32:@192.168.28.160/32:
@192.168.28.161/32,ro=@192.168.28.152/32,rw=@192.168.28.101/32:@192.168.28.102/32:
@192.168.28.153/32:@192.168.28.154/32:@192.168.28.155/32:@192.168.28.160/32:
@192.168.28.161/32
Listing 17: Observing NFS export status of PR1 and TRANS projects (appliance head 1).
sapm7-h2-storadm:shares TRANS> **get sharenfs**
sharenfs = sec=sys,root=@192.168.28.101/32:@192.168.28.102/32:@192.168.28.152/32:
@192.168.28.153/32:@192.168.28.154/32:@192.168.28.155/32:@192.168.28.160/32:
@192.168.28.161/32,rw=@192.168.28.101/32:@192.168.28.102/32:@192.168.28.152/32:
@192.168.28.153/32:@192.168.28.154/32:@192.168.28.155/32:@192.168.28.160/32:
@192.168.28.161/32
sapm7-h2-storadm:shares TRANS> **get sharenfs**
sharenfs = sec=sys,root=@192.168.28.101/32:@192.168.28.102/32:@192.168.28.152/32:
@192.168.28.153/32:@192.168.28.154/32:@192.168.28.155/32:@192.168.28.160/32:
@192.168.28.161/32,ro=@192.168.28.152/32,rw=@192.168.28.101/32:@192.168.28.102/32:
@192.168.28.153/32:@192.168.28.154/32:@192.168.28.155/32:@192.168.28.160/32:
@192.168.28.161/32
Listing 18: Observing NFS export status of PR1 and TRANS projects (appliance head 2).
root@em7pr1-ascs-02:~# clrg status
=== Cluster Resource Groups ===
Group Name Node Name Suspended Status
---------- --------- --------- ------
ascs-rg em7pr1-ascs-01 No Offline
em7pr1-ascs-02 No Online
ers-rg em7pr1-ascs-01 No Offline
em7pr1-ascs-02 No Online
scalmnt-rg em7pr1-ascs-01 No Offline
em7pr1-ascs-02 No Online
Listing 19: Checking status.
Reboot the first node:
root@sapm7adm-haapp-0101:~# clzc boot -n sapm7adm-haapp-0101 pr1-ascs-zc
Waiting for zone boot commands to complete on all the nodes of the zone cluster "pr1-ascs-zc"...
Listing 20: Rebooting node 1.
Check the syslog messages and recheck the NFS export status of the PR1 and TRANS projects. The IP address 192.168.28.152/32 should now appear in the rw list and is no longer in the ro list:
Mar 11 15:02:46 sapm7adm-haapp-0201 {0={message=Success., name=supercluster2/local/TRANS}}
Mar 11 15:02:46 sapm7adm-haapp-0201 {0={message=Success., name=supercluster1/local/PR1}}
Mar 11 15:02:47 sapm7adm-haapp-0201 cl_runtime: [ID 564910 kern.notice] NOTICE: Membership: Node 'em7pr1-ascs-01' (node id 2) of cluster 'pr1-ascs-zc' joined.
Mar 11 15:02:47 sapm7adm-haapp-0201 Cluster.RGM.pr1-ascs-zc.rgmd: [ID 529407 daemon.notice] resource group scalmnt-rg state on node em7pr1-ascs-01 change to RG_OFFLINE
Mar 11 15:02:47 sapm7adm-haapp-0201 Cluster.RGM.pr1-ascs-zc.rgmd: [ID 529407 daemon.notice] resource group ers-rg state on node em7pr1-ascs-01 change to RG_OFFLINE
Mar 11 15:02:47 sapm7adm-haapp-0201 Cluster.RGM.pr1-ascs-zc.rgmd: [ID 529407 daemon.notice] resource group ascs-rg state on node em7pr1-ascs-01 change to RG_OFFLINE
Mar 11 15:03:03 sapm7adm-haapp-0201 Cluster.RGM.pr1-ascs-zc.rgmd: [ID 529407 daemon.notice] resource group scalmnt-rg state on node em7pr1-ascs-01 change to RG_ONLINE
sapm7-h1-storadm:shares PR1> **get sharenfs**
sharenfs = sec=sys,root=@192.168.28.101/32:@192.168.28.102/32:@192.168.28.152/32:\
@192.168.28.153/32:@192.168.28.154/32:@192.168.28.155/32:@192.168.28.160/32:
@192.168.28.161/32,ro=@192.168.28.152/32,rw=@192.168.28.101/32:@192.168.28.102/32:
@192.168.28.153/32:@192.168.28.154/32:@192.168.28.155/32:@192.168.28.160/32:
@192.168.28.161/32
sapm7-h1-storadm:shares PR1> **get sharenfs**
sharenfs = sec=sys,root=@192.168.28.101/32:@192.168.28.102/32:@192.168.28.152/32:
@192.168.28.153/32:@192.168.28.154/32:@192.168.28.155/32:@192.168.28.160/32:
@192.168.28.161/32,rw=@192.168.28.152/32:@192.168.28.101/32:@192.168.28.102/32:
@192.168.28.153/32:@192.168.28.154/32:@192.168.28.155/32:@192.168.28.160/32:
@192.168.28.161/32
sapm7-h2-storadm:shares TRANS> **get sharenfs**
sharenfs = sec=sys,root=@192.168.28.101/32:@192.168.28.102/32:@192.168.28.152/32:
@192.168.28.153/32:@192.168.28.154/32:@192.168.28.155/32:@192.168.28.160/32:
@192.168.28.161/32,