Best Of
NetSuite Admin Tip | Narrative Insights on Reports and Records (NetSuite 2026.1)

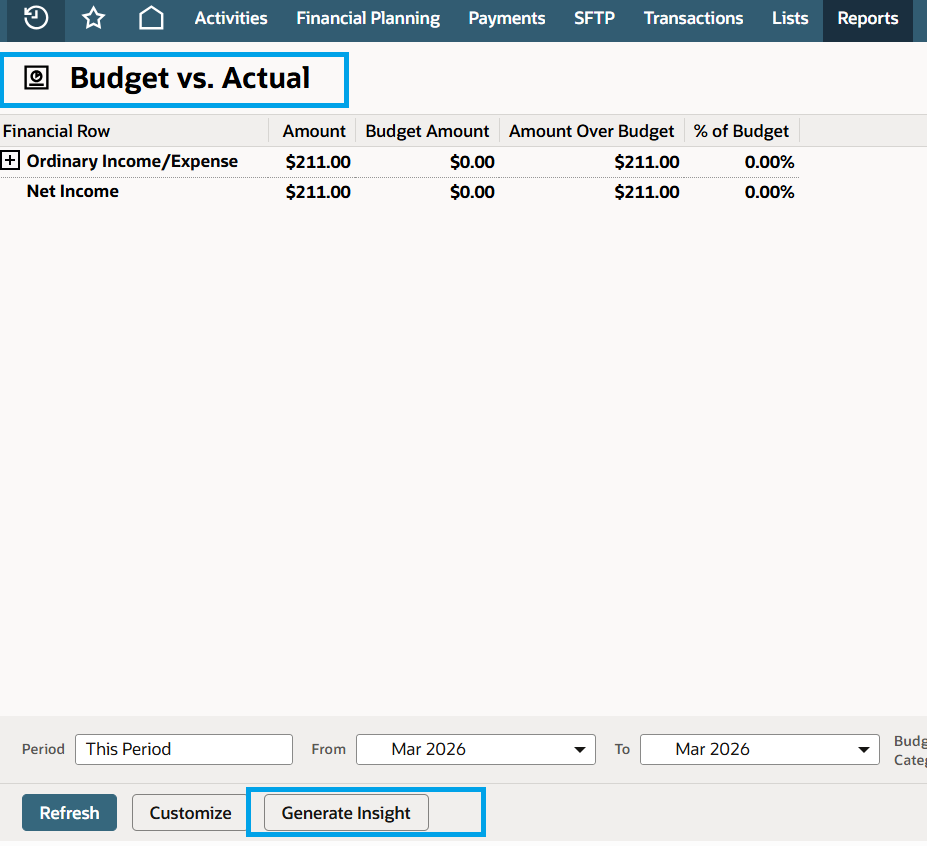
NetSuite 2026.1 introduces Narrative Insights, AI-generated summaries for certain reports and records. These summaries help users quickly interpret results and highlight trends, risks, and opportunities without manually reading and summarizing large datasets.
How Users Access It:
Where supported, users can generate a summary by selecting Generate Insight on eligible reports or records. ( Note: Narrative Insights is available only in supported locations and languages. )
What Administrators Need to Know (Controls & Governance)
- Enabled by default: Narrative Insights will be on after upgrading to 2026.1.
- Admin control: Users with the Administrator role can disable Narrative Insights if needed.
- When it’s enabled by default, admins should proactively decide:
- Whether the feature aligns with your organization’s close, audit, and reporting policies
- Which teams should use it (and in what contexts)
- Whether any internal guidance/training is needed before broad adoption
Important Reminder (Risk & Accuracy)
Narrative Insights is AI-generated. Users should validate the summary by reviewing the underlying data before relying on it for decisions, audit support, or executive reporting. Consider communicating a standard disclaimer to finance/reporting users (e.g., “use as a starting point; verify details in the source report/record”).
For more information about Narrative Insights, you may check SuiteAnswers ID: 1024893 | Narrative Insights Overview.
We are eager to hear your feedback! Share your insights or experiences in the comments or start a discussion in the NetSuite Admin Corner. Let us keep the learning going!

Re: Failed Withholding Tax processing
Hello @TEN
Will you please click on 'Related Records' and edit the payment for this transaction? (It shows as paid)
Edit the payment and then 'unapply' the payment for this invoice. The Invoice will now be Open.
Now Add your Withholding taxes. Save the record.
Once you have saved it with the taxes and items, you can apply your payment to the invoice again.
I hope this helps!

Re: CSV import the Disposal Date
Hi @Karen See
Since you are referring to this search, the values generated are captured on the Asset Record. However, we confirmed that these values cannot currently be updated through the UI. After further testing and investigation, I confirmed that this is a current system limitation covered under Enhancement 237902: “Fixed Assets > Asset Sale/Disposal tab > Ability to edit the fields on this tab.
As a workaround:
User has to "undo" the Disposal of the Asset and Dispose it again with the correct date.
- Edit the Asset Record by changing the following fields:
- Asset Status - set it from Disposed to Depreciating.
- Current Net Book Value – from 0.00 to its actual amount prior to disposal.
- Cumulative Depreciation – actual amount prior to disposal
- Quantity – from zero to its actual quantity prior to disposal.
- Delete the Posting Transaction created by the Disposal i.e., the Journal Entry (User can check this in the Asset Record > Depreciation History Tab).
- Delete the Depreciation History Record (User can check this in the Asset Record > Depreciation History Tab).
- Dispose the Asset under Fixed Assets > Transactions > Asset Disposal, this time with the correct Disposal Date.
You may disregard the workaround if this does not work for you. You can go to SuiteIdeas page to vote for the enhancement.
Apologies for the inconvenience this limitation may be causing you but I hope this helps clarify your concern.
Thanks and regards,
Ayie
Re: SuiteScript, is there a way that I can have submitFields() not trigger other record scripts?
Solved! There is an undocumented option you can use for submitFields() called disableTriggers
record.submitFields({

type: so.type,

id: so.id,

values,

options: { enableSourcing: false, ignoreMandatoryFields: true, disableTriggers: true }

});
 Dext3r
SCS/SCA/SiteBuilder > Reports > Shoppers' Login > Display IP address
To enhance your site's security, you may occasionally need to monitor the IP addresses associated with customer logins. This allows you to identify suspicious patterns or unauthorized access attempts.
Follow these steps to view shopper IP logs:
- In NetSuite UI, go to Setup > Users/Roles > View Login Audit Trail
- Set Use Advanced Search Checkbox = T
- Under Criteria Tab > Standard Subtab, set Filter to Customer Fields…
- Select Internal ID for the Customer Filter
- Set Internal ID Condition to ‘any of’
- Click the Select Multiple Button
- Add IDs
- Click Set
- Click Add on the Filter
- Click Click Submit

Re: NetSuite Admin Tips: Tracking the Construction in Progress (CIP) in Fixed Asset Management
Hey Katrina,
Thanks for your tip.
I followed your flow but I have a problem with it.
When I propose the assets to the CIP Asset Type, a unique AL is chosen, when I do the Asset Transfer to the new Asset Type, the AL changes by the system to the new Asset Type AL by default.
How can I ignore this AL's change? I want to keep the AL from the CIP Asset type.
Thank!
 Yisgav
Re: Workflow on WMS Mobile
Hey @User_K51C7,
Until now, we were able to modify the SCM Mobile processing only via script. I can't recall seeing any modification options via Workflow per the official SCM Mobile customization guide.

Re: UPN or UID or GUID
Hello @User_A5D7F,
If the context is about SAML configuration, then no, SuiteProjects Pro SAML SSO is not strictly “UPN only.”
What it actually requires is a unique user identifier mapped in the SAML assertion, and that is typically the SuiteProjects Pro User ID (Employee ID), not necessarily Azure AD UPN.
The required identifier is: NameID or user_nickname in which these will map to the SuiteProjects Pro User ID.
Note: If your IdP (like Entra ID/Azure AD) uses NameID internally as a transient/session identifier, Oracle recommends sending the actual SuiteProjects Pro user identifier through user_nickname.
Additionally, in practice:
Attribute | Required? | Notes |
|---|---|---|
UPN | Optional / common mapping | Often used because it’s unique and human-readable |
UID | Not specifically required | Can be used if mapped as the user identifier |
GUID/ObjectID | Not required by SuiteProjects Pro | Only works if you intentionally map it to the SuiteProjects Pro user ID |
NameID | Required unless using | Main SAML identifier |
user_nickname | Commonly required in Entra setups | Carries the SuiteProjects Pro User ID |
For Microsoft Entra ID specifically, Oracle’s example setup explicitly instructs admins to create a custom claim called user_nickname that contains the SuiteProjects Pro User ID.
You can find more information about this via SAML Assertion Attributes, Configuring Microsoft Entra ID for the SAML Integration or SuiteAnswers ID: 96764 Configuring Microsoft Entra ID for the SAML Integration.

Re: AI Description Field
Hi @faisalabdulmoid_39498!
Good day!
Apologies for the late response.
Upon further checking, there is currently no official documentation confirming whether a Custom Record Description field from an SDF SuiteApp deployed on a trailing account will automatically convert into the AI Description field when deployed to an account with NetSuiteNext enabled.
At this time, the AI Description field is primarily utilized by NetSuite AI-related features and services, such as the NetSuite AI Connector Service. This service leverages the Model Context Protocol (MCP) to connect external AI platforms (for example, ChatGPT or Claude) with NetSuite data to support AI-driven responses and integrations.
Additionally, there is no available documentation outlining how AI-mandated features can be embedded into an SDF SuiteApp developed on a trailing account that does not have the NetSuiteNext feature enabled.
For further clarification, it would be best to coordinate directly with your Account Manager, as they may have more information regarding upcoming changes or recommended approaches. We also recommend monitoring future NetSuite release notes and official documentation for updates related to NetSuiteNext and AI-related SuiteApp behavior.

Re: Amount Debit foreign currency is empty in Item Fulfillment saved search
Hi @User_OFTMK try to use below formula,
CASE
WHEN NVL({appliedtotransaction.fxamount}, 0) != 0
THEN {appliedtotransaction.amount} / {appliedtotransaction.fxamount}
WHEN NVL({debitfxamount}, 0) != 0
THEN {debitamount} / {debitfxamount}
ELSE 0
END
- Criteria:
Typeis Item Fulfillment. - Criteria:
Main Lineis False (to see item/GL detail). - Criteria:
Tax Lineis False. - Criteria:
COGS Lineis True (This is a hidden gem filter that often fixes IF reporting). - Results: Use the
CASE WHENformula above with a Summary Type ofMaximum.
By filtering specifically for the COGS Line, you isolate the GL impact you want (the debit) while still being able to see the "Created From" (Sales Order) information.