Best Of
Re: Vendor Payment to Bill Credit
Hi Angela
Thanks for the reply. The Vendor Bill was paid.
My colleague found a relevant workaround solution from Suite Answer 90906.
Record Deposited Refund From Vendor Credit After Bill was Already Paid In Full Kedalene
NetSuite Admin Tip | Making Specific Pages Public in a Password-Protected Web Store

There may be cases where your web store is configured as password protected, but you still want certain pages such as blogs, landing pages, or informational content to remain publicly accessible without requiring customer login.
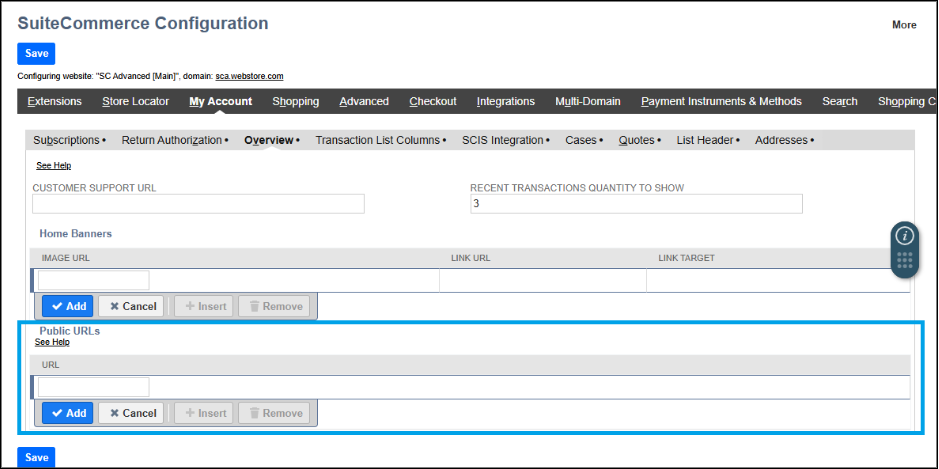
SuiteCommerce provides a Public URLs configuration that allows selected pages to bypass the login requirement.
You can configure public access by following the steps below:
- Navigate to: Commerce > Websites > Configuration
- Select the appropriate Website and Domain
- Click Configure
- Open: My Account tab > Overview subtab
- In the URL field, enter the page URL you want to make public
- Click Add
- Repeat the process for all URLs you want publicly accessible
- Click Save
Important things to consider when using Public URLs:
- Product pages cannot be made public if the Reference Product Review Records SuiteApp is installed
- Public URLs are not tied to any specific extension, meaning any URL added here becomes accessible without login regardless of installed extensions.
- If you enter only a slash (/) in the URL field, only the homepage becomes publicly accessible.
- Do not include URL parameters in the Public URLs field, as the feature is not designed to support parameterized URLs and may cause unexpected URL behavior.
This setup is useful when:
- Sharing blog pages publicly.
- Allowing access to marketing or landing pages.
- Making informational pages available without customer authentication.
- Keeping checkout and account-related pages protected while exposing selected content publicly.
We would love to hear your thoughts – please feel free to share any insights or experiences you have in the comments or post a discussion in the NetSuite Admin Corner and let's continue learning together!

Re: Legacy tax VIES VAT Validation
Thanks Jolly. What you have said seems to match what I believe to the be case as well. Already raised a ticket with NetSuite. Thanks for your input.

NetSuite Admin Tip | Preventing Scripts from Running on the Wrong Record Type

When a script runs on the wrong record type, it can create errors, update the wrong data, or make troubleshooting harder. Even when a script is deployed carefully, it is a good practice to add checks in the script logic to confirm that it is running in the expected context.
This helps make SuiteScript behavior safer and easier to support.
Scenario
An admin or developer creates a script for one record type.
Examples:
- Customer
- Vendor
- Sales Order
- Purchase Order
- Custom Record
The script is intended to run only for that record type, but due to deployment changes, testing, or reuse of script logic, it may run somewhere unexpected.
If the script assumes the wrong fields or record structure, it may fail or produce incorrect results.
Solution
Add a record type check before running the main script logic.
The script should confirm that the current record type matches the expected record type. If it does not match, the script should stop processing.
This is sometimes called a script guard or safety check.
What to Check
Before the script continues, confirm:
- the expected record type
- the deployment record type
- whether the script should run on create, edit, or delete
- whether the required fields exist on the record
- whether the script is being reused across multiple records
These checks help prevent the script from applying logic in the wrong place.
Sample Script Guard
The sample below shows a simple User Event Script that checks the record type before continuing.
/**
* @NApiVersion 2 .1

* @NScriptType UserEventScript

*/

define(['N/log'], (log) => {


    const EXPECTED_RECORD_TYPE = 'customrecord_request_tracker';


    function beforeSubmit(context) {

        const rec = context.newRecord;


        if (rec.type !== EXPECTED_RECORD_TYPE) {

            log.audit({

                title: 'Script Skipped',

                details: `Expected ${EXPECTED_RECORD_TYPE}, but received ${rec.type}`

            });

            return;

        }


        // Add record-specific logic here.

        log.audit({

            title: 'Record Type Confirmed',

            details: `Script is running on ${rec.type}`

        });

    }


    return {

        beforeSubmit

    };

});
How It Works
The script checks the current record type using:
rec.type
If the record type does not match the expected value, the script logs a message and stops by using:
return;
If the record type matches, the script continues with the intended logic.
Notes
- Deploy the script on the correct record type.
- Add a record type check when the script should only run in one context.
- Use clear log messages when skipping execution.
- Confirm field IDs exist on the target record type.
- Test with create, edit, and delete scenarios if applicable.
- Review deployments after copying or reusing scripts.
- Use sandbox before production deployment.
Disclaimer :The sample code described herein is provided on an "as is" basis, without warranty of any kind, to the fullest extent permitted by law. Oracle + NetSuite Inc. does not warrant or guarantee the individual success developers may have in implementing the sample code on their development platforms or in using their own Web server configurations.
Oracle + NetSuite Inc. does not warrant, guarantee or make any representations regarding the use, results of use, accuracy, timeliness or completeness of any data or information relating to the sample code. Oracle + NetSuite Inc. disclaims all warranties, express or implied, and in particular, disclaims all warranties of merchantability, fitness for a particular purpose, and warranties related to the code, or any service or software related thereto.
Oracle + NetSuite Inc. shall not be liable for any direct, indirect or consequential damages or costs of any type arising out of any action taken by you or others related to the sample code.
Share your insights and experiences in the NetSuite Admin Corner.

NetSuite Admin Tip | A Record Needs Automatic Processing After Save: When to Use a User Event Script

When a record needs automatic processing after it is saved, a User Event Script may be the right option. User Event Scripts can run during record actions such as create, edit, delete, or save, depending on how the script is written.
This is useful when business logic needs to happen automatically as part of the record lifecycle.
Scenario
A business team needs something to happen after a record is saved.
Examples may include:
- setting a follow-up field
- updating a related record
- creating a task
- writing an audit note
- validating record data
- sending information to another process
The user should not need to click another button or manually update another record after saving.
Solution
Use a User Event Script when logic should run automatically during a record event.
A User Event Script can be designed to run:
- before the record is saved
- after the record is saved
- when the record is loaded
For processing that should happen after the record is already saved, use the afterSubmit entry point.
When to Use a User Event Script
A User Event Script may be a good fit when:
- logic depends on a record being created or edited
- processing should happen automatically after save
- related records need to be updated
- validation must happen before saving
- users should not manually trigger the process
Example:
A custom request record is saved with a status of Pending Review. After save, the script creates a task for the reviewer.
When Not to Use a User Event Script
A User Event Script may not be the best option when:
- the process needs to run on a schedule
- large batches of records need processing
- users need a guided custom page
- logic should run only when a button is clicked
- processing should be handled asynchronously
In those cases, consider other script types such as Scheduled Scripts, Map/Reduce Scripts, Suitelets, or Client Scripts.
Simple Example
The sample below shows a User Event Script that runs after a custom record is saved. If the request status is Pending Review, it logs that the record is ready for follow-up.
/**

* @NApiVersion 2 .1

* @NScriptType UserEventScript

*/

define(['N/log'], (log) => {


    function afterSubmit(context) {

        const rec = context.newRecord;


        const status = rec.getText({

            fieldId: 'custrecord_request_status'

        });


        if (status === 'Pending Review') {

            log.audit({

                title: 'Record Ready for Review',

                details: `Record ID ${rec.id} is pending review.`

            });

        }

    }


    return {

        afterSubmit

    };

});
How It Works
- afterSubmit runs after the record is saved.
- context.newRecord gets the saved record.
- getText reads the displayed status value.
- If the status is Pending Review, the script logs an audit message.
This sample is intentionally simple. In a real use case, the script might create a task, update a related record, or trigger another process.
Notes
- Use beforeSubmit when data must be changed before the record is saved.
- Use afterSubmit when processing should happen after the record is saved.
- Avoid heavy processing in User Event Scripts if the logic may slow down users.
- Use Scheduled or Map/Reduce Scripts for large batch processing.
- Test with create, edit, and delete scenarios where applicable.
- Confirm the script is deployed on the correct record type.
- Review execution logs during testing.
Disclaimer: The sample code described herein is provided on an "as is" basis, without warranty of any kind, to the fullest extent permitted by law. Oracle + NetSuite Inc. does not warrant or guarantee the individual success developers may have in implementing the sample code on their development platforms or in using their own Web server configurations.
Oracle + NetSuite Inc. does not warrant, guarantee or make any representations regarding the use, results of use, accuracy, timeliness or completeness of any data or information relating to the sample code. Oracle + NetSuite Inc. disclaims all warranties, express or implied, and in particular, disclaims all warranties of merchantability, fitness for a particular purpose, and warranties related to the code, or any service or software related thereto.
Oracle + NetSuite Inc. shall not be liable for any direct, indirect or consequential damages or costs of any type arising out of any action taken by you or others related to the sample code.
Share your insights and experiences in the NetSuite Admin Corner.
NetSuite Admin Tip | A User Reports Missing Access to a Custom Record: Permissions to Check First

When a user cannot access a custom record, the issue is often related to role permissions, custom record settings, form access, or navigation setup. Reviewing these areas first can help admins identify the cause more quickly.
Scenario
A user reports that they cannot see or open a custom record in NetSuite.
The issue may appear in different ways:
- the custom record does not appear in the menu
- the user cannot open a record link
- the user can view the record but cannot edit it
- the user can access one custom record but not another
- the user receives a permission-related error
Solution
Start by checking the user’s role and the custom record permission setup.
A custom record may exist in the account, but users still need the correct access level to view, create, edit, or delete records.
Permissions to Check First
Role Permissions
Open the user’s role and review whether the custom record is included under permissions.
Confirm the correct access level:
- View
- Create
- Edit
- Full
If the user only needs to review records, View may be enough. If they need to update records, they may need Edit.
Custom Record Type Permissions
Open the custom record type setup and review its permissions.
Confirm whether the record type is restricted by role or permission settings.
If permissions are not assigned correctly, users may not be able to access the record even if it appears in navigation.
Form Access
If the custom record uses a custom form, confirm that the user’s role can access the form.
A user may have record permission but still experience issues if the form is not available to their role.
Center Tab or Menu Access
If the issue is that the user cannot find the custom record from the menu, check how the record is exposed in navigation.
The user may still access the record through a direct link, but not see it in the menu if the center tab or link is not assigned correctly.
Related Record Permissions
If the custom record links to another record, confirm the user can access the related record too.
Example:
A custom record links to a customer, vendor, employee, or transaction. If the user does not have access to the related record, the page may not behave as expected.
Common Causes
- custom record permission is missing from the role
- access level is too low
- custom form is not available to the role
- menu or center link is not configured
- related record permission is missing
- user is testing with a different role than expected
- role changes were made but not fully validated
Notes
- Always test using the same role as the affected user.
- Confirm whether the user needs view-only access or edit access.
- Check both the role permission and the custom record type setup.
- Review custom forms if the record opens incorrectly.
- Check related record permissions if the custom record uses linked fields.
- Avoid giving Full access unless the user truly needs it.
- Test in sandbox first if changing access for multiple roles.
References
- SA: Setting Permissions for a Custom Record Type (ID: 1024321)
- SA: Creating Custom Records (ID: 1024227)
Summary
When a user reports missing access to a custom record, start with the role, custom record permissions, form access, navigation setup, and related record permissions. Reviewing these areas first can help admins resolve access issues more efficiently while keeping permissions controlled.
Share your insights and experiences in the NetSuite Admin Corner.
NetSuite Admin Tip | A Script Should Run for Only One Form: How to Plan Script Deployment Scope

When a script is deployed on a record type, it may run for more users, forms, or scenarios than originally intended. If the script should only apply to one custom form, the deployment scope and script logic should be planned carefully.
Planning the scope helps prevent unexpected updates, unnecessary errors, and user disruption.
Scenario
A business team has more than one custom form for the same record type.
Example:
- Standard Request Form
- Finance Review Form
- Operations Review Form
A script should run only when users work with the Finance Review Form.
If the script runs on all forms, it may update records incorrectly or apply logic to users who should not be affected.
Solution
Deploy the script on the correct record type, then add logic to confirm the form before the script continues.
The script should check the current form or form-related value and exit if the record is not using the intended form.
This helps keep the script behavior limited to the correct business process.
Why Deployment Scope Matters
A script that runs too broadly can cause issues such as:
- changing records that should not be changed
- showing validation messages on the wrong form
- creating errors for unrelated users
- slowing down record entry
- making troubleshooting harder
Even if the script is deployed correctly, it is still a good practice to include script logic that confirms whether the current form is the intended one.
What to Check Before Building the Script
Before writing the script, confirm:
- which record type the script should run on
- which custom form should trigger the logic
- whether the script should run on create, edit, or both
- which roles use the form
- whether the same record can be edited later from a different form
- whether the script should stop or skip processing when the form does not match
This helps avoid running logic in the wrong context.
Sample Script Logic
The sample below shows a simple User Event Script that checks the custom form before continuing.
Replace the form internal ID and field IDs with the actual values from your account before testing.
/**

* @NApiVersion 2 .1

* @NScriptType UserEventScript

*/

define(['N/log'], (log) => {


    const TARGET_FORM_ID = '123'; // Replace with the internal ID of the target custom form


    function beforeSubmit(context) {

        const rec = context.newRecord;


        const currentForm = rec.getValue({

            fieldId: 'customform'

        });


        if (String(currentForm) !== TARGET_FORM_ID) {

            log.audit({

                title: 'Script Skipped',

                details: `Record is not using target form. Current form: ${currentForm}`

            });

            return;

        }


        // Add form-specific logic here.

        log.audit({

            title: 'Target Form Confirmed',

            details: 'Script logic will continue.'

        });

    }


    return {

        beforeSubmit

    };

});
How It Works
- The script reads the customform field.
- It compares the current form to the target custom form ID.
- If the form does not match, the script stops by using return.
- If the form matches, the script continues with the intended logic.
Notes
- Deploy the script on the correct record type.
- Confirm the internal ID of the target custom form.
- Test using all forms assigned to the record type.
- Test with the roles that will use the form.
- Consider whether records may be edited later using a different form.
- Add clear log messages so skipped executions are easy to understand.
- Avoid relying only on form layout if the business rule should apply more broadly.
Disclaimer :The sample code described herein is provided on an "as is" basis, without warranty of any kind, to the fullest extent permitted by law. Oracle + NetSuite Inc. does not warrant or guarantee the individual success developers may have in implementing the sample code on their development platforms or in using their own Web server configurations.
Oracle + NetSuite Inc. does not warrant, guarantee or make any representations regarding the use, results of use, accuracy, timeliness or completeness of any data or information relating to the sample code. Oracle + NetSuite Inc. disclaims all warranties, express or implied, and in particular, disclaims all warranties of merchantability, fitness for a particular purpose, and warranties related to the code, or any service or software related thereto.
Oracle + NetSuite Inc. shall not be liable for any direct, indirect or consequential damages or costs of any type arising out of any action taken by you or others related to the sample code.
Share your insights and experiences in the NetSuite Admin Corner.
NetSuite Admin Tip | A Script Is Not Working as Expected: How to Read Execution Logs

When a script does not work as expected, execution logs are one of the first places to check. Logs can help show whether the script ran, where it failed, and what information was captured during execution.
Reading execution logs can make troubleshooting faster and help admins or developers understand what happened.
Scenario
A SuiteScript customization is not producing the expected result.
Examples may include:
- a field did not update
- an email was not sent
- a record was not created
- a script stopped before completing
- a validation message did not appear
- a scheduled process did not finish
The script may not show an obvious error to the user, so the admin needs to review the execution logs.
Solution
Open the script execution logs and review the log entries created during script execution.
Logs can show messages such as:
- audit entries
- debug details
- error messages
- record IDs being processed
- script usage details
- failed processing steps
This helps narrow down where the issue happened.
What to Check in Execution Logs
Confirm the Script Ran
First, check whether the script generated any log entries.
If there are no logs, the issue may be related to:
- script deployment status
- deployment audience
- execution role
- trigger condition
- record type mismatch
- script not being triggered
Review the Log Level
Different log levels can help identify different types of information.
Common examples:
- Debug – useful for detailed troubleshooting
- Audit – useful for key process milestones
- Error – useful for failures or exceptions
- Emergency – useful for serious script issues
If the script only logs errors, there may be limited information when no exception occurs.
Look for Error Details
Review any error log entries carefully.
Check for:
- error name
- error message
- record ID
- field ID
- line or function reference
- step where the issue occurred
This can help identify whether the problem is caused by missing data, permissions, invalid field IDs, or unexpected logic.
Compare Expected vs Actual Behavior
Use the logs to compare what the script was expected to do with what it actually did.
For example:
- Did the script find the right record?
- Did it read the expected field value?
- Did it enter the correct condition?
- Did it stop before updating the record?
- Did it process fewer records than expected?
This helps determine whether the issue is setup-related or logic-related.
Example
A script should update a custom field when a record is saved, but the field remains blank.
The execution log may show:
- the script ran successfully
- the record ID was captured
- the condition was not met
- the update step was skipped
In this case, the issue may not be the field update itself. The condition controlling the update may need review.
Sample Code
The sample below shows a simple User Event Script with different log levels.
/**
- @NApiVersion 2 .1
- @NScriptType UserEventScript
try {
const rec = context.newRecord;
// Audit log: Confirms that the script started and identifies the record being processed.
log.audit({
title: 'Script Started',
details: `Record Type: ${rec.type}, Record ID: ${rec.id}`
});
const status = rec.getText({
fieldId: 'custrecord_request_status'
});
// Debug log: Shows the field value read by the script for troubleshooting.
log.debug({
title: 'Status Value',
details: `Status found: ${status}`
});
if (status !== 'Pending Review') {
// Audit log: Explains why the script stopped without continuing the process.
log.audit({
title: 'Condition Not Met',
details: 'Record is not Pending Review. Script will stop.'
});
return;
}
// Audit log: Confirms that the record met the condition and processing can continue.
log.audit({
title: 'Condition Met',
details: 'Record is Pending Review. Continue processing.'
});
// Add processing logic here.
} catch (error) {
// Error log: Captures failure details if the script encounters an exception.
log.error({
title: 'Script Error',
details: {
name: error.name,
message: error.message,
stack: error.stack
}
});
}
}
return {
afterSubmit
};
});
References
- SA: Using the Script Execution Log Subtab (ID:43456)
- SA: Viewing the Inspection Execution Log (ID: 106583)
Notes
- Start by confirming whether the script ran at all.
- Check deployment status and audience if no logs appear.
- Use error logs to identify failures.
- Use audit logs to confirm major processing steps.
- Avoid logging sensitive data.
- Add clearer log messages if existing logs are too vague.
- Test again in sandbox after updating logging or logic.
Summary
Execution logs are useful when a script is not working as expected. They can show whether the script ran, what steps were completed, and where errors occurred.
A good review of execution logs can help identify missing setup, incorrect conditions, permission issues, or script logic problems more quickly.
Disclaimer: The sample code described herein is provided on an "as is" basis, without warranty of any kind, to the fullest extent permitted by law. Oracle + NetSuite Inc. does not warrant or guarantee the individual success developers may have in implementing the sample code on their development platforms or in using their own Web server configurations.
Oracle + NetSuite Inc. does not warrant, guarantee or make any representations regarding the use, results of use, accuracy, timeliness or completeness of any data or information relating to the sample code. Oracle + NetSuite Inc. disclaims all warranties, express or implied, and in particular, disclaims all warranties of merchantability, fitness for a particular purpose, and warranties related to the code, or any service or software related thereto.
Oracle + NetSuite Inc. shall not be liable for any direct, indirect or consequential damages or costs of any type arising out of any action taken by you or others related to the sample code.
Share your insights and experiences in the NetSuite Admin Corner.
NetSuite Admin Tip | A Business Rule Changes Often: How to Make SuiteScript Easier to Maintain

Business rules can change as processes evolve. If those rules are hardcoded directly into SuiteScript, every change may require a developer to edit, test, and redeploy the script.
Designing scripts with maintainability in mind can make future updates easier and reduce unnecessary rework.
Scenario
A business team uses a SuiteScript customization to apply specific logic.
Examples may include:
- assigning a default reviewer
- setting a processing status
- applying a threshold amount
- selecting an email recipient
- choosing which saved search to run
- deciding how many days before follow-up
Over time, the business rule changes. If the value is hardcoded in the script, even a small update may require a code change.
Solution
Move frequently changing values out of the script when possible.
Instead of hardcoding every rule, consider using configuration options such as:
- script parameters
- custom records
- custom lists
- saved searches
- custom fields
This allows administrators to adjust certain values without changing the core script logic.
Example
A script assigns a reviewer when a request amount is greater than a certain threshold.
Hardcoded logic may look like:
if (amount > 5000) {

    reviewer = 123;

}
This works, but if the threshold changes from 5000 to 7500, or the reviewer changes, the script must be edited.
A more maintainable design can store the threshold and reviewer in a script parameter or custom configuration record, so the values can be updated without changing the main script logic.
Common Values to Avoid Hardcoding
Consider making these values configurable when they may change:
- employee IDs
- saved search IDs
- status values
- threshold amounts
- email recipients
- date offsets
- approval routing values
- processing limits
Not every value needs to be configurable. The goal is to identify values that are likely to change.
Ways to Improve Maintainability
Use Script Parameters for Simple Values
Script parameters are useful for values such as saved search IDs, employee IDs, limits, or default settings.
Example:
const script = runtime.getCurrentScript();


const thresholdAmount = script.getParameter({

    name: 'custscript_threshold_amount'

});
This lets an administrator update the value on the script deployment instead of editing the script file.
Use Custom Records for Larger Rule Sets
If the rule includes multiple related values, a custom record may be easier to maintain.
Example configuration record:
- Rule Name
- Threshold Amount
- Reviewer
- Active
- Effective Date
This works well when there are multiple rules or when the business wants a clearer configuration table.
Use Custom Lists for Controlled Values
If the script depends on statuses or categories, custom lists can help keep values consistent.
Example:
- Pending Review
- Approved
- Rejected
- Needs Follow-Up
This helps reduce errors from inconsistent text values.
Keep Script Logic Clear
Even when values are configurable, the script should remain easy to understand.
Use clear function names, comments where helpful, and consistent error handling.
References
- SA: Script Deployment (ID: 49287)
- SA: Script Parameter Preferences (ID: 10571)
- SA: SuiteScript (ID: 31709)
- SA: SuiteCloud (ID: 1014757)
Notes
- Make frequently changing values configurable.
- Avoid hardcoding employee IDs, email addresses, thresholds, and saved search IDs when possible.
- Use script parameters for simple settings.
- Use custom records for more complex rule tables.
- Keep configuration names clear so admins understand what they control.
- Test configuration changes in sandbox before production.
- Document which values can be updated without changing code.
Summary
When a business rule changes often, SuiteScript should be designed so updates are easier to manage. By moving changing values into script parameters, custom records, custom lists, or saved searches, teams can reduce code changes and make the script easier to support over time.
The goal is to keep the script stable while allowing the business rules around it to change safely.
Disclaimer: The sample code described herein is provided on an "as is" basis, without warranty of any kind, to the fullest extent permitted by law. Oracle + NetSuite Inc. does not warrant or guarantee the individual success developers may have in implementing the sample code on their development platforms or in using their own Web server configurations.
Oracle + NetSuite Inc. does not warrant, guarantee or make any representations regarding the use, results of use, accuracy, timeliness or completeness of any data or information relating to the sample code. Oracle + NetSuite Inc. disclaims all warranties, express or implied, and in particular, disclaims all warranties of merchantability, fitness for a particular purpose, and warranties related to the code, or any service or software related thereto.
Oracle + NetSuite Inc. shall not be liable for any direct, indirect or consequential damages or costs of any type arising out of any action taken by you or others related to the sample code.
Share your insights and experiences in the NetSuite Admin Corner.
Force Updating Grayed-Out Account Record Fields
Scenario: The user wants to update the Sub Account field on an account record, so it rolls up under a different parent account. However, the field is currently grayed out. This change is needed to ensure the account is reflected correctly in the financial statement.
Solution:
- Edit Account 9535 (id: 438)
- Right click then select ‘Inspect’
- On the console, paste this below:
- require(['N/currentRecord'], function(currentRecord) {
var record = currentRecord.get();
record.setValue({
fieldId: 'parent',
value: '163'
});
}); - Save
Actual Result: Subaccount for Account Record is now successfully edited.
Note: Edit fieldID and value as needed
