Best Of

Re: Where to find List/Records
Hi all! I have now found where the list is. Actually, the list that I am trying to find earlier is State, and just recently found out that this is a standard list in NS which is found in Setup > Company > State/Provinces/Counties.

NetSuite Admin Tip: Automatic Location Assignment

As a NetSuite administrator, you know that keeping your customer, item, and transaction data organized is essential for maintaining accurate records and getting insights from your data. Luckily, NetSuite has many features to help you with this, one of which is Automatic Location Assignment.
Automatically assigning a location to transactions is a useful feature for administrators in NetSuite, especially those working in the retail and wholesale distribution industries. This feature simplifies the creation of transactions by eliminating the need to manually select a location every time. Instead, it allows transactions to be associated with predefined locations based on various criteria, making the process more efficient and reducing the chances of errors.
The Automatic Location Assignment feature enables the automatic and asynchronous setting of the optimal fulfillment location (either warehouse or store) for sales order lines. Utilizing this functionality offers several advantages:
- Eases the burden on Fulfillment Managers by eliminating the need for manual definition and configuration of fulfillment locations.
- Allows Fulfillment Managers to focus on exception management tasks.
- Lowers the expenses associated with maintaining and modifying fulfillment processes.
- Prevents revenue loss caused by stock-outs.
To enable the feature, go to Setup > Company > Enable Features > Transactions tab > Shipping & Receiving section, then check the Automatic Location Assignment box.

After enabling the feature, you should then complete several setup tasks. Some setup tasks are required, while others are optional and depend on how you want to use the feature. Mandatory setup tasks include:
- Configure Locations
- Create an Automatic Location Assignment Configuration
- Create Automatic Location Assignment Rules
- Choose Automatic Location Assignment Settings
- Run Automation
Refer to SuiteAnswers 77508: Setting Up Automatic Location Assignment for detailed instructions on the steps involved.
Tips for Using Automatic Location Assignment
While Automatic Location Assignment can save you time and effort, there are a few things to keep in mind to ensure that it's working optimally for your business:
- Review location usage regularly: As your business grows and changes, your location usage may also change. Therefore, it's important to review your location hierarchy and usage regularly to ensure they still make sense for your business.
- Update location preferences as needed: Similarly, as your business needs change, you may need to update your location preferences. For example, if you change vendors or item types, you may need to update your rules for location assignment.
- Train your staff: Make sure your warehouse staff understands how Automatic Location Assignment works and how to use it effectively. This will help ensure consistency and accuracy in your location assignments.
With Automatic Location Assignment and the right setup and management, you can save time and reduce errors in your warehouse operations, helping your business run more smoothly.
We hope this overview of Automatic Location Assignment and these tips are helpful. If you have any questions or need further assistance, please don't hesitate to reach out here in the NetSuite Support Community.
—-
Do you have best practices or experiences with this feature that you want to share? Comment them down below or post them in the NetSuite Admin Corner!

Re: Change table in Bill of Materials printout
@Grace Catabian-Oracle - Seems like that's par for the course today! Well, I really appreciate all the effort you have put into my various questions! BTW, you have very cute dogs! 😀

Re: Looking to build a report that tells me how many Sales Orders were approved on a given day.
Thank you very much for the detail. The steps above have been implemented and the report is working.
 gbradley
Re: How to create a new Set Field Value using a custom field on workflow
@Grace Catabian-Oracle - Thank you for working with me on this! I will look into the Enhancement to which you referred
Re: workflow to update custom record field on schedule
@Jervin Nicholas Teopengco-Oracle This is awesome, thank you so much. I will be looking at using this option. Little bit of setup but in the end that is showing exactly what they need to see on the custom record: The Sales Order, it's corresponding invoice, and the invoice status. Perfect. Thank you!
Re: Looking to build a report that tells me how many Sales Orders were approved on a given day.
Hello, @gbradley. Good day.
@Midhun Nath's method is a saved search. Here is a step by step process on how to create the Saved Search, and how to complete those popup windows or boxes:
1. Using Administrator or any role using classic interface, navigate to Lists > Search > Saved Searches > New
2. Locate and click Transaction
3. Enter desired Search Title
4. Click Criteria subtab
5. Click Standard list
6. Under Filter column, select the following:
a. select Type, click Sales Order, and click Set
b. select Main Line, tick NO, and click Set
c. select Formula (Numeric), and in the window that will pop-up, set the following, then click Set:
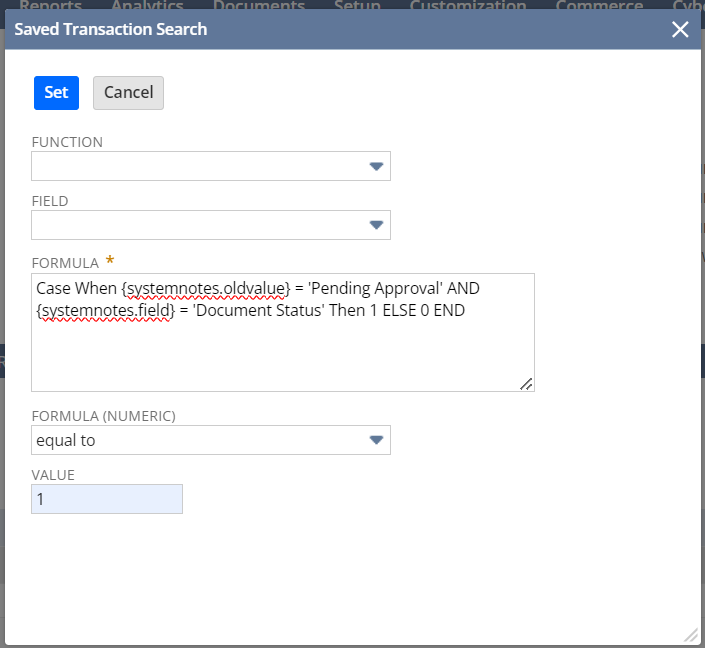
- for easier reference, you can copy and paste this formula: Case When {systemnotes.oldvalue} = 'Pending Approval' AND {systemnotes.field} = 'Document Status' Then 1 ELSE 0 END
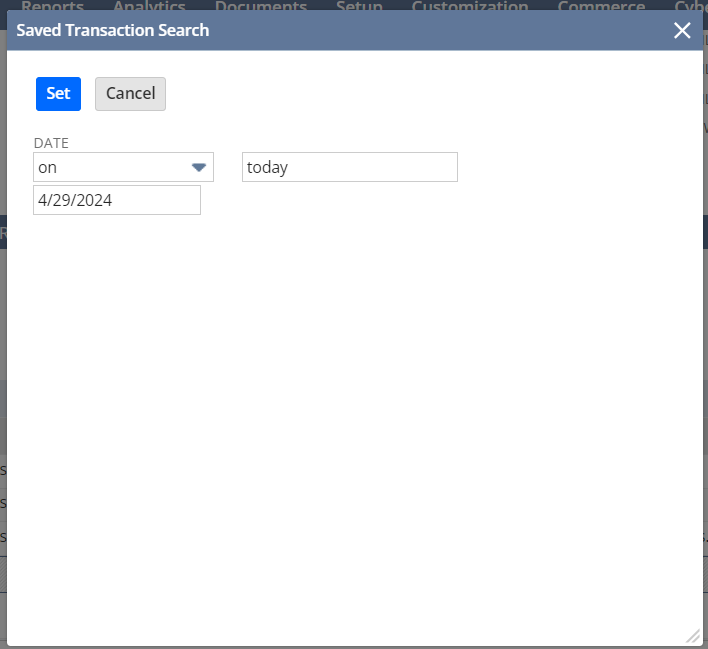
d. select System Notes Fields… then in the window that will pop up select Date, follow the below setting and click Set
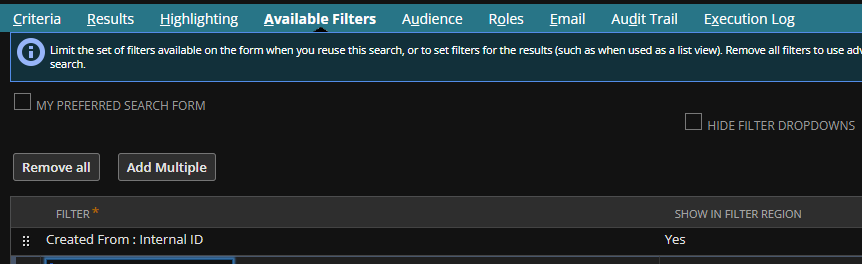
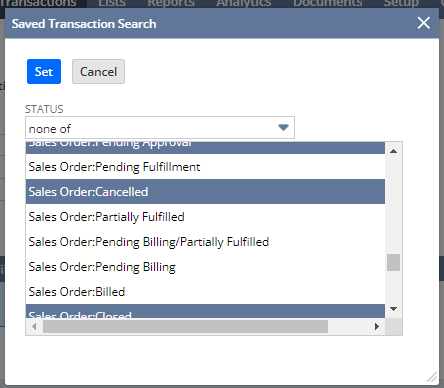
e. Select Status, select none of, and select or highlight all three: Sales Order: Pending Approval, Sales Order: Cancelled, and Sales Order: Closed, then click Set.
7. Click Results subtab
8. Click Columns list and click Remove All
9. Under Field column, select the following:
a. Select Document Number and in the Custom Label field, type Document Number then click Add.
b. Select Status and in the Custom Label field, type Document Status then click Add.
c. Select Formula (Text), in the Formula field, enter the below formula and in the Custom Label field, type Approver then click Add.
Case When {systemnotes.oldvalue} = 'Pending Approval' AND {systemnotes.newvalue} = 'Pending Fulfillment' AND {systemnotes.field} = 'Document Status' Then {systemnotes.name} End
d. Select Formula (Text), in the Formula field, enter the below formula and in the Custom Label field, type Approved Date then click Add.
Case When {systemnotes.oldvalue} = 'Pending Approval' AND {systemnotes.newvalue} = 'Pending Fulfillment' AND {systemnotes.field} = 'Document Status' Then {systemnotes.date} End
10. Click Save & Run
Let us know if you have additional questions.

Re: SuiteQL > How to make an SQL Query a stored procedure?
Thanks Nicole Mendoza-Oracle for moving this to its own thread.
I appreciate the SuiteQL link in the last thread.
I also let him know…. "I have not encountered NetSuite instances that have stored SQL procedures so far. I believe it is currently not yet within standard
NetSuite features for SuiteQL."
Hoping 🤞 anyone might have some suggestions from their experience, even if it might be confirmation, that it can't be done 😏.
Thanks all.
 CDuf
CDuf